This guide walks you through the painstaking path of migrating old GELI-encrypted pools to new ZFS-encrypted pools, assuming you have spare disks to store the entirety of your data temporarily. We also emphasize on the confidentiality of the data, something that does not necessarily come out-of-the-box in TrueNAS, at least not for all possible options.
Introduction to the GELI problem
If you ever created an encrypted pool back in the days (circa ~2020, not very far from now, actually) from FreeNAS 11.3, your pool is encrypted with GELI. GELI got deprecated soon after, starting from TrueNAS 12.0 and appears as “Legacy Encryption”. It is still possible to open such pools but not create new ones. With the end of TrueNAS CORE, based on FreeBSD, GELI pools are a hard road block that prevents upgrading your system to TrueNAS SCALE, based on Debian.
To “convert” a GELI-encrypted pool to a ZFS-encrypted pool, supported by both CORE and SCALE, the process is a headache: you cannot convert in-place. You will need at least the same amount of spare disk space as the volume consumed on your GELI-encrypted pool. That means additional disks, either in the same system or in a remote system. This tutorial assumes you plugged those temporary disks in the same system.
Not only that, but if you actually care about not leaking your encryption keys, TrueNAS does not adequately warn you of the consequences of your choices. In making this tutorial, I attempted migration via several routes, some stored my encryption keys in an unencrypted database, while others didn’t. Some of this is due to how TrueNAS approaches ZFS encryption, so you need to become familiar with these assumptions as well.
Some methods that don’t involve a temporary disk suggest decrypting GELI in-place using some tricks then copying each dataset to ZFS-encrypted ones on the same pool but this is risky and involves plaintext written to disk, which is unacceptable.
This tutorial expands on the generic instructions given in TrueNAS documentation and puts particular emphasis on data confidentiality.
In preparation for the real migration of my NAS, I simulated the process in a virtual machine. I installed FreeNAS 11.3-U5, created an encrypted pool, assigned a passphrase to it, then upgraded using the ISO of TrueNAS 12.0-U8.1, then to 13.0-U6.8.
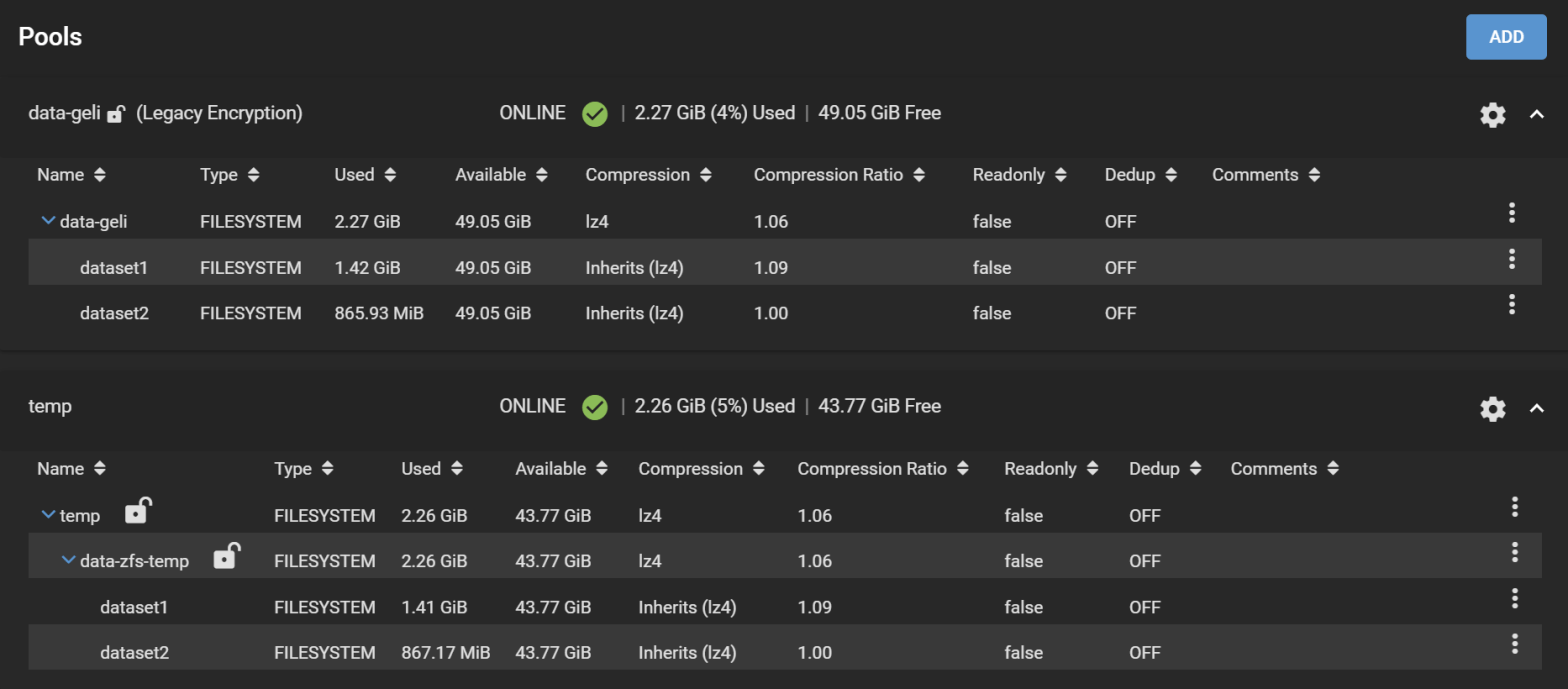
Here is the pool we are going to work with:
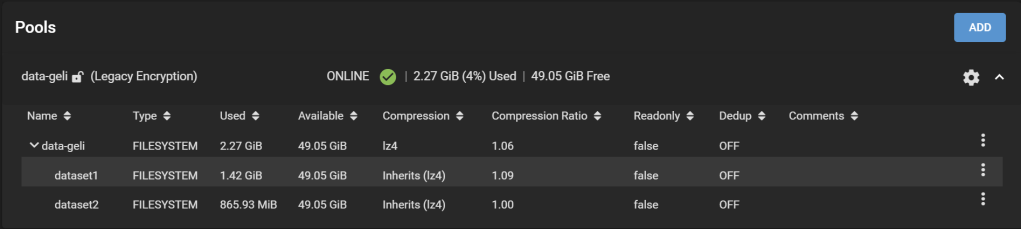
Our pool is called data-geli, is backed by 5x 20GB virtual disks in RaidZ2, and has two datasets, provisioned with 1.42GiB and 865.93MiB worth of data to make it look more realistic.
I’m going to explain two methods to migrate your data, matching different confidentiality requirements. (Method #2 is still under construction as this moment).
Requirements met in Method #1:
- All existing snapshots and dataset configurations (e.g., compression,
- No plaintext data should be written to disk. This excludes decrypting in-place.
- The data transferred to the temporary disks needs to be encrypted at all times on the disks.
- If the process is interrupted at any stage, it can resume and no plaintext data should be exposed in the storage disks.
- Progress should be shown because it will take days for the real system.
This list matches a threat model where only the confidentiality of the data storage disks is important: In case when you 1) RMA disks, 2) throw disks away without securely deleting the content, or 3) get disks stolen but the boot pool is not stolen.
Requirements met in Method #2:
Here, the threat model is stronger: we consider someone who could get physical access to the server and freely explore the TrueNAS database on disk. We also consider that secrets written to disk (or boot pool) can be recovered later through forensics even though they are logically deleted. On top of the above requirements, we add:
6. Encryption keys for the migration, all master keys/passphrases/data encryption keys, including the final keys, should never appear on unencrypted disks. This requirement prohibits the use of the GUI for migration, because keys are stored as part of the configuration. This method is inherently less “user-friendly”.
Difference between GELI and ZFS encryption
Coming from the GELI era, you must understand that ZFS encryption is not an exact replacement of GELI.
GELI is a full-disk encryption technique that hides everything written to the disk, including the metadata about datasets. On the other hand, ZFS encryption is a per-dataset encryption technique and preserves all dataset metadata in plaintext. This includes dataset names (even child datasets), dataset hierarchy, space used/available/referenced per dataset, and whether they are encrypted. Therefore, confidentiality is limited to only the content of the datasets, but not the existence and properties of the datasets themselves. So, make sure their names don’t reveal confidential information already. More info on the differences in this guide.
Ready?
Method #1. GUI-friendly method
Step 1. Prepare the temporary pool
After adding the necessary additional disks to the system, with an effective capacity at least as great as the amount of data consumed on the original pool, add a new pool: Under Storage > Pools, click Add. Select Create a pool. Let’s name it temp.
Tick “Encryption“, accept the warning. I only added one disk here, so the new pool is a stripe, which leads to another warning about how unsafe this is (i.e., if this temporary disk fails during the migration process, we are doomed).
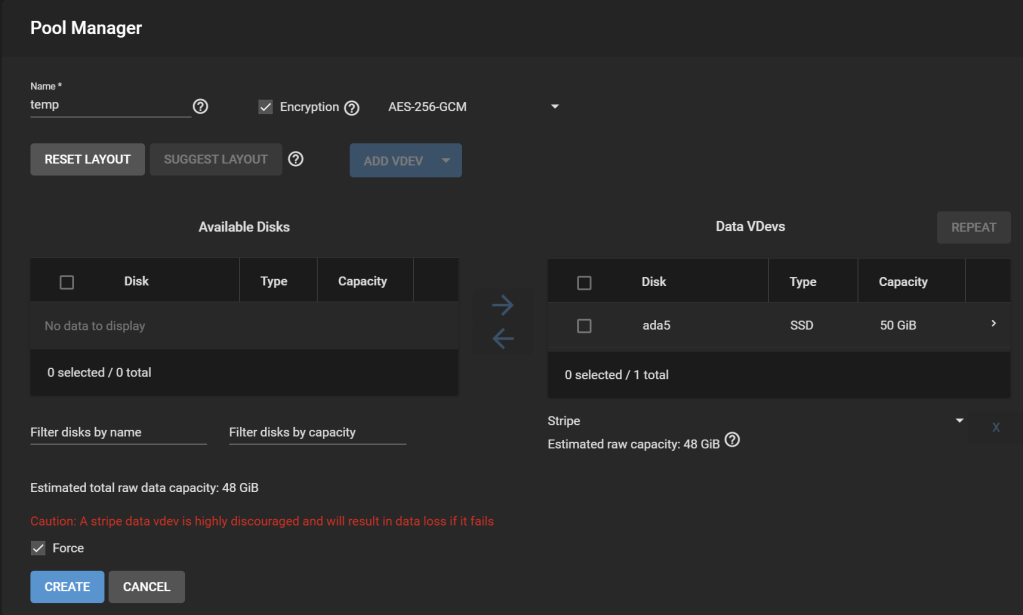
On the real system, I would have a backup of the pool on external storage, so a stripe is OK for the migration. Worst case, I can restore from the backup.
Why not migrate using the backup? It is not a replication of the ZFS pool that includes all snapshots nor preserves the configuration of the pools. It is a mere copy at the file level over SMB. Ideally, I want to restore the pool and all its datasets as if nothing happened, so this would not be the most suitable way.
Download your encryption key for the pool as suggested and you’re done.
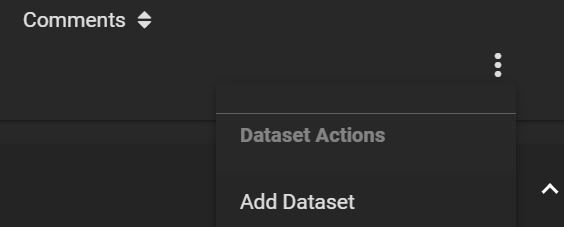
Step 2. Add a temporary dataset
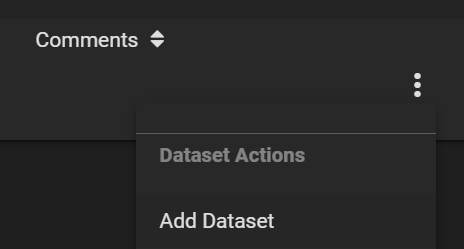
The temp pool comes with a root temp dataset. Because it is not supported to replicate a ZFS pool to an existing encrypted dataset, we must create a child dataset in the newly created temp dataset to receive our data. Click on the three dots on the right of the row for the temp dataset, and click Add Dataset.
Let’s call our new dataset data-zfs-temp. Leave all options as default as it will be overwritten soon.

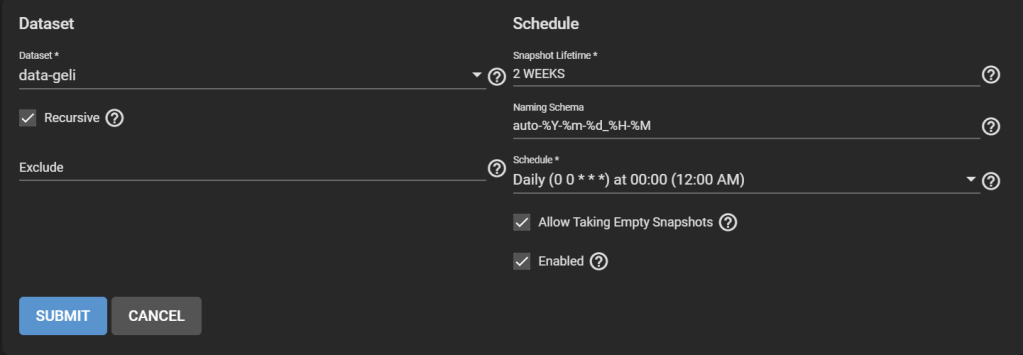
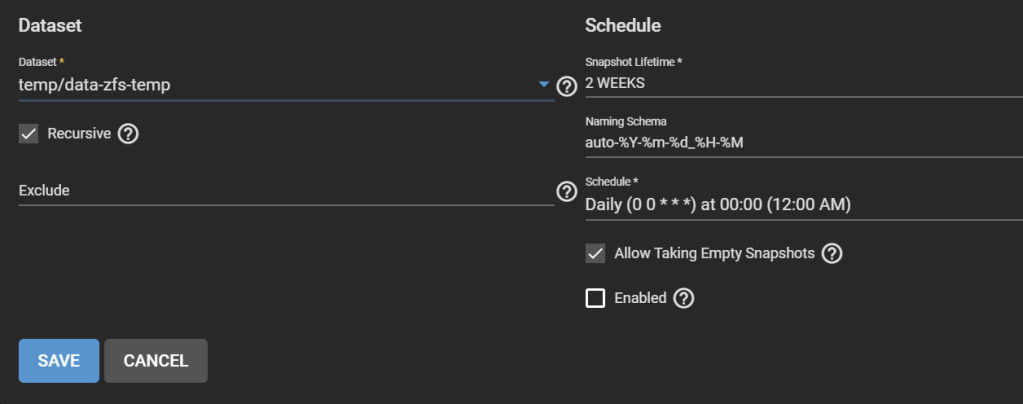
Step 3. Create a Periodic Snapshot Task
Don’t worry, this is just an artifact of how replication works in TrueNAS. Go to Tasks > Periodic Snapshot Tasks, then Add one. Select the original pool. Check Recursive.
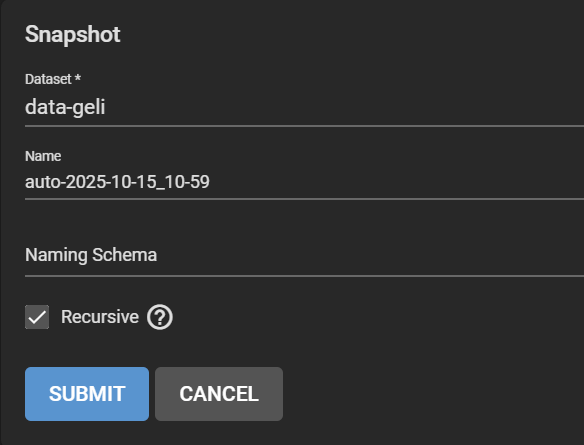
Step 4. Take a snapshot of the original pool
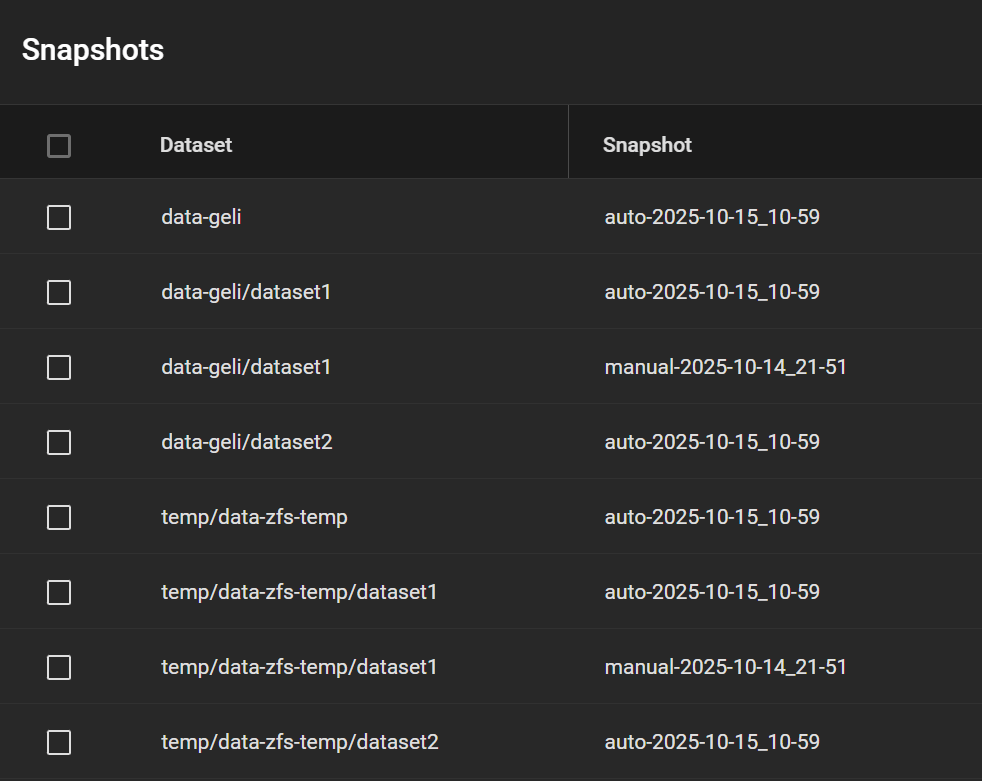
Go to Storage > Snapshots, click Add. Select the original dataset, in our case ashley-test. Change the “manual” part of the suggested name to “auto” to match the periodic snapshot scheme and pretend that it ran. Make it recursive to snapshot all child datasets.
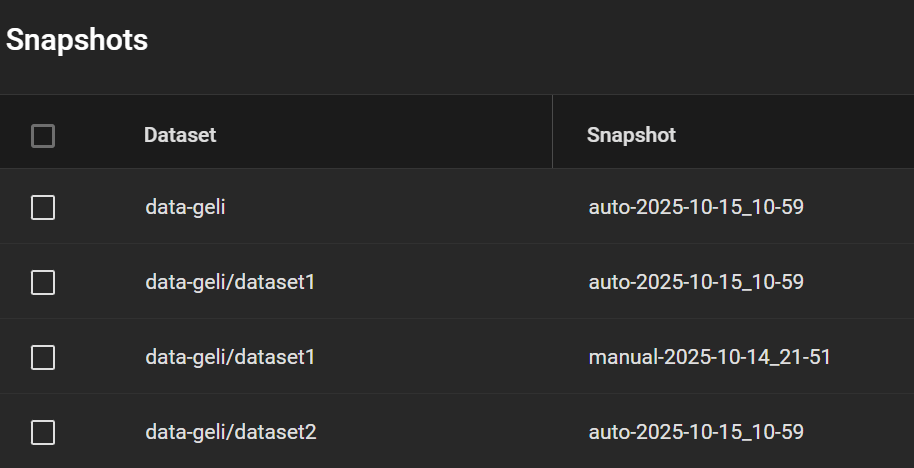
My snapshots then looked this like, including a manual snapshot I made earlier (my real system has many other snapshots, so I want to test whether this one appears in the replicated pool).
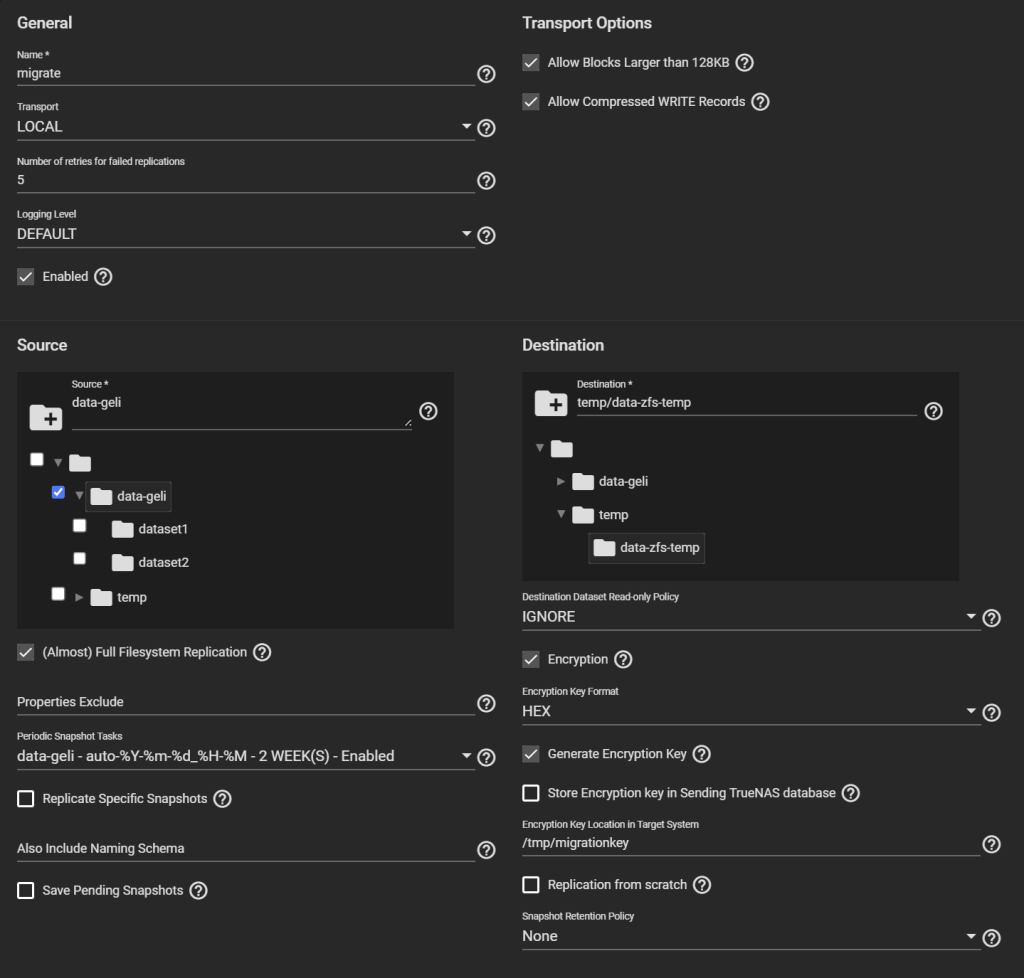
Step 5. Create and run a Replication Task
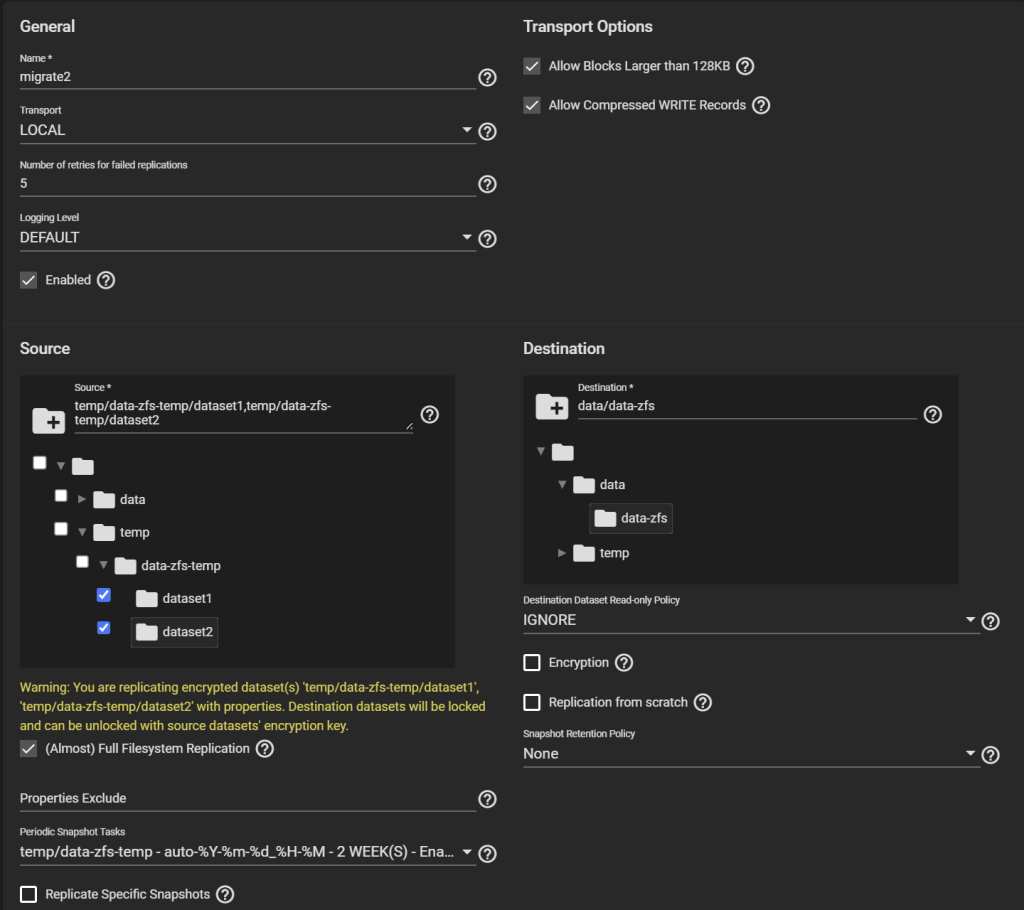
Go to Tasks > Replication Tasks, and click Add, and click Advanced Replication Creation. Here, there are several things to configure.
- First, give it a name (“migrate” here).
- Transport: LOCAL.
- Select the original pool as the Source, and the temporary child dataset we created as the Destination.
- Select “(Almost) Full Filesystem Replication” under Source.
- Select the newly created entry under Periodic Snapshot Tasks.
- Destination Dataset Read-only Policy: IGNORE.
- Tick Encryption, otherwise, despite being a child of an encrypted dataset, your temporary pool won’t be encrypted, contradicting Requirement 1.
- Select HEX or Passphrase, but this won’t change the fact that TrueNAS will storage the generated key/passphrase to
/data/freenas-v1.dbon the boot pool. This means, while this replication task exists (running or not), the key to decrypt it is exposed. This is a vulnerable period before you can delete the task and the corresponding data. If you are OK with this, then go ahead, otherwise consider Method #2 instead.
- Uncheck “Store Encryption key in Sending TrueNAS database“. When you uncheck this option, the new field “Encryption Key Location in Target System” appears, choose something under
/tmp(mounted as tmpfs, you can verify with “df -h /tmp“), e.g.,/tmp/migrationkey. This step is needed as the passphrase doesn’t get passed as a parameter of some commands but is read from a location. The file will be removed after a reboot. As long as the recovery task exists, the key for your temporary storage is kept. Say, if the replication process is interrupted, it can be resumed. If you reboot, you can find the generated key by editing this task. - Uncheck Run automatically.
- Click Submit
Edit the task to copy the generated key.
Next, click Run Now.
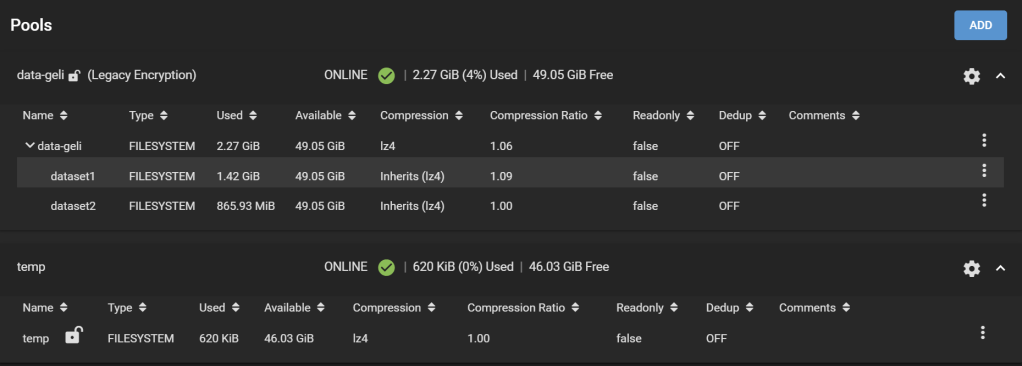
Step 6. Check the temporary pool
The replication task will go from Pending to Running to Finished.

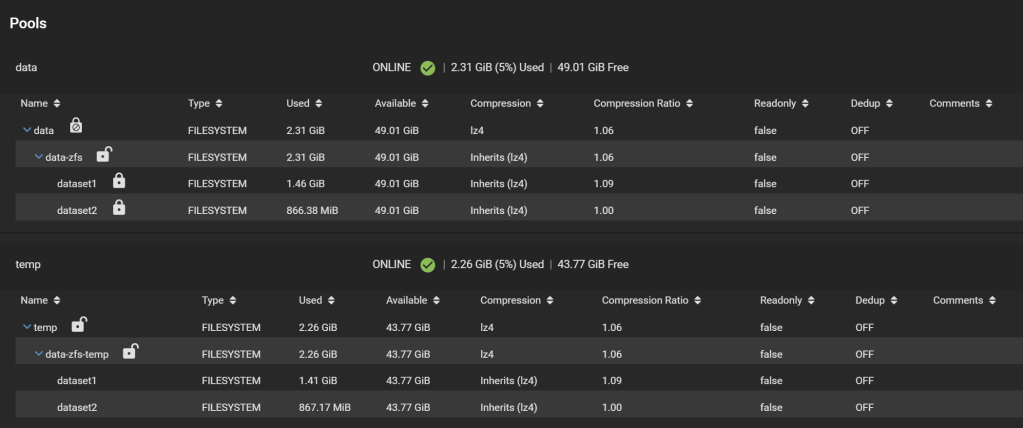
The new temporary pool now holds all your data encrypted with the passphrase you set and with ZFS encryption.
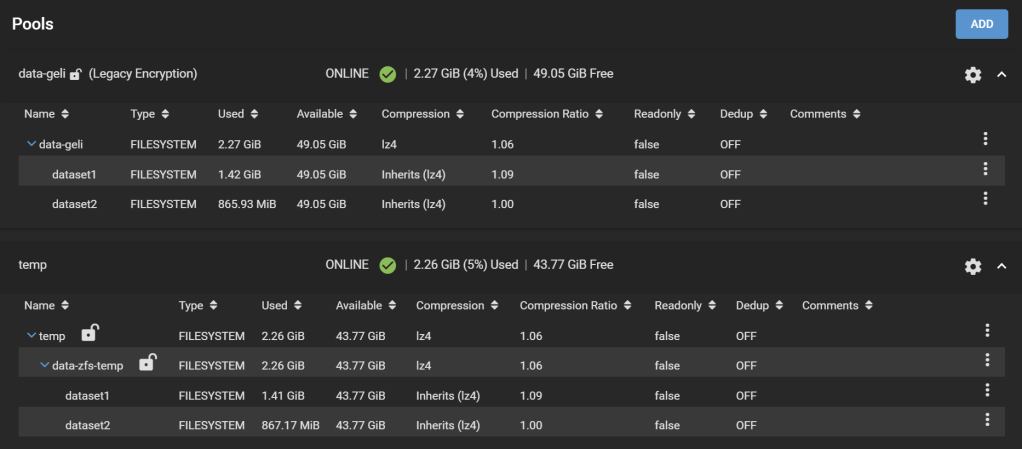
All snapshots are preserved as well.
Notes on Step 6. Insights from a real migration
Strangely, on the real system, on a dataset with some 10k files, 1k folders, the effective disk size shrunk notably. The dataset has 2.33TiB worth of data, and it took 2.58TiB of storage before (at a compression ratio of 1.04), and on the temporary pool this dataset now takes only 2.12TiB (interestingly, the compression ratio didn’t change). This is reflected on the “Size on disk” field reported by Windows, and also matches the Used field under the Pool page on TrueNAS.
This is not due to a change in snapshots (in fact, snapshots got copied as well, and this dataset didn’t have any snapshot other than the one I just made for the replication anyway). This should be due to reduced fragmentation when data was copied. Nice benefit!


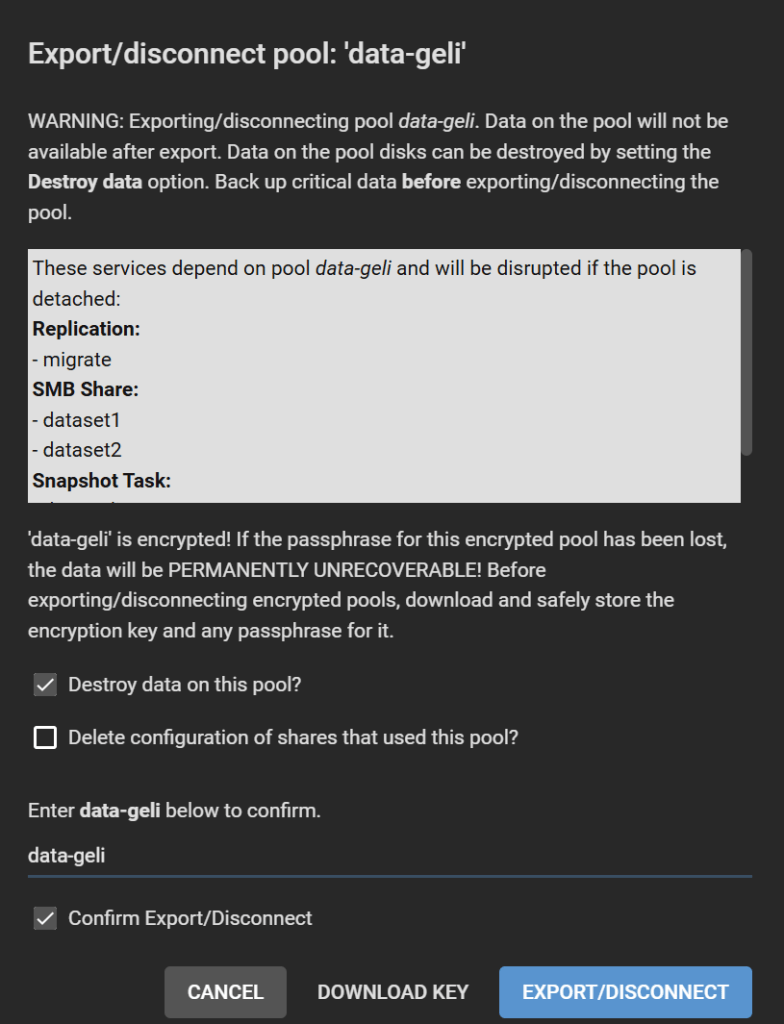
Step 7. Erase the original pool
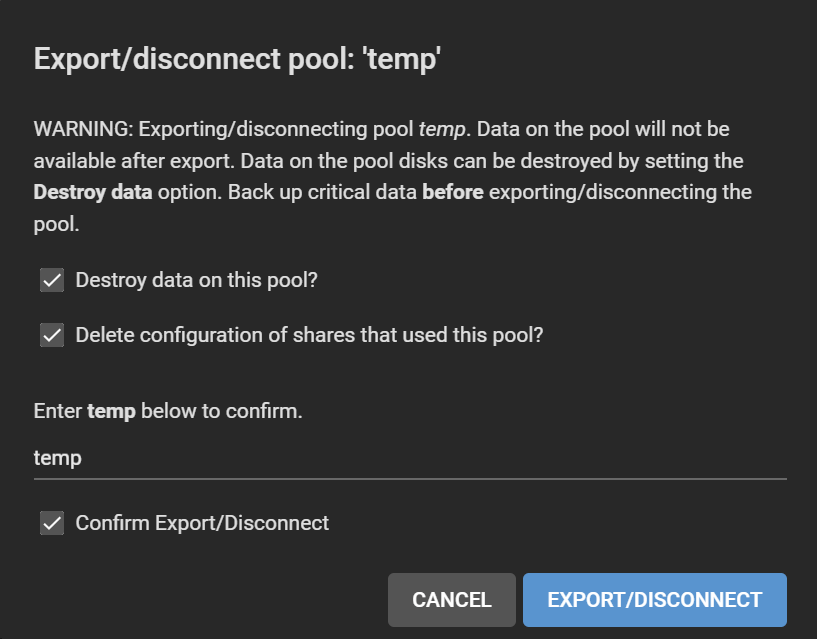
Go to Storage > Pool, click on the gear icon on the old pool, select Export/Disconnect.
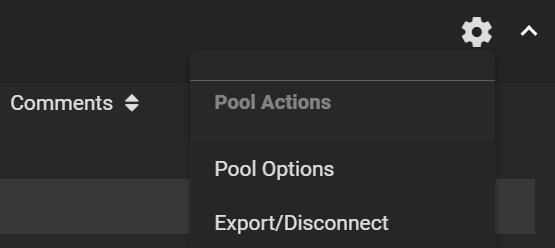
Check all boxes, or maybe keep “Delete configuration of shares that used this pool?” unchecked if you want to restore these shares after re-migration, though you will need to adjust the path for each of them. Follow the instructions and click Export/Disconnect.

Step 8. Recreate a new pool
In Pools, click Add, Create Pool. Configure the vdevs the way they were before. We will call this pool data. Do NOT enable encryption! If this pool is your “default” pool, it will store data in TrueNAS SCALE that need to be unencrypted, such as ix-applications. It is more difficult to set the pool as encrypted in this case. We will solve this issue by creating all our datasets within an encrypted dataset instead of encrypting the whole pool.

Create an Encrypted dataset, named data-zfs in our case.
Make it encrypted. Choose Encryption Type: Passphrase. Choose a strong one, possibly your final passphrase. The number of PBKDF2 iterations defaults to 350,000, but other systems like VeraCrypt use 500,000 by default, so feel free to increase TrueNAS’ default value.
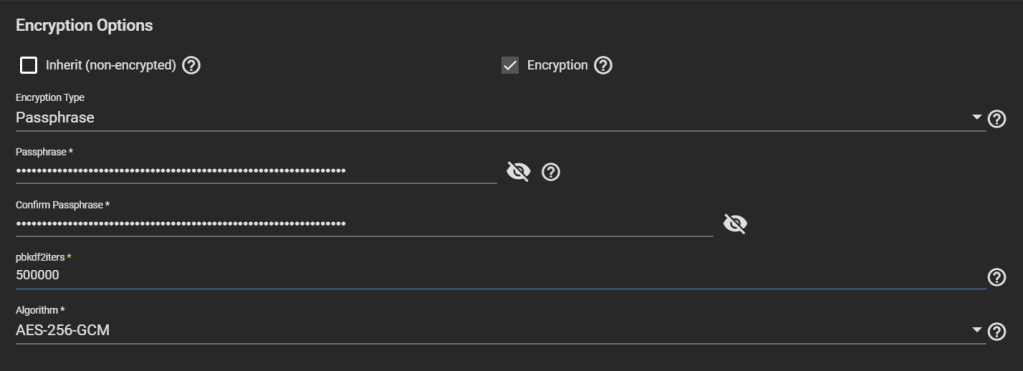
Big warning: DO NOT CHOOSE “Key” as Encryption Type. TrueNAS considers that if you use a “key” instead of a “passphrase”, you want to have it stored in TrueNAS database, which is written unencrypted in the boot pool. This helps unlock the dataset automatically at boot, which might not be what you want.
Step 9. Replicate to the new pool
Under Tasks > Periodic Snapshot Tasks, edit the periodic replication task we created earlier and change the dataset to the temporary dataset created earlier that contains all replicated datasets, in our case temp/data-zfs-temp. Enable the task.
Under Tasks > Replication Tasks, after you make sure you copied the key generated for the previous replication task, delete that replication task and create a new one. Use the same settings as before, but choose as the Source datasets ALL the child datasets of the temp dataset and not the temp dataset it self (temp/data-zfs-temp/*), and the Destination as the new dataset on the re-created pool (data/data-zfs).
Create and run the task.
Step 10. Setting passphrases
Now things are still messy. The child datasets on the new pool are managed differently than the parent, they don’t inherit the encryption of the parent. And they use a key that was written to disk for the first replication task. We need to change all that.
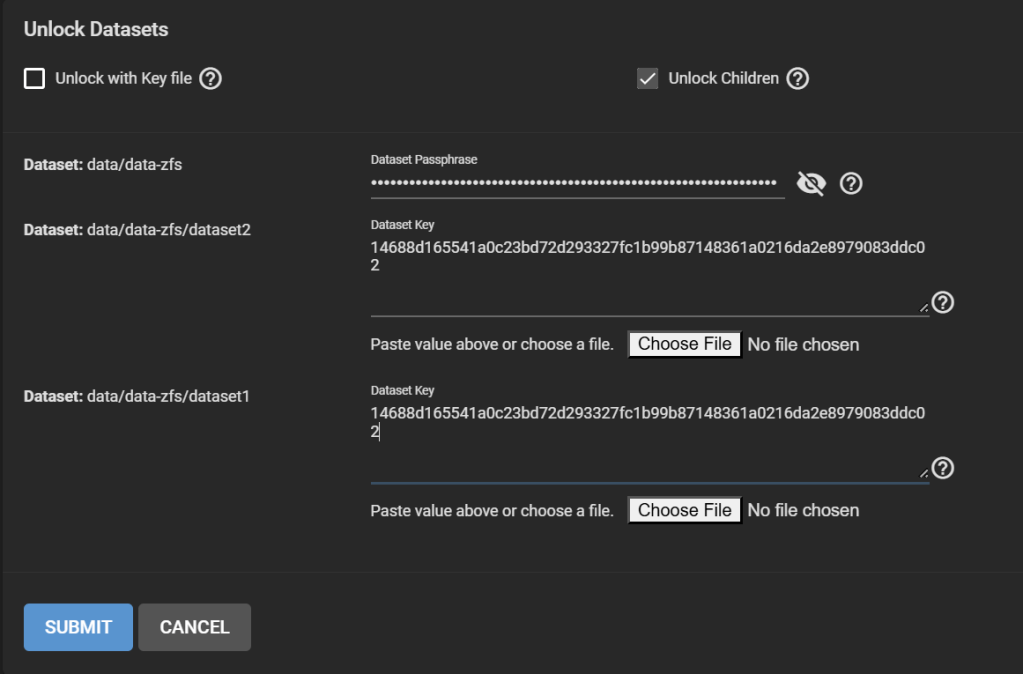
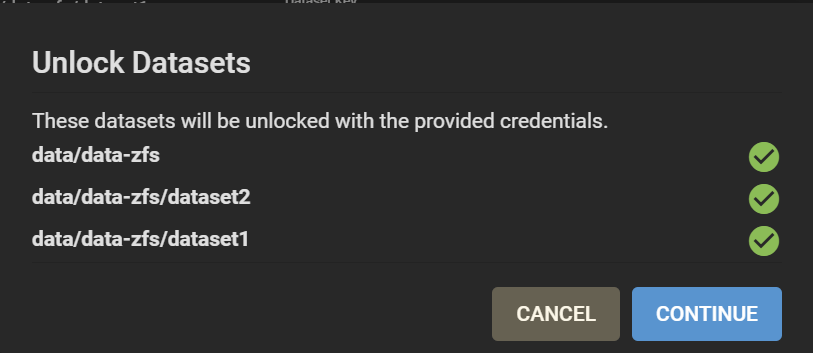
First, lock the data-zfs dataset: three dots > Lock. Then Unlock. This makes it easier to unlock all your datasets. On the Unlock screen, untick “Unlock with Key file”. Enter the passphrase for the data-zfs dataset you created in Step 8. Enter for all your child datasets the key that was generated in Step 5 and that you should have copied either at that moment, or in Step 6. You can still find it under /tmp/migrationkey if you did not reboot.
Good. Now, your pools look like this:
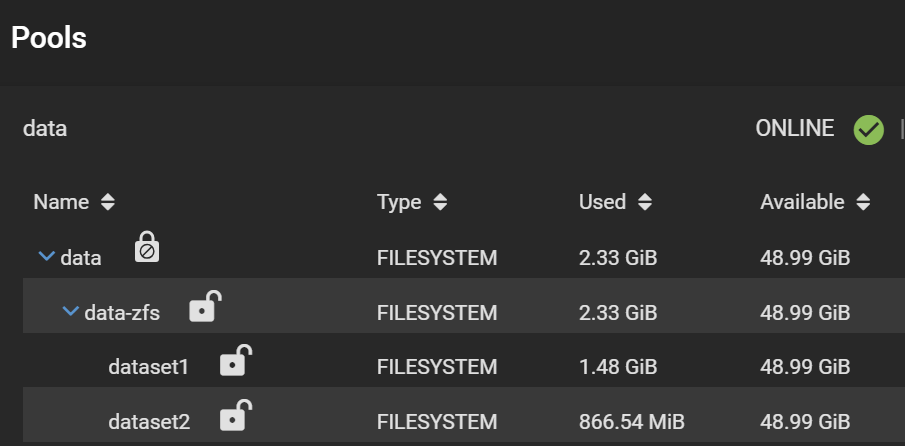
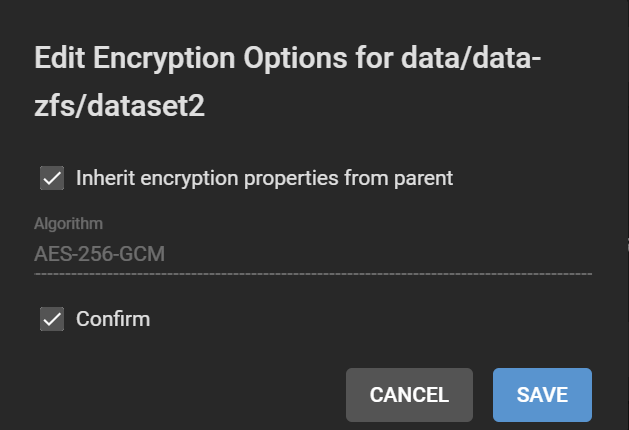
Note the separate padlocks on each dataset, meaning they are governed by different keys/passphrases. Next, we want to make all the child datasets inherit the encryption key (or passphrase in this case) from the data-zfs dataset, so we can unlock them all at once using the passphrase we set. For each child dataset, click on the three dots, Encryption Options. Then tick “Inherit encryption properties from parent“.
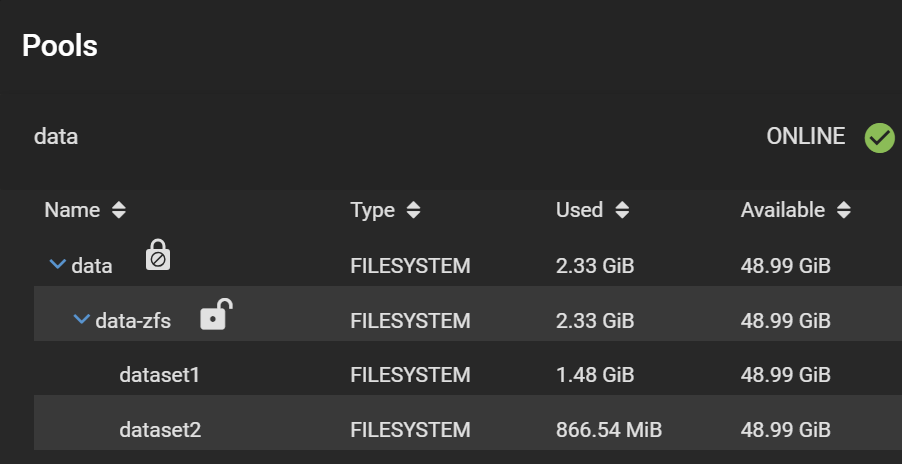
Finally, your datasets should look like this:
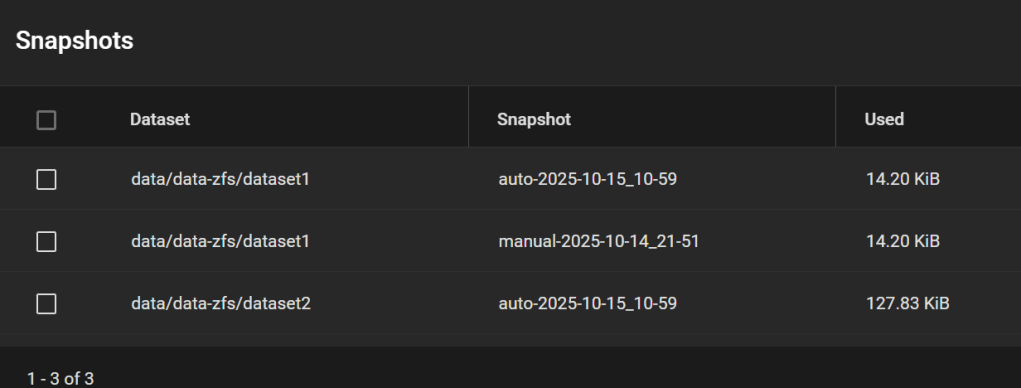
And the snapshots are all here:
Step 11. Cleaning up
- Delete
/tmp/migrationkey, either from the shell (rm /tmp/migrationkey), or by rebooting. - Tasks > Replication Tasks> remove the task.
- Tasks > Periodic Snapshot Tasks > remove the task.
- On the temp pool, gear icon > Export/Disconnect. Tick everything. Click Export/Disconnect.
- Remove old GELI encryption keys under
/data/geli. They were used in conjunction with your passphrase to unlock the disks.
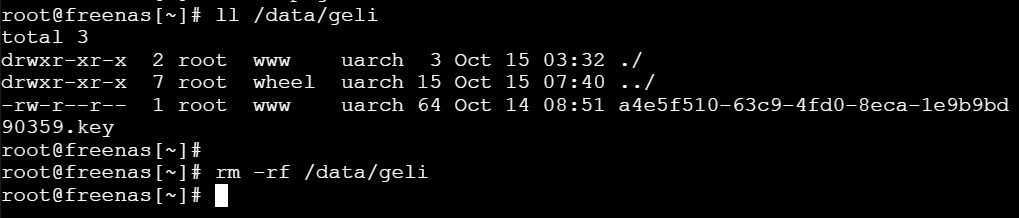
rm -rf /data/geli- Adjust your SMB shares, since the dataset paths have changed.
Done!
Method #2
This section is under construction. It will hopefully involve the proper zfs send/recv commands after I try them out.
Appendix: Why I’m not happy with Method #1: Encryption keys written to disk
due to the storage of the encryption key in the replication task settings in the unencrypted freedb-v1.db. OK, technically encrypted, but using the static key located in /data/pwenc_secret.
We can verify that the encryption key/passphrase for the replication task is indeed written to disk. After creating the task in Step 5 in Method #1, run from a shell:
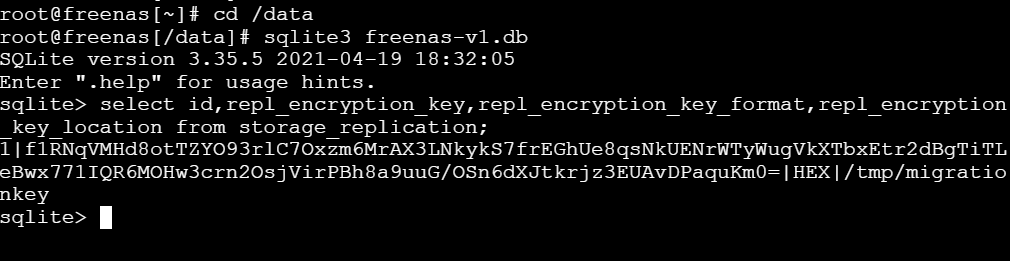
With a script adapted from https://milek.blogspot.com/2022/02/truenas-scale-zfs-wrapping-key.html?m=1, simply change at the end:for row in dbcur.execute('select id,repl_name,repl_encryption_key from storage_replication'):
id,repl_name,repl_encryption_key = row
print(f'dataset: {repl_name}\n key: {pwenc_decrypt(repl_encryption_key)}\n')
And run it:

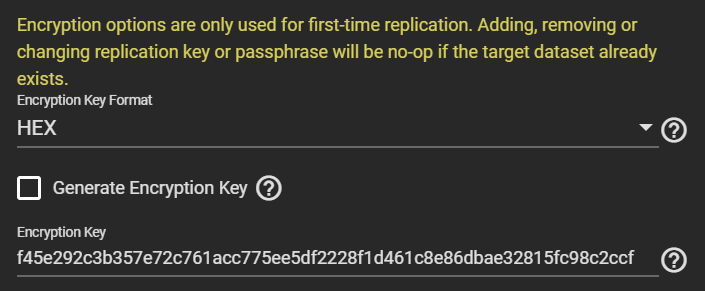
The output shows the key (or passphrase if you chose that) with which the data of the temporary dataset is encrypted. It also matches what the GUI shows:
Since replicating the temporary datasets to the final pool copies the encrypted data as is without re-encryption, it means this key exposure has long-term effects: anyone able to grab this key during replication can decrypt your final pools unless you change the key later on (and you assume nobody copied at least the headers of your pool that contain the actual data encryption key, DEK). The DEK is generated when the encrypted dataset is created and does not change over the dataset’s lifetime.
Let’s get rid of the TrueNAS GUI to avoid all these complications!
