Three years ago, I wrote about how to update the BIOS of a Samsung Galaxy Book Pro 360 laptop given that the BIOS installer could not run successfully on its own. One pain point was unpacking the firmware image from the installer. I used a race condition to acquire the files, but this isn’t very reliable and accessible to non tech-savvy users. Today, we will unpack the firmware image in a proper way.
Back on my (now spare) Samsung Galaxy Book Pro 360 laptop with the latest BIOS update I could find: version P06AKF from System_BIOS_update_P06AKF.exe. You can normally download it via Samsung Update, although they have made changes since last time I used it, and you are summoned to use Samsung Device Care instead.
Provided you have this installer and you want to get the firmware image out of it, you may wonder if the installer has any option to extract files instead of trying to install them.
Tools like Universal Extractor don’t work on this binary, and randomly passing flags like /extract doesn’t work.
Reversing the Onepack unpacker
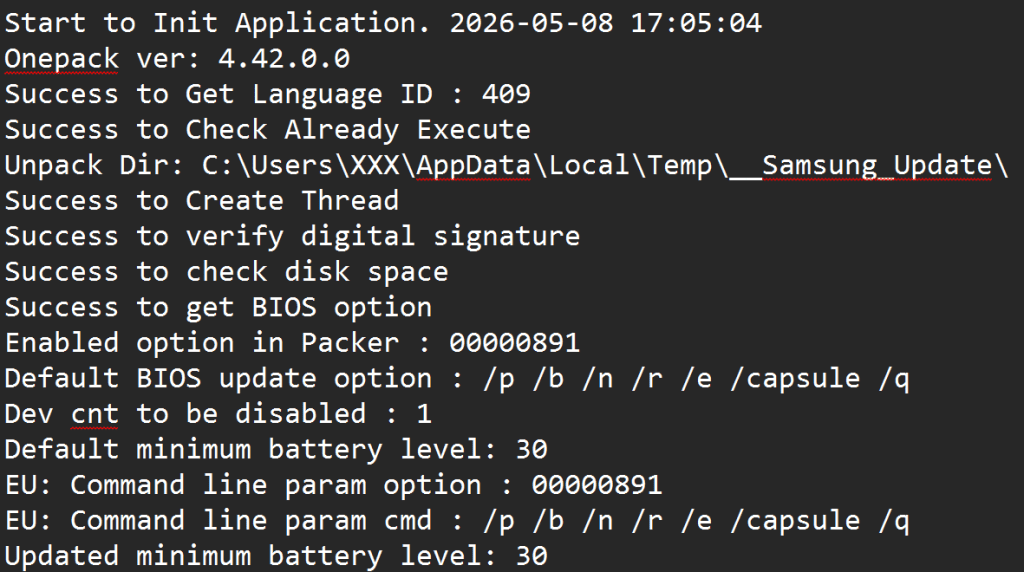
When running the installer, a log file is created under %TEMP%\__Samsung_Update. Let’s look at this log and find important strings in the binary in IDA.
“Onepack” is an interesting name suggesting a packer. Unfortunately, Google returns no result.
When IDA opens the installer, it suggests opening the debug file D:\git\VS\TOOLS_Onepack\Source\OnePack 4.0\Release\UnPacker.pdb. This is the path used during development of this installer on the developers’ machine. “OnePack 4.0” appears again. However, no luck finding a ready unpacker.
OK, so if the installer is an unpacker, it must have a routine at the beginning and all files must be attached somehow.
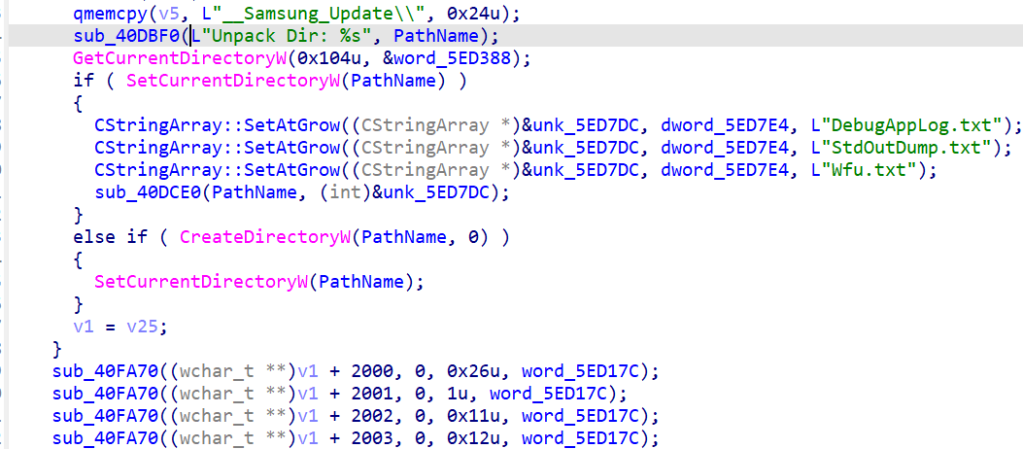
Let’s go search for “unpack” since this is the name of the PDB file. One match shows “Unpack Dir”, let’s follow.

This lands in a function that doesn’t seem to do a lot, see this excerpt:
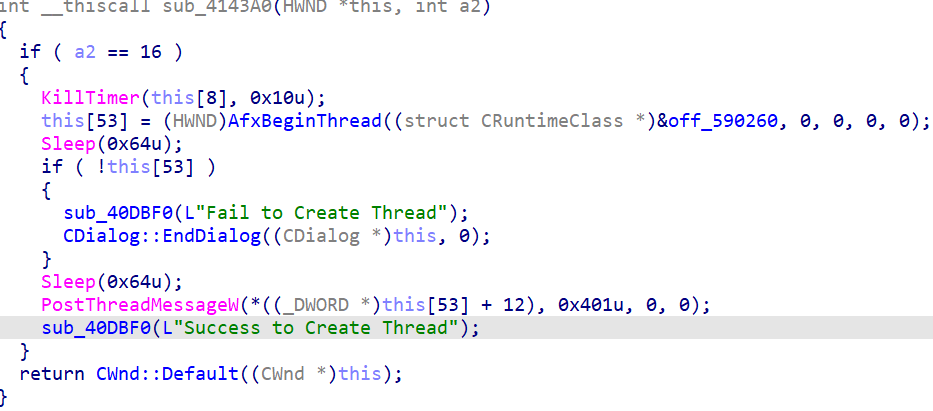
We continue and now search for the next line in the log starting with “Success to Create Thread”.
Again, a small function. The off_590260 with which a thread gets created does not point to any code.
Next, I’m looking at the end of the log, which includes the message shown on the screen when the update is ready to be installed:
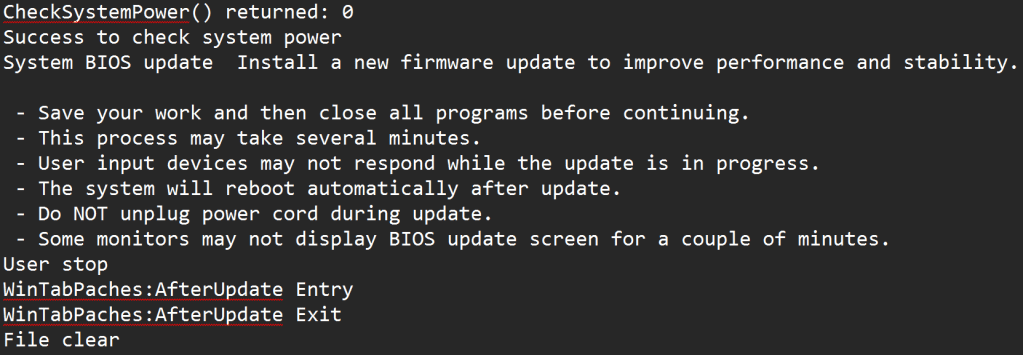
Let’s search for the string “Install a new firmware update”.
No result…
How about “System BIOS update” that appears just before on the same line? Nop.
This is frustrating. I insisted and went back to the top of the log with the string “Enabled option in Packer” and bingo now I see a function that has:
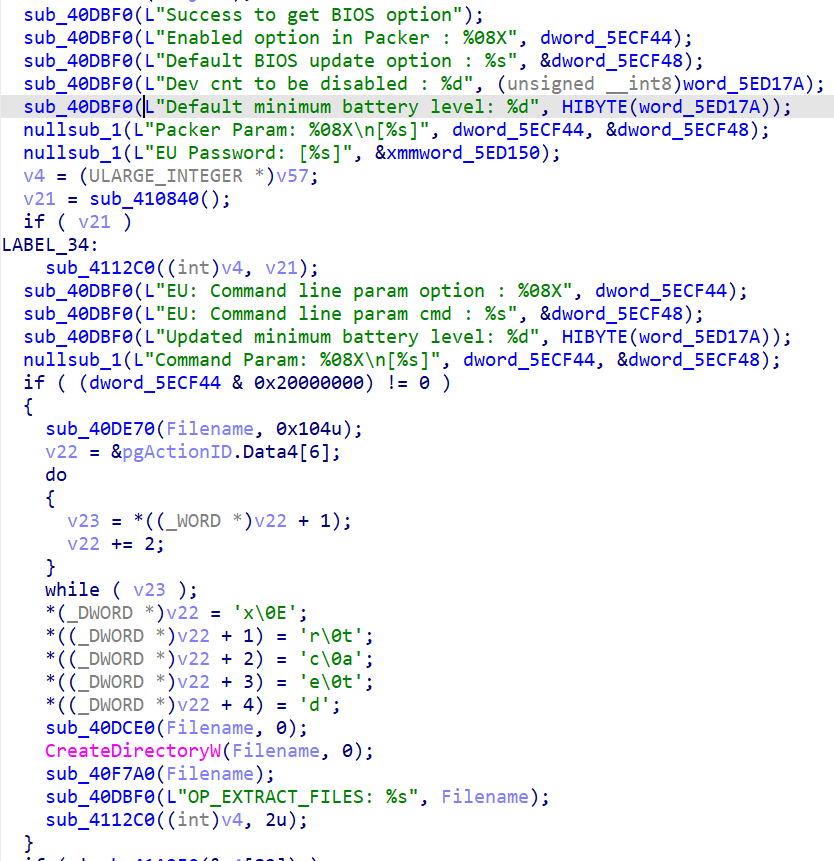
Notice the “OP_EXTRACT_FILES” string. I don’t see that in my log. Maybe there is a way to tell the installer to simply extract files? Notice here that v22 is the string “Extracted” and it is used in the call to sub_40DCE0 although it doesn’t show on the decompiled code but this is clearer in assembly:
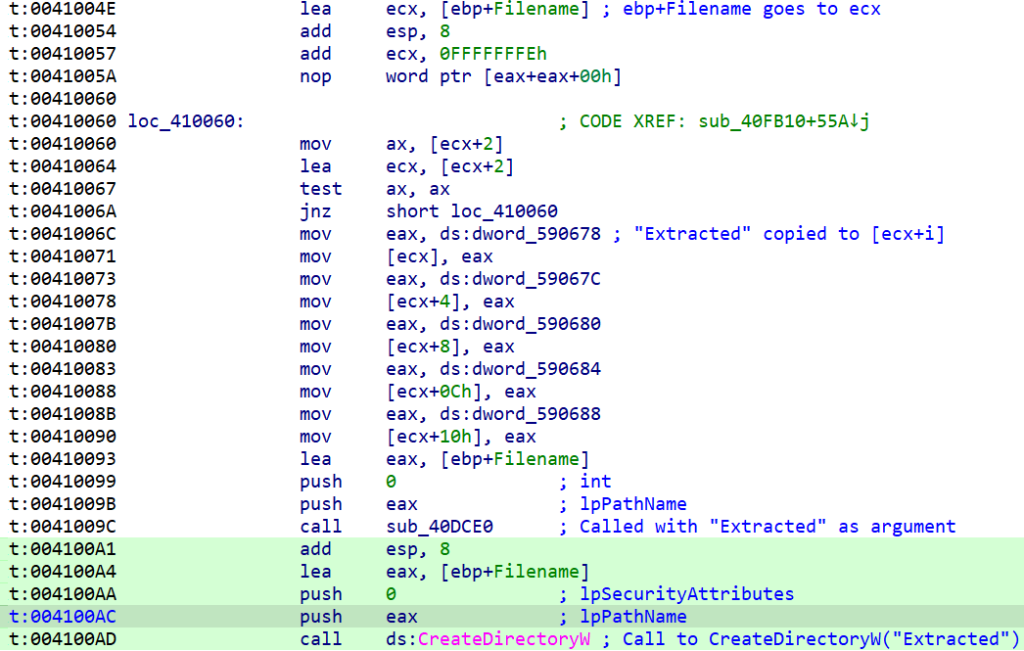
This piece of code creates a directory called “Extracted“, but I’ve never seen it.
Process Monitor on the process shows no such directory is created by just running the executable until this point.
The next function sub_40F7A0 is more interesting.
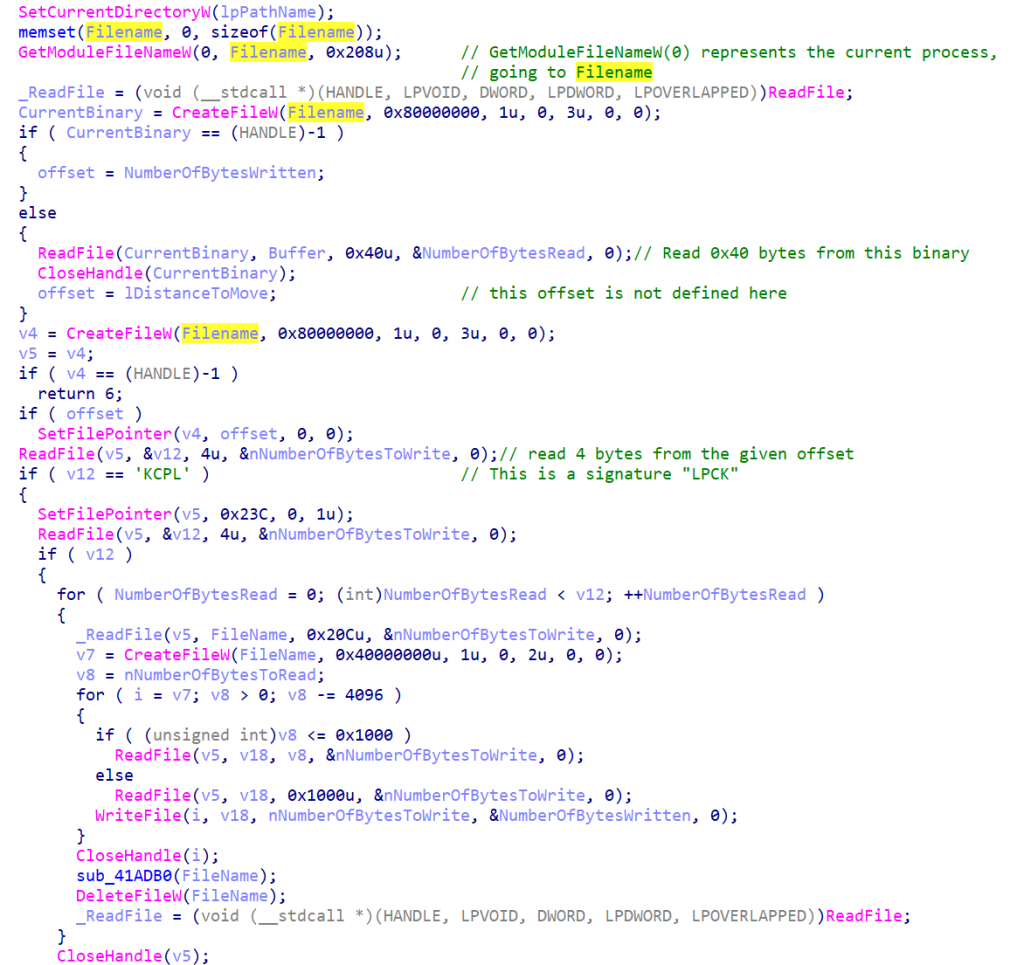
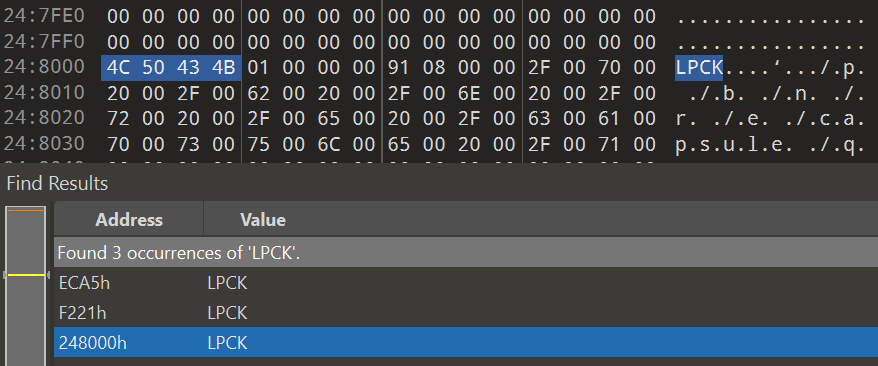
First, this function looks at an offset that’s so far unknown and verifies that the 4 bytes at that offset are “LPCK”. A quick search for this magic signature in the installer binary shows 3 matches. Two are from strcmp instructions, and one is lonely and clearly at a boundary at file offset 0x248000.
The unpacker starts reading at a relative offset 0x23C from where we were. This is 0x248240. This 4 byte area represents an int of value 12 (0x0C), representing the number of files to extract.
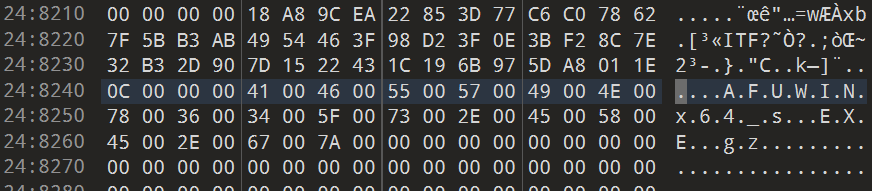
For each file, the first 0x20C bytes are used as a filename. As we can see in the screenshot above, the first filename is the string “AFUWINx64_s.EXE.gz” followed by plenty of zeros that are ignored as a Unicode string. This points to a gziped file. Sure enough, after this 0x20C offset, we encounter data that is prefixed with the signature of a gzip file (1F 8B).

It also appears that the 4 bytes before represent the size of this file.
At this stage, we could spend more effort to systematically extract the hardcoded offset, or build a script to locate the right LPCK magic string, extract each gzip files, and uncompress them. I don’t like having a custom unpacker not knowing how much it can generalize.
Reversing the Onepack unpacker’s extraction feature
A better approach to me would be to have the unpacker do its job and give us the extracted data effortlessly.
Remember we encountered code that created an Extracted folder. We haven’t explored how to trigger this path yet.
The condition for this folder to be created is to have (dword_5ECF44 & 0x20000000) != 0. Cross-refs for dword_5ECF44 point to several places:
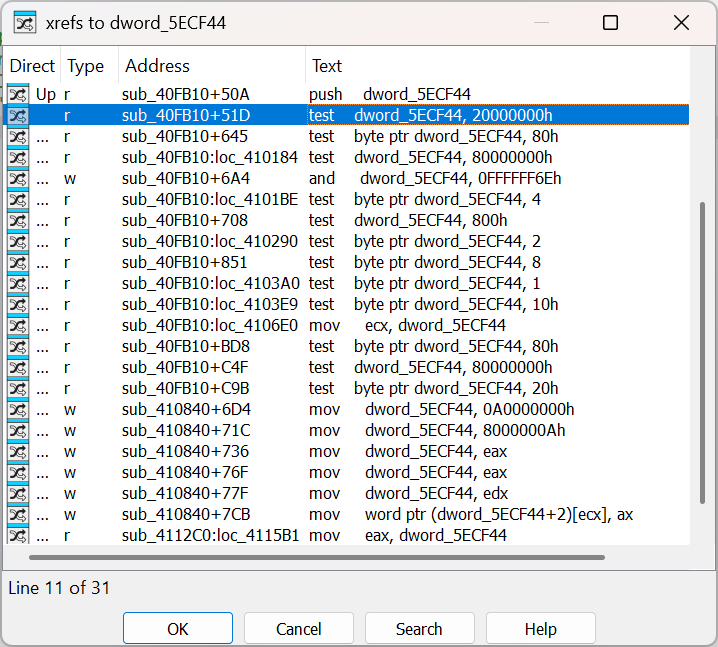
See at the bottom of this list, several mov instructions setting the value of this dword in sub_410840. Let’s explore this function:
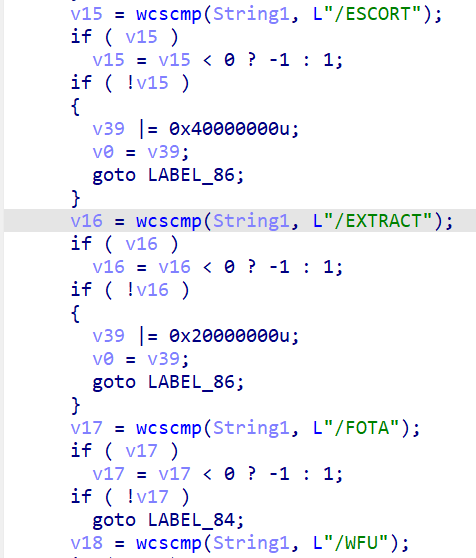
sub_410840Very interesting! It looks like it is parsing command line arguments, and one of them is called /EXTRACT. Great, let’s just call System_BIOS_update_P06AKF.exe /EXTRACT without thinking further and…. Nothing. No extracted folder. Duh.
Looking into the logic of this, we see that /EXTRACT leads v39 to be ORed with 0x20000000u. This value is later used to set the dword_5ECF44 of interest, however, the value 0x20000000u that would match our earlier constraint is changed into 0xA0000000, totally not what we want. Plus, v39 needs to be negative, otherwise, the dword is untouched.

However, there is also this trick:
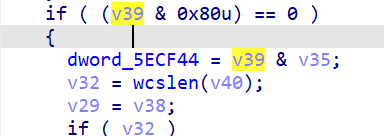
If v39 & 0x80 == 0, then the dword_5ECF44 = v39 & v35.
If both v39 and v35 can have a common 0x20000000u, and v39 does not have an 0x80, and also v39 < 0, we win. v35 is initialized as -1, meaning 0xFFFFFFFF, so no problem for the first constraint. v39 does not seem to have an 0x80 unless /WFU is used.
Most importantly, to get v39 < 0, we need the most significant bit set to 1, i.e., bit 31 at 1, or something looking like v39 |= 0x80000000. This is the case with the /EU parameter.
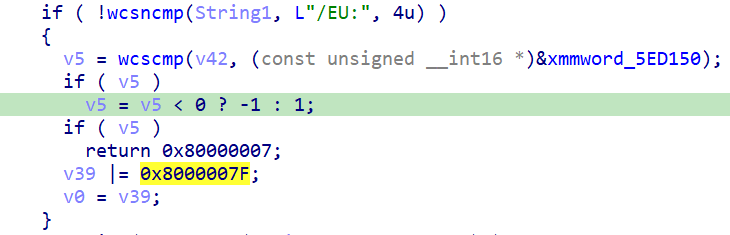
Unfortunately, /EU should be followed by a string. Recall also from the previous function that reported log entries that we have seen such an “EU” string, it is expected to be a password:

This starts to make sense, the installer protects unpacking with a password!
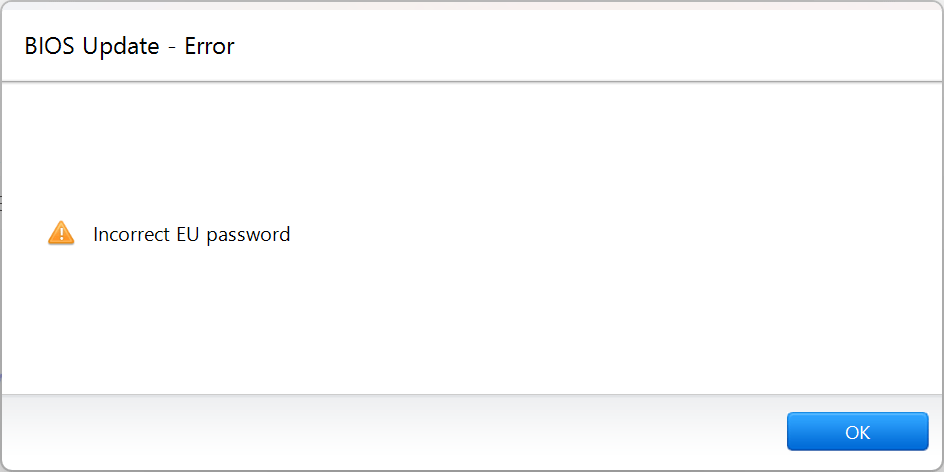
Trying an empty password with System_BIOS_update_P06AKF.exe /EU: /EXTRACT didn’t work, but at least I get a relevant error message:
EU here stands for Enterprise Update. The password is somewhat hidden in this memory value that’s located in the .data section (xmm_5ED150) but that’s not initialized when looking at it statically.
As always in such a case, we have two solutions: statically reverse-engineer the expected value, or run the installer and look for the value in memory with a debugger. I opted for the simplest solution: debugging.
The offset of the comparison in IDA shows as 0xFD36 (file offset).

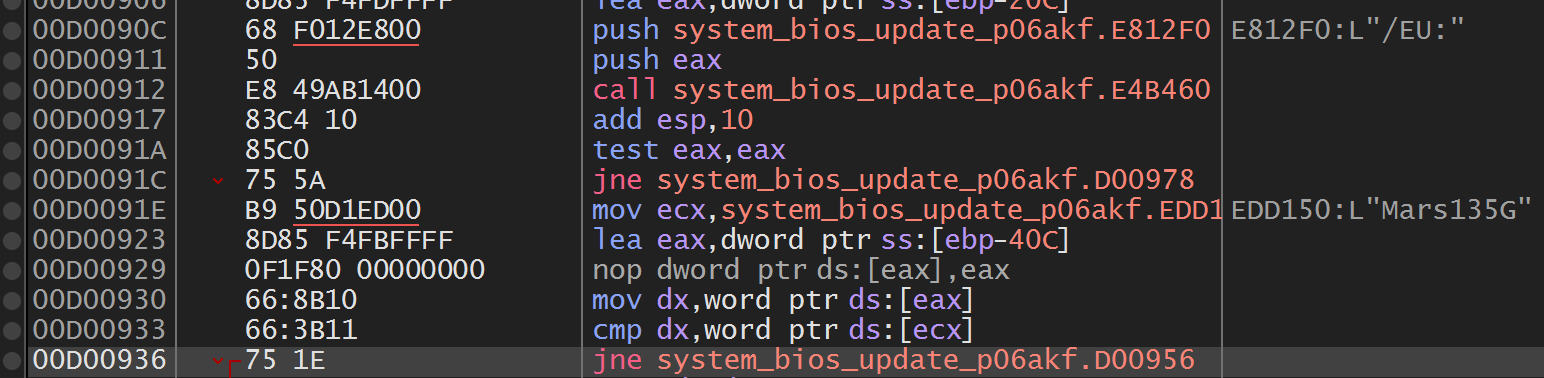
I fire x32dbg (yes, the installer is a 32-bit executable), and attach to the installer that is ready to install:
In x32dbg, under Symbols, I make sure to point to the installer binary. Then right click anywhere > Go to > File offset. Just above this comparison, the parameter with the correct password appears…
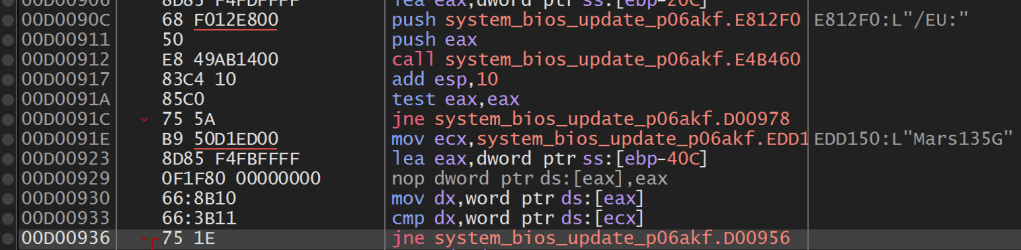
System_BIOS_update_P06AKF.exe around file offset 0xFD36Yay! Password is: Mars135G
We can now try to run the extractor with System_BIOS_update_P06AKF.exe /EU:Mars135G /EXTRACT. This time the installer is silent, extracts and leaves. We get all the files properly extracted!

When encountering blocked AMI drivers, it is then possible to run the actual installer (AFUWINx64_s.EXE) from a command prompt in Windows Recovery and perform the BIOS update using the parameters that appear in the DebugAppLog.txt.

Hi Xavier
This is an excellent post, and I am following your other post as my Samsung Galaxy Book 5 Pro BIOS update from version P00VAJ to P09VAJ got stuck, leaving the BIOS version and the BIOS MICOM version different. Now the charger is not recognized and I am having a terrible time trying to complete this update with Samsung support asking me to ship the laptop back since its under warranty. But I am not in the US from last week, so I need to figure out a solution based on your research.
Although I tried to find the EU Password for my update using x32dbg, it was not too easy, and so I just found an easier way! Its to run powershell as admin and execute the following and then run the updater
$srcFolder = “$env:LOCALAPPDATA\Temp\__Samsung_Update”
$dstFolder = “C:\temp\copy”
while ($true) {
robocopy $srcFolder $dstFolder /E /R:0 /W:0 > $null
Start-Sleep -Milliseconds 300
}
This got me the .CAP file 🙂
Now to refer to your next post and see if I can resolve the MICOM and BIOS version differences!
PS: Thanks for writing your posts, they definitely help at least one other person across the world, even when AI does not have answers
LikeLike
Nice way to automate the race to copy the files! But why can’t you just re-apply the update? Does it show the version is already up to date? Hopefully playing with the command line AMI updater works better.
LikeLike
Hi Xavier
The problem was that with a P00VAJ BIOS and P09VAJ MICOM version, the USB-C PD system would not recognize that the original 65W Samsung adapter was connected, and the battery was charged fully. Every time the BIOS update would fail with the message:
“BIOS Update stopped
AC adapter and 25 percent or more charged battery required for update. Please make sure AC adapter is connected properly and try updating the BIOS again
Press any key to continue booting”
I tried both USB-C ports, different Samsung original chargers and wires and even a 100W GaN fast charger. Samsung did not have support for laptops in Sri Lanka, and I could not ship it to the US.
However, after extracting the CAP file and booting into a recovery command line, I was able to execute the BIOS update command from there using the information retrieved from the %TEMP%\__Samsung_Update\DebugAppLog.txt log file.
Thanks to you, I was able to get the BIOS update to complete, and everything is good again and the USB-C PD charging is fine again!
regards
asankha
LikeLike
Oh, you were almost stuck in a deadlock. Glad to hear you could bypass the warning with my tutorial!
LikeLiked by 1 person