Three years ago, I wrote about how to update the BIOS of a Samsung Galaxy Book Pro 360 laptop given that the BIOS installer could not run successfully on its own. One pain point was unpacking the firmware image from the installer. I used a race condition to acquire the files, but this isn’t very reliable and accessible to non tech-savvy users. Today, we will unpack the firmware image in a proper way.
Back on my (now spare) Samsung Galaxy Book Pro 360 laptop with the latest BIOS update I could find: version P06AKF from System_BIOS_update_P06AKF.exe. You can normally download it via Samsung Update, although they have made changes since last time I used it, and you are summoned to use Samsung Device Care instead.
Provided you have this installer and you want to get the firmware image out of it, you may wonder if the installer has any option to extract files instead of trying to install them.
Tools like Universal Extractor don’t work on this binary, and randomly passing flags like /extract doesn’t work.
Reversing the Onepack unpacker
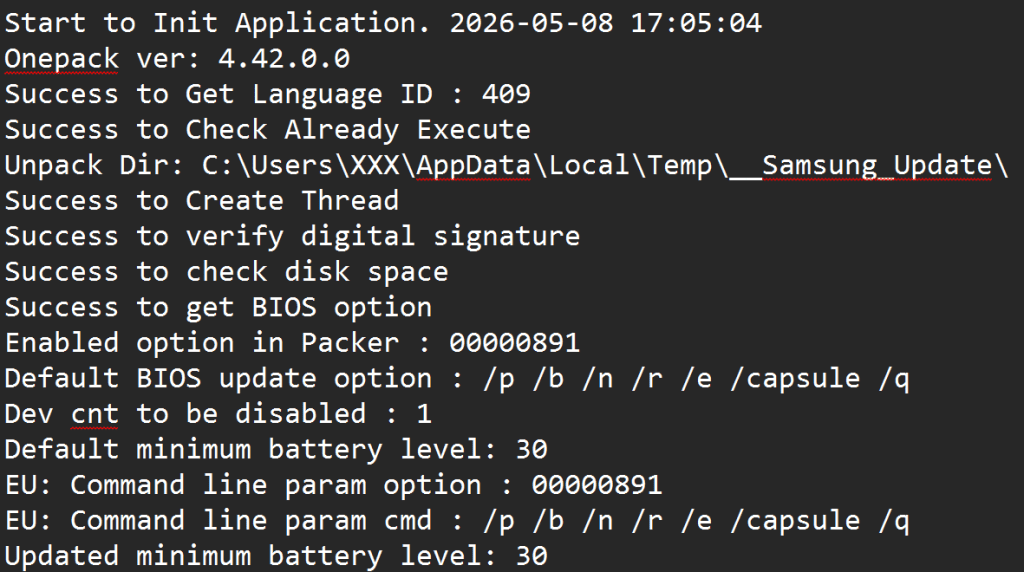
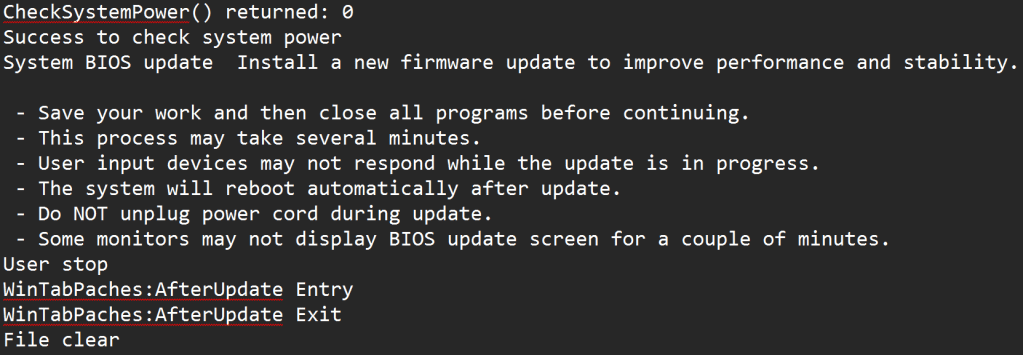
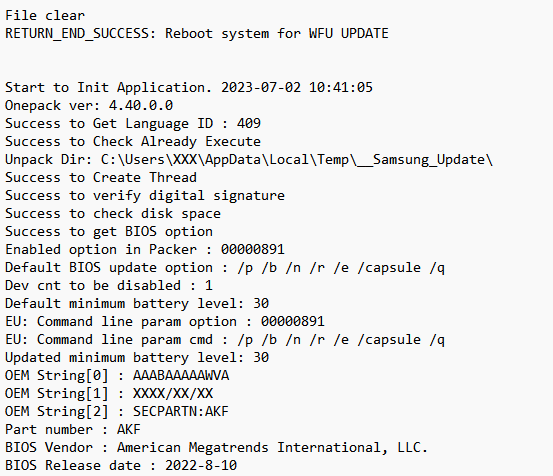
When running the installer, a log file is created under %TEMP%\__Samsung_Update. Let’s look at this log and find important strings in the binary in IDA.
Log after running System_BIOS_update_P06AKF.exe and not doing anything
“Onepack” is an interesting name suggesting a packer. Unfortunately, Google returns no result.
When IDA opens the installer, it suggests opening the debug file D:\git\VS\TOOLS_Onepack\Source\OnePack 4.0\Release\UnPacker.pdb. This is the path used during development of this installer on the developers’ machine. “OnePack 4.0” appears again. However, no luck finding a ready unpacker.
OK, so if the installer is an unpacker, it must have a routine at the beginning and all files must be attached somehow.
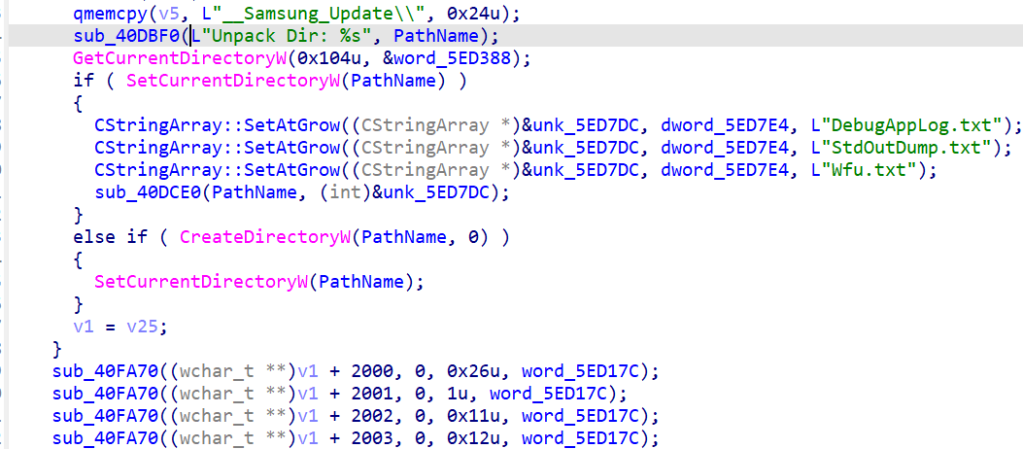
Let’s go search for “unpack” since this is the name of the PDB file. One match shows “Unpack Dir”, let’s follow.
Results for “unpack”
This lands in a function that doesn’t seem to do a lot, see this excerpt:
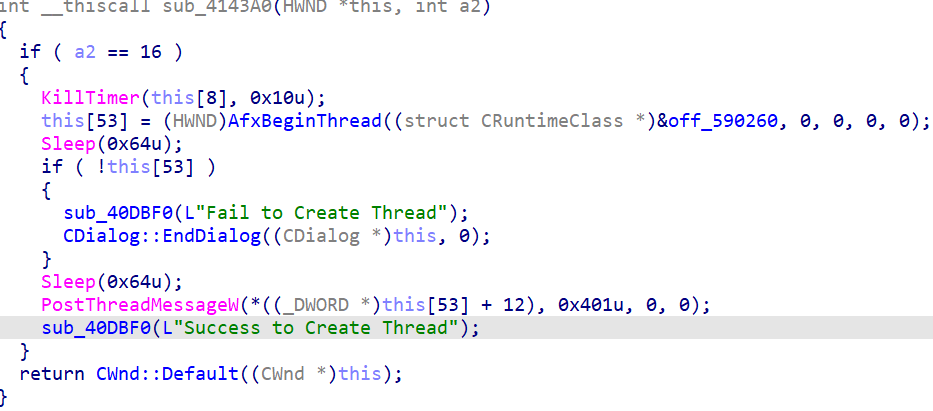
We continue and now search for the next line in the log starting with “Success to Create Thread”.
Again, a small function. The off_590260 with which a thread gets created does not point to any code.
Function where the string “Success to Create Thread” appear
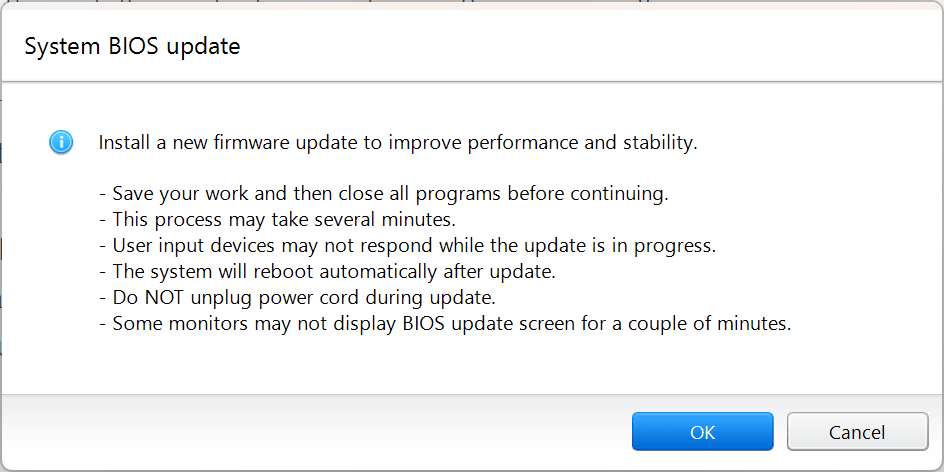
Next, I’m looking at the end of the log, which includes the message shown on the screen when the update is ready to be installed:
Let’s search for the string “Install a new firmware update”.
No result…
How about “System BIOS update” that appears just before on the same line? Nop.
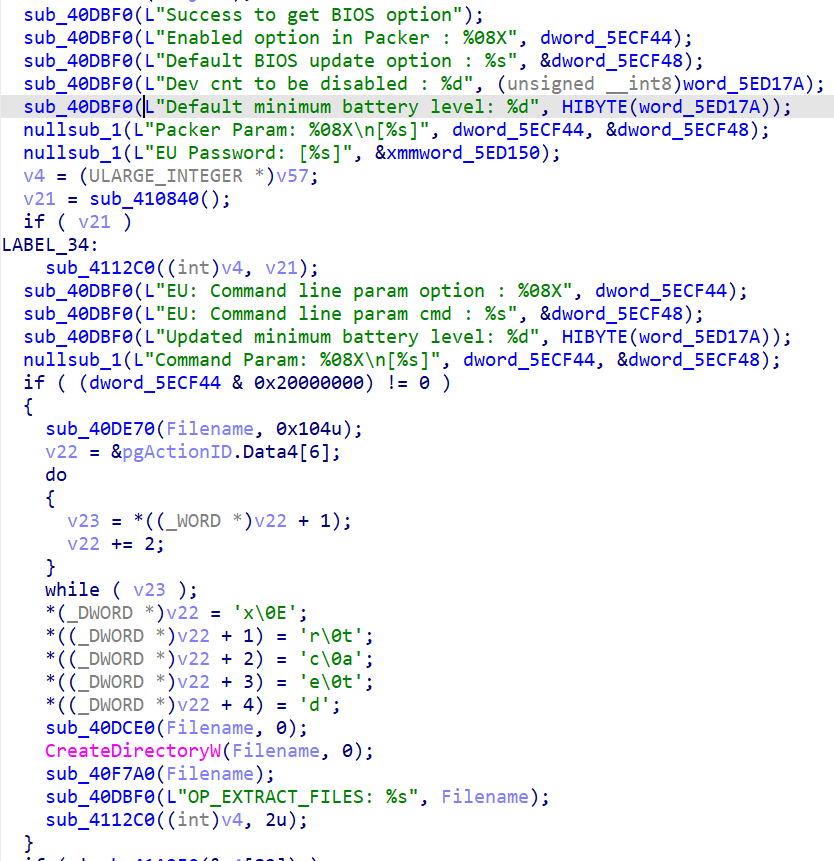
This is frustrating. I insisted and went back to the top of the log with the string “Enabled option in Packer” and bingo now I see a function that has:
Function matching string “Enabled option in Packer”
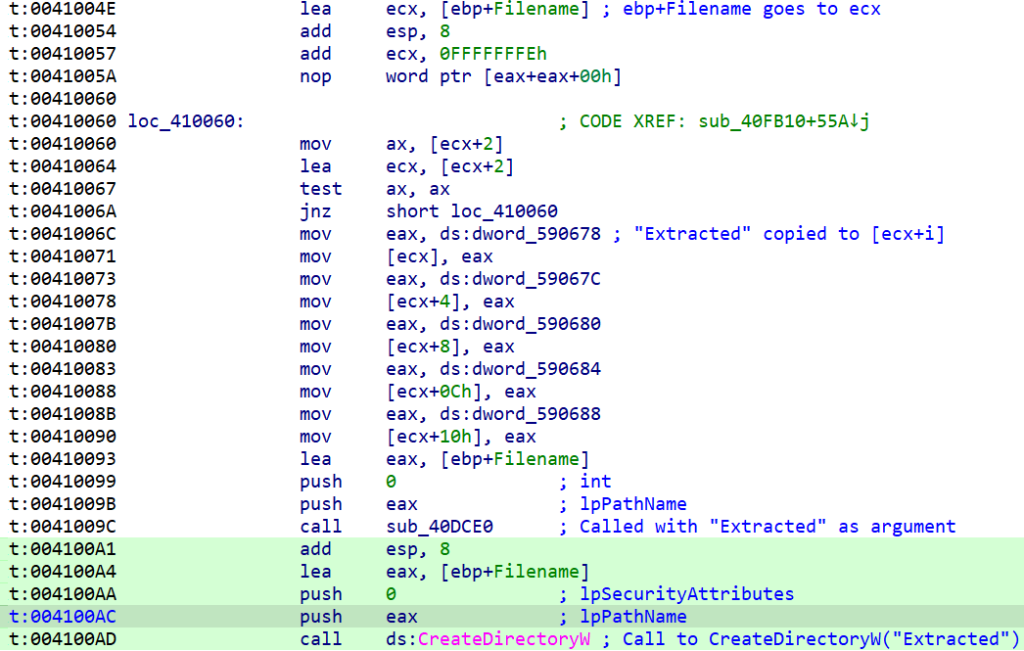
Notice the “OP_EXTRACT_FILES” string. I don’t see that in my log. Maybe there is a way to tell the installer to simply extract files? Notice here that v22 is the string “Extracted” and it is used in the call to sub_40DCE0 although it doesn’t show on the decompiled code but this is clearer in assembly:
“Extracted” from the 5 dwords goes to eax, then to ecx+i, which is ebp+Filename
This piece of code creates a directory called “Extracted“, but I’ve never seen it.
Process Monitor on the process shows no such directory is created by just running the executable until this point.
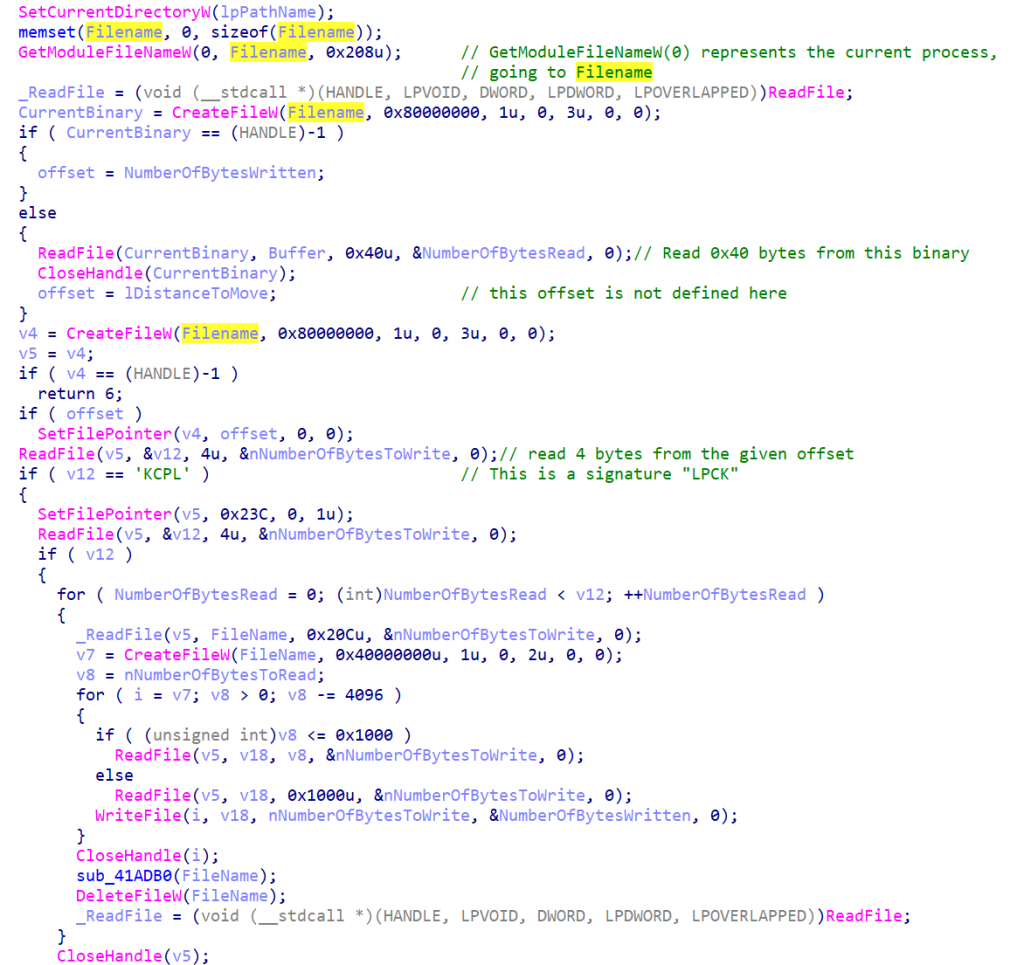
The next function sub_40F7A0 is more interesting.
sub_40F7A0 is responsible for extracting embedded files in the binary
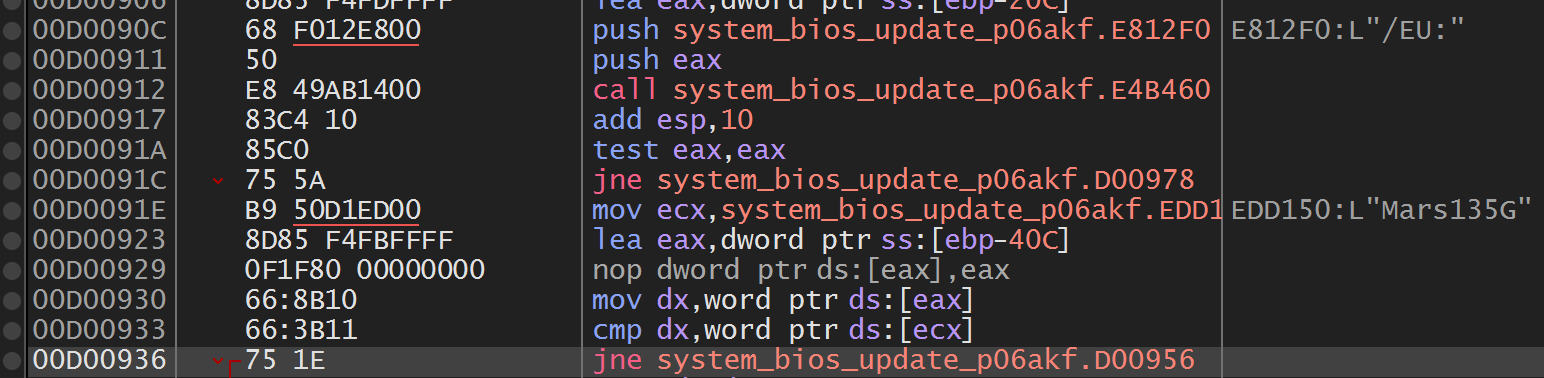
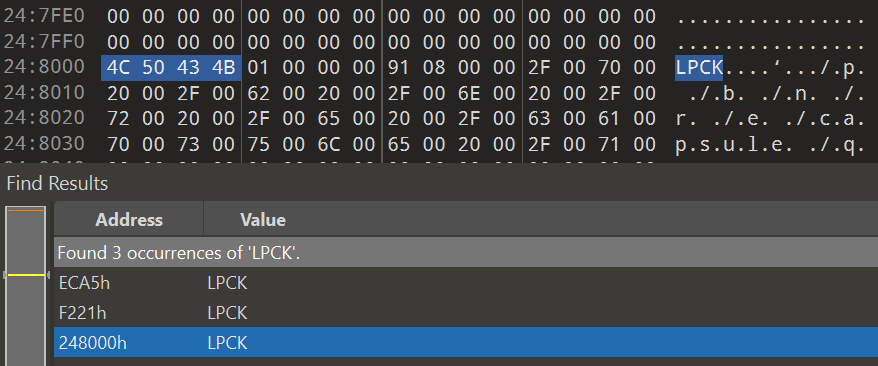
First, this function looks at an offset that’s so far unknown and verifies that the 4 bytes at that offset are “LPCK”. A quick search for this magic signature in the installer binary shows 3 matches. Two are from strcmp instructions, and one is lonely and clearly at a boundary at file offset 0x248000.
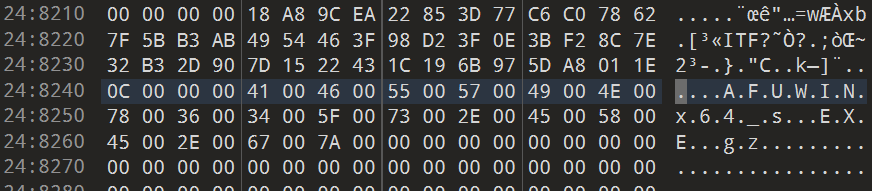
The unpacker starts reading at a relative offset 0x23C from where we were. This is 0x248240. This 4 byte area represents an int of value 12 (0x0C), representing the number of files to extract.
For each file, the first 0x20C bytes are used as a filename. As we can see in the screenshot above, the first filename is the string “AFUWINx64_s.EXE.gz” followed by plenty of zeros that are ignored as a Unicode string. This points to a gziped file. Sure enough, after this 0x20C offset, we encounter data that is prefixed with the signature of a gzip file (1F 8B).
It also appears that the 4 bytes before represent the size of this file.
At this stage, we could spend more effort to systematically extract the hardcoded offset, or build a script to locate the right LPCK magic string, extract each gzip files, and uncompress them. I don’t like having a custom unpacker not knowing how much it can generalize.
Reversing the Onepack unpacker’s extraction feature
A better approach to me would be to have the unpacker do its job and give us the extracted data effortlessly.
Remember we encountered code that created an Extracted folder. We haven’t explored how to trigger this path yet.
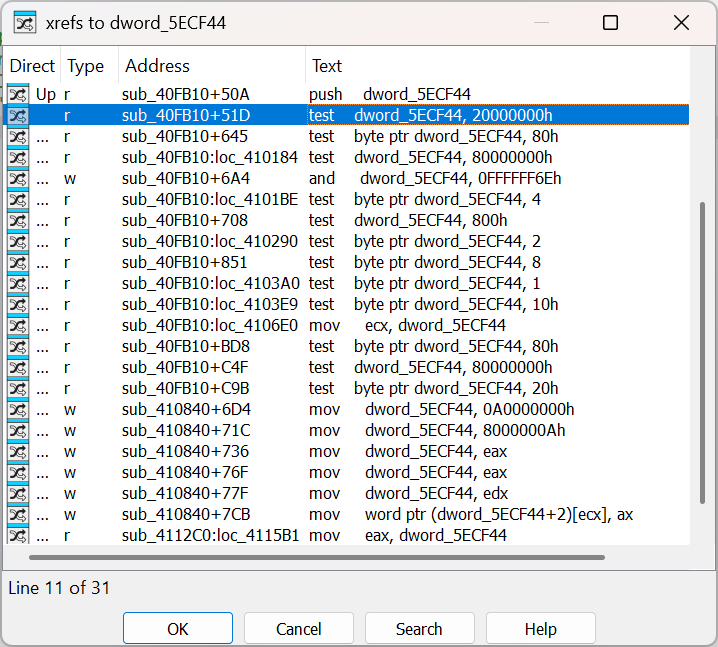
The condition for this folder to be created is to have (dword_5ECF44 & 0x20000000) != 0. Cross-refs for dword_5ECF44 point to several places:
dword_5ECF44 xrefs
See at the bottom of this list, several mov instructions setting the value of this dword in sub_410840. Let’s explore this function:
Part of sub_410840
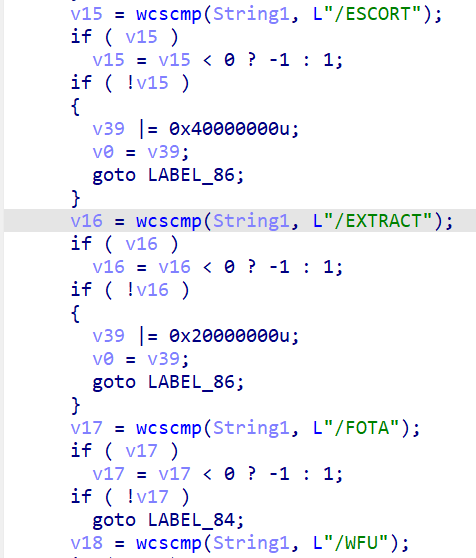
Very interesting! It looks like it is parsing command line arguments, and one of them is called /EXTRACT. Great, let’s just call System_BIOS_update_P06AKF.exe /EXTRACT without thinking further and…. Nothing. No extracted folder. Duh.
Looking into the logic of this, we see that /EXTRACT leads v39 to be ORed with 0x20000000u. This value is later used to set the dword_5ECF44 of interest, however, the value 0x20000000u that would match our earlier constraint is changed into 0xA0000000, totally not what we want. Plus, v39 needs to be negative, otherwise, the dword is untouched.
However, there is also this trick:
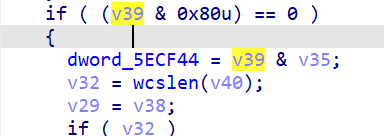
If v39 & 0x80 == 0, then the dword_5ECF44 = v39 & v35.
If both v39 and v35 can have a common 0x20000000u, and v39 does not have an 0x80, and also v39 < 0, we win. v35 is initialized as -1, meaning 0xFFFFFFFF, so no problem for the first constraint. v39 does not seem to have an 0x80 unless /WFU is used.
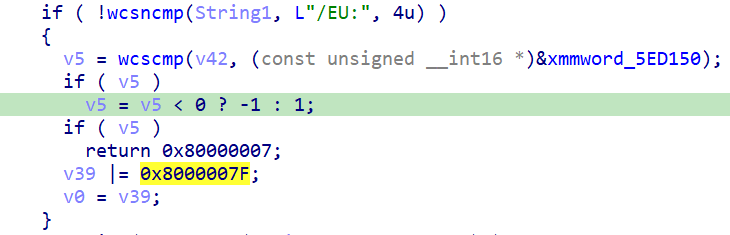
Most importantly, to get v39 < 0, we need the most significant bit set to 1, i.e., bit 31 at 1, or something looking like v39 |= 0x80000000. This is the case with the /EU parameter.
Unfortunately, /EU should be followed by a string. Recall also from the previous function that reported log entries that we have seen such an “EU” string, it is expected to be a password:
This starts to make sense, the installer protects unpacking with a password!
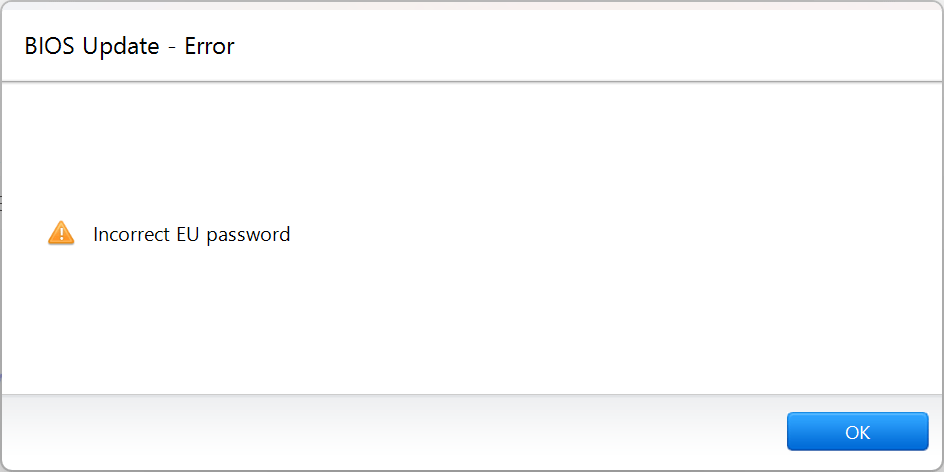
Trying an empty password with System_BIOS_update_P06AKF.exe /EU: /EXTRACT didn’t work, but at least I get a relevant error message:
The EU password is not correct, preventing extraction
EU here stands for Enterprise Update. The password is somewhat hidden in this memory value that’s located in the .data section (xmm_5ED150) but that’s not initialized when looking at it statically.
As always in such a case, we have two solutions: statically reverse-engineer the expected value, or run the installer and look for the value in memory with a debugger. I opted for the simplest solution: debugging.
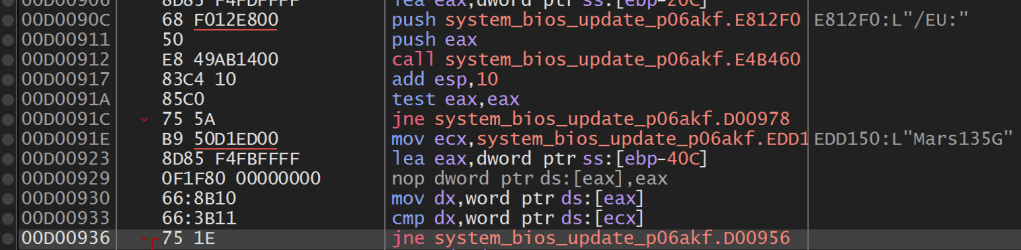
The offset of the comparison in IDA shows as 0xFD36 (file offset).
I fire x32dbg (yes, the installer is a 32-bit executable), and attach to the installer that is ready to install:
In x32dbg, under Symbols, I make sure to point to the installer binary. Then right click anywhere > Go to > File offset. Just above this comparison, the parameter with the correct password appears…
x32dbg of System_BIOS_update_P06AKF.exe around file offset 0xFD36
Yay! Password is: Mars135G
We can now try to run the extractor with System_BIOS_update_P06AKF.exe /EU:Mars135G /EXTRACT. This time the installer is silent, extracts and leaves. We get all the files properly extracted!
When encountering blocked AMI drivers, it is then possible to run the actual installer (AFUWINx64_s.EXE) from a command prompt in Windows Recovery and perform the BIOS update using the parameters that appear in the DebugAppLog.txt.
What is the common issue between the Tor Browser being stuck at establishing a connection, failing to list Android devices with adb, and Inkscape not launching? A big mystery. ChatGPT couldn’t help much.
Symptoms
It started with weird symptoms. When I wanted to proxy my traffic through an SSH SOCKS proxy (plink -D), this wouldn’t work. Port forwarding with -L 8000:localhost:8000 wouldn’t work either. I would get errors that suggest it’s half-working, half not working. And it wasn’t an SSH problem. When I ran these SSH commands in a VM, they would work!
Then, I couldn’t use eduVPN, the Dutch university VPN solution. After authentication, it would be blocked at “configuring” the network. Since eduVPN is based on OpenVPN, and I had two OpenVPN instances running, I figured there might be a conflict. One is the vanilla OpenVPN community version, the other one is a Dutch-hardened OpenVPN-NL. I uninstalled both of them, but it didn’t help.
Another time, I want to use the Tor Browser that I was using without issue before. It doesn’t bootstrap the connection. After I clicked “Connect”, it would usually do its thing, collect info on nodes, and establish a connection. Here, I didn’t even see the progress bar. It was doing nothing. No other connection options (bridges) worked either.
Another day, I needed to run something through adb on my phone. I have the Android Studio installed, and used to have no problem listing my devices and running a shell on them. That day, adb devices never returns. Quite awkward. I get a prompt on my phone to allow my computer, so things are somewhat working, but it cannot proceed completely.
That same day, I also wanted to convert a PDF to SVG using Inkscape. I try to run it, but it never comes up. I remember Inkscape takes a few seconds to show up. I look at the process, it’s doing nothing.
Five seemingly different problems.
Loopback interface
I figured that at least in some of these cases, there was localhost involved. SSH proxy or port forwarding means I need to contact localhost. adb starts a server on localhost too. What about Inkscape?
I started listening with Wireshark on the loopback interface, and saw that surely, Inkscape started talking on localhost! It talks to gdbus.exe, a GTK “D-Bus” something. The traffic suggested there was a failed authentication with no follow-up: REJECTED EXTERNAL DBUS_COOKIE_SHA1. At this stage, I asked ChatGPT, and it tried to find issues. It suggested disabling whatever authentication there was via environment variables. Didn’t work. Clear Inkscape AppData profile. Nop. Try to use ProcMon and capture something useful. gdbus.exe was browsing HKCR then stopped. Could it be a corrupted registry hive? Permission issues on some of these registry keys? A security solution intercepting some of these calls? None of that.
Then it struck me: I have multiple problems involving localhost connections, they must all be related.
I asked ChatGPT how to reset all my network stack. I must have messed up something by fiddling with my settings, I figured.
Under Network & internet > Advanced network settings, I tried “Network reset”.
Rebooted. Tested Inkspace and SSH proxy. Didn’t work.
ChatGPT gave me a few commands to run:
netsh winhttp reset proxy
ipconfig /flushdns
netsh winsock reset
netsh int ip reset
netsh advfirewall reset
shutdown /r /t 0
This resets Winsock, IP parameters, Windows Firewall rules, removes possible system proxy settings. Rebooted. Tested. Didn’t work.
ChatGPT suggested checking 3rd party filter drivers bound to network adapters:
I had indeed many interfaces and filters: VMware Workstation, VirtualBox, another VPN app, npcap (Wireshark), wireguard, etc. I uninstalled many of them. Didn’t work.
Loopback test
I insisted to ChatGPT that something was wrong for localhost traffic only. It suggested some EDR/firewall things might be blocking. I don’t have an EDR solution on this computer, but ok.
Let’s do a test, it suggested. In PowerShell, run a server and a client that connect to each other, and exchange 50MB of data. If it works, it must be an application problem, not a network problem.
The test succeeded, 50MB were transferred on localhost. But I still thought this had to do with localhost traffic. What’s going on?!
I captured instances of the SSH port forwarding not working. By connecting to a HTTPS server through SSH, I can establish a TLS connection, see the certificate, but then TLS handshake stops before I can send data. This is super awkward. When I let this same SSH proxy listen on 0.0.0.0:8000 locally, and connect to it from a VM via the shared NAT interface, I have no problem, the TLS connection finishes, and I can request a page. So, I have incomplete/truncated connections.
All traffic made by curl https://localhost:8008 on plink -L 8008:localhost:8000 server
The Wireshark capture showed the connection on localhost was done over IPv6. ChatGPT suggested IPv6/IPv4 problems such as a “split-head” problem, where IPv4 would be working but the IPv6 server was actually listening from another process. None of this was useful. By forcing IPv4 only, the problem remained.
All traffic made by curl https://127.0.0.1:8008 on plink -L 8008:localhost:8000 server
TCP Congestion Algorithm
I then remembered that months ago, while reviewing a thesis on TCP congestion, I explored the supported TCP congestion algorithms in Windows and figured there is a more advanced algorithm that’s supported but not enabled by default. This is typically a case where I want to switch to the best algorithm and enjoy faster speeds, especially on my local network.
See, the TCP protocol is built in a way that it wants to maximize the use of your bandwidth without creating congestion on the network. Whenever there is packet loss, it assumes you’ve saturated the network, and a congestion avoidance algorithm kicks in. It typically reduces the speed, and let the network recover. It would progressively increase the speed again until more packets got lost. This mechanism is not super smart, so there are newer algorithms that allow for faster recovery.
Modern Windows uses CUBIC and I found that BBRv2 sounded more promising, so I ran this command months ago:
netsh int tcp set supplemental Template=Internet CongestionProvider=bbr2
I didn’t necessarily notice any difference in speed tests, but decided to leave it as it is.
So I first confirmed whether this setting survived the network reset I did, and yes the Internet template was still configured with BBRv2. I asked ChatGPT whether this change could be the culprit to my problem, and it said it was plausible but didn’t see immediately how that would be the case.
I reverted back to CUBIC, and without even rebooting, I could proxy through SSH, I could start Inkspace, I could connect through Tor! I could connect via eduVPN. Just like magic!
The command to revert back is:
netsh int tcp set supplemental template=internet congestionprovider=cubic
ChatGPT: Why BBR2 can break things
Congestion control decides how quickly TCP ramps up sending and how it paces bursts. On a near-zero RTT path (localhost), small mistakes in pacing/ACK handling can look like “connects but then nothing progresses”, especially for apps that do lots of short writes/reads or rely on timely flush behavior.
Whether this is accurate or not, I don’t know, but I’m sticking to CUBIC for now! Fixed 5 problems at once.
This guide walks you through the painstaking path of migrating old GELI-encrypted pools to new ZFS-encrypted pools, assuming you have spare disks to store the entirety of your data temporarily. We also emphasize on the confidentiality of the data, something that does not necessarily come out-of-the-box in TrueNAS, at least not for all possible options.
Introduction to the GELI problem
If you ever created an encrypted pool back in the days (circa ~2020, not very far from now, actually) from FreeNAS 11.3, your pool is encrypted with GELI. GELI got deprecated soon after, starting from TrueNAS 12.0 and appears as “Legacy Encryption”. It is still possible to open such pools but not create new ones. With the end of TrueNAS CORE, based on FreeBSD, GELI pools are a hard road block that prevents upgrading your system to TrueNAS SCALE, based on Debian.
To “convert” a GELI-encrypted pool to a ZFS-encrypted pool, supported by both CORE and SCALE, the process is a headache: you cannot convert in-place. You will need at least the same amount of spare disk space as the volume consumed on your GELI-encrypted pool. That means additional disks, either in the same system or in a remote system. This tutorial assumes you plugged those temporary disks in the same system.
Not only that, but if you actually care about not leaking your encryption keys, TrueNAS does not adequately warn you of the consequences of your choices. In making this tutorial, I attempted migration via several routes, some stored my encryption keys in an unencrypted database, while others didn’t. Some of this is due to how TrueNAS approaches ZFS encryption, so you need to become familiar with these assumptions as well.
This tutorial expands on the generic instructions given in TrueNAS documentation and puts particular emphasis on data confidentiality.
In preparation for the real migration of my NAS, I simulated the process in a virtual machine. I installed FreeNAS 11.3-U5, created an encrypted pool, assigned a passphrase to it, then upgraded using the ISO of TrueNAS 12.0-U8.1, then to 13.0-U6.8.
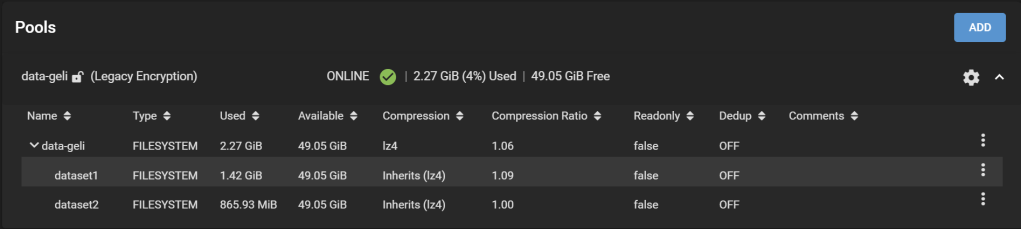
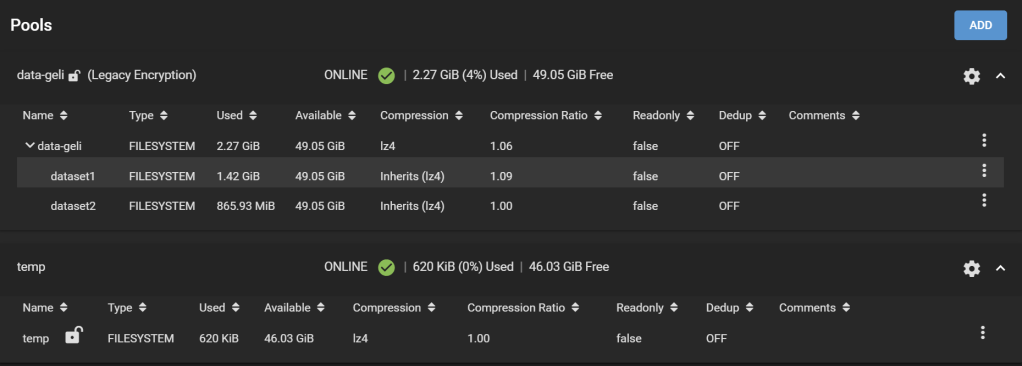
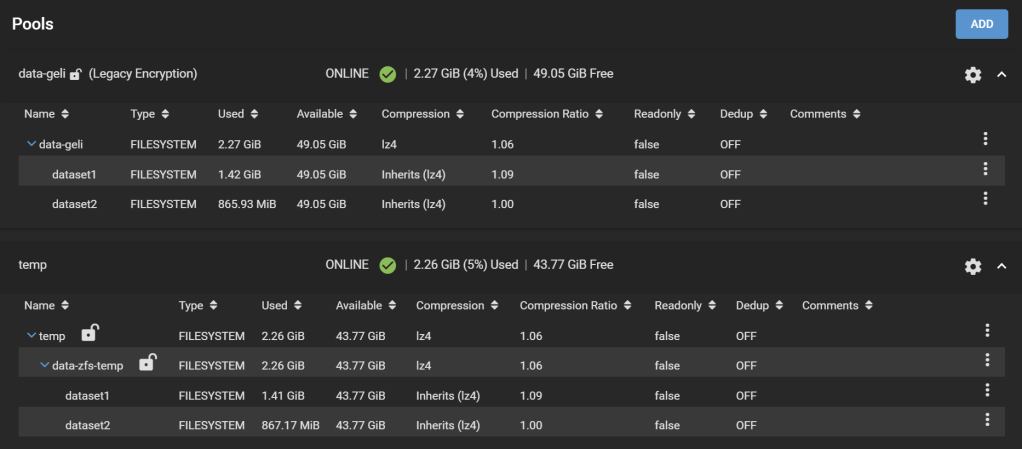
Here is the pool we are going to work with:
Test pool encrypted with GELI on FreeNAS 11.3-U5, shown in TrueNAS 13.0-U6.8
Our pool is called data-geli, is backed by 5x 20GB virtual disks in RaidZ2, and has two datasets, provisioned with 1.42GiB and 865.93MiB worth of data to make it look more realistic.
I’m going to explain two methods to migrate your data, matching different confidentiality requirements. (Method #2 is still under construction as this moment).
Requirements met in Method #1:
All existing snapshots and dataset configurations (e.g., compression,
No plaintext data should be written to disk. This excludes decrypting in-place.
The data transferred to the temporary disks needs to be encrypted at all times on the disks.
If the process is interrupted at any stage, it can resume and no plaintext data should be exposed in the storage disks.
Progress should be shown because it will take days for the real system.
This list matches a threat model where only the confidentiality of the data storage disks is important: In case when you 1) RMA disks, 2) throw disks away without securely deleting the content, or 3) get disks stolen but the boot pool is not stolen.
Requirements met in Method #2:
Here, the threat model is stronger: we consider someone who could get physical access to the server and freely explore the TrueNAS database on disk. We also consider that secrets written to disk (or boot pool) can be recovered later through forensics even though they are logically deleted. On top of the above requirements, we add:
6. Encryption keys for the migration, all master keys/passphrases/data encryption keys, including the final keys, should never appear on unencrypted disks. This requirement prohibits the use of the GUI for migration, because keys are stored as part of the configuration. This method is inherently less “user-friendly”.
Difference between GELI and ZFS encryption
Coming from the GELI era, you must understand that ZFS encryption is not an exact replacement of GELI.
GELI is a full-disk encryption technique that hides everything written to the disk, including the metadata about datasets. On the other hand, ZFS encryption is a per-dataset encryption technique and preserves all dataset metadata in plaintext. This includes dataset names (even child datasets), dataset hierarchy, space used/available/referenced per dataset, and whether they are encrypted. Therefore, confidentiality is limited to only the content of the datasets, but not the existence and properties of the datasets themselves. So, make sure their names don’t reveal confidential information already. More info on the differences in this guide.
Ready?
Method #1. GUI-friendly method
Step 1. Prepare the temporary pool
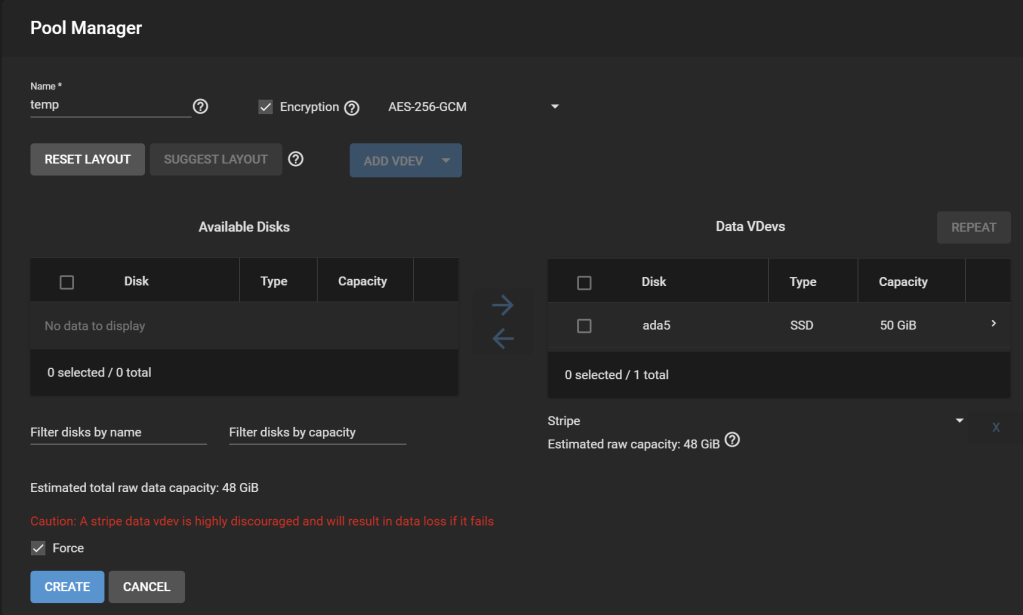
After adding the necessary additional disks to the system, with an effective capacity at least as great as the amount of data consumed on the original pool, add a new pool: Under Storage > Pools, click Add. Select Create a pool. Let’s name it temp.
Tick “Encryption“, accept the warning. I only added one disk here, so the new pool is a stripe, which leads to another warning about how unsafe this is (i.e., if this temporary disk fails during the migration process, we are doomed).
Temp pool creation
On the real system, I would have a backup of the pool on external storage, so a stripe is OK for the migration. Worst case, I can restore from the backup.
Why not migrate using the backup? It is not a replication of the ZFS pool that includes all snapshots nor preserves the configuration of the pools. It is a mere copy at the file level over SMB. Ideally, I want to restore the pool and all its datasets as if nothing happened, so this would not be the most suitable way.
Download your encryption key for the pool as suggested and you’re done.
Step 2. Add a temporary dataset
Temp pool created, with its root dataset
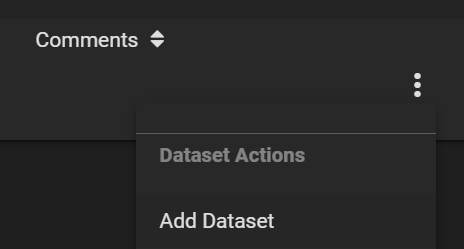
The temp pool comes with a root temp dataset. Because it is not supported to replicate a ZFS pool to an existing encrypted dataset, we must create a child dataset in the newly created temp dataset to receive our data. Click on the three dots on the right of the row for the temp dataset, and click Add Dataset.
Add a dataset to temp
Let’s call our new dataset data-zfs-temp. Leave all options as default as it will be overwritten soon.
Placeholder dataset created
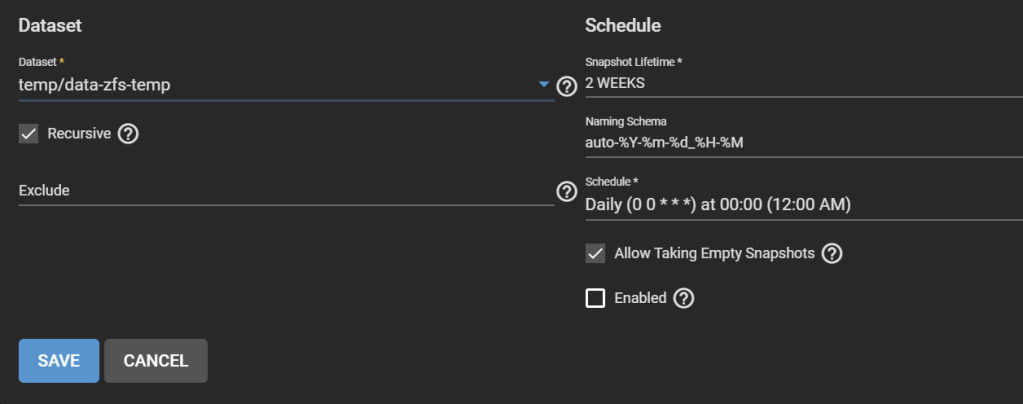
Step 3. Create a Periodic Snapshot Task
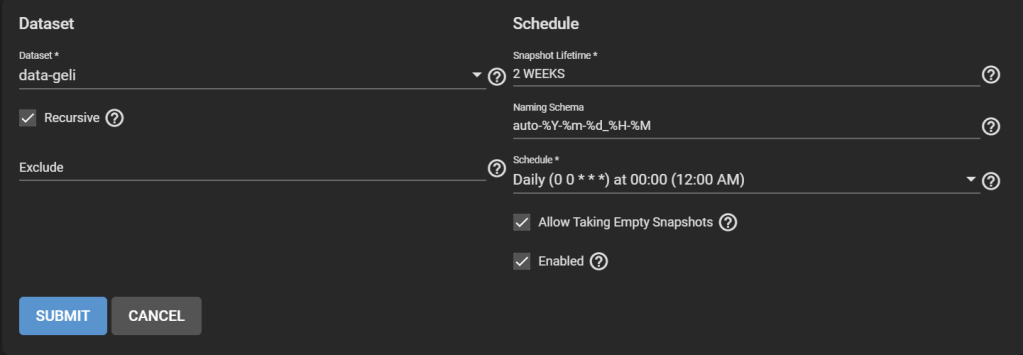
Don’t worry, this is just an artifact of how replication works in TrueNAS. Go to Tasks > Periodic Snapshot Tasks, then Add one. Select the original pool. Check Recursive.
Adding a new periodic snapshot task to make TrueNAS happy later
Step 4. Take a snapshot of the original pool
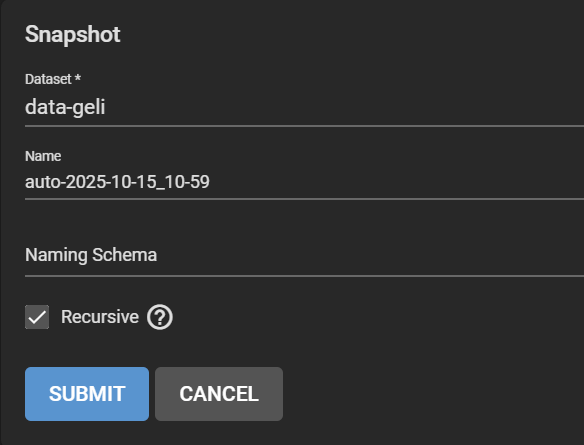
Go to Storage > Snapshots, click Add. Select the original dataset, in our case ashley-test. Change the “manual” part of the suggested name to “auto” to match the periodic snapshot scheme and pretend that it ran. Make it recursive to snapshot all child datasets.
Create a snapshot and replace “manual” by “auto” to match the periodic snapshot task
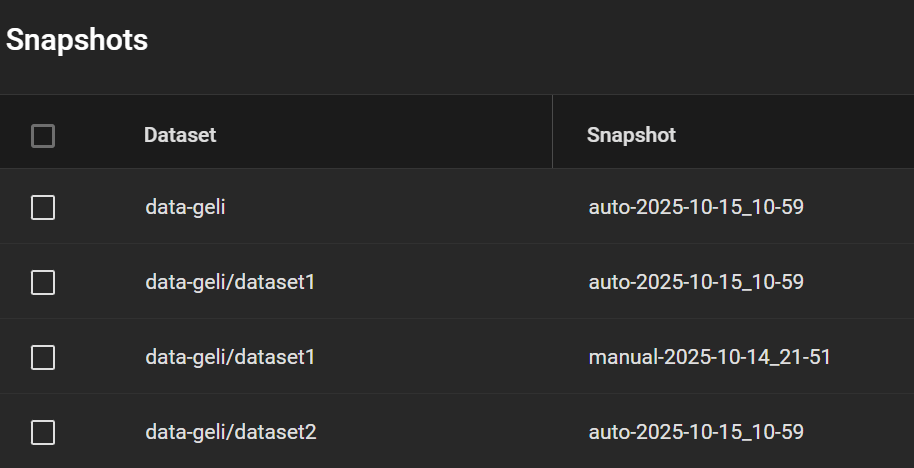
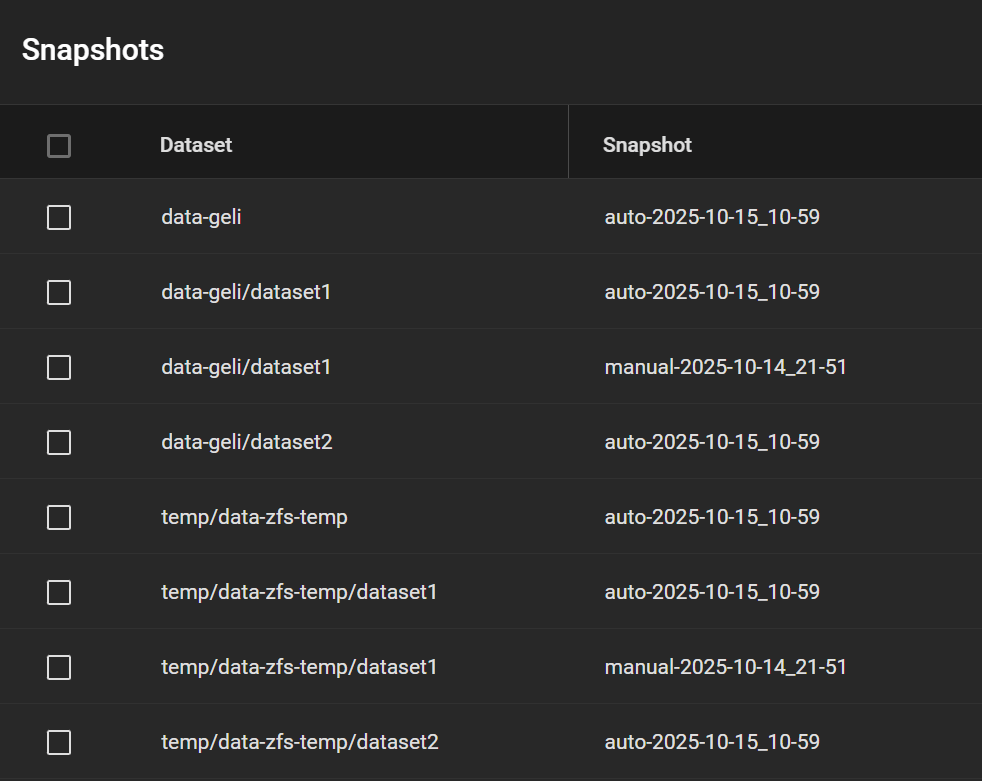
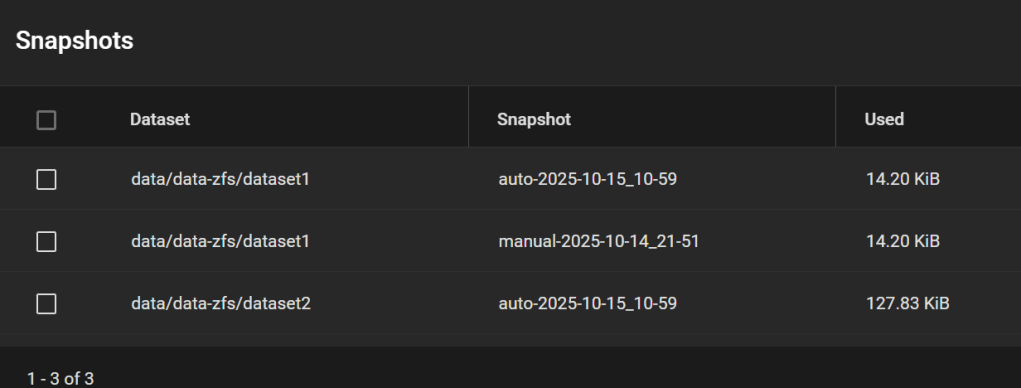
My snapshots then looked this like, including a manual snapshot I made earlier (my real system has many other snapshots, so I want to test whether this one appears in the replicated pool).
Overview of the snapshots prior to migration
Step 5. Create and run a Replication Task
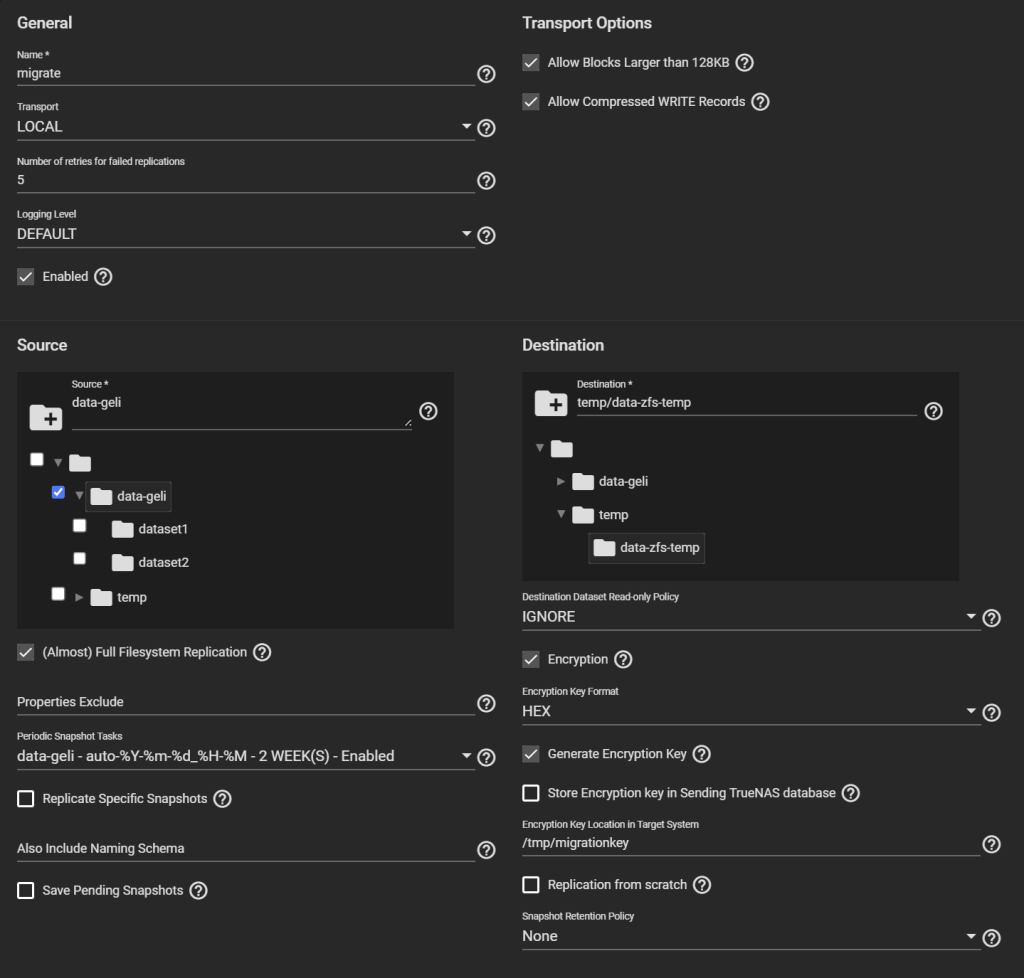
Go to Tasks > Replication Tasks, and click Add, and click Advanced Replication Creation. Here, there are several things to configure.
First, give it a name (“migrate” here).
Transport: LOCAL.
Select the original pool as the Source, and the temporary child dataset we created as the Destination.
Select “(Almost) Full Filesystem Replication” under Source.
Select the newly created entry under Periodic Snapshot Tasks.
Destination Dataset Read-only Policy: IGNORE.
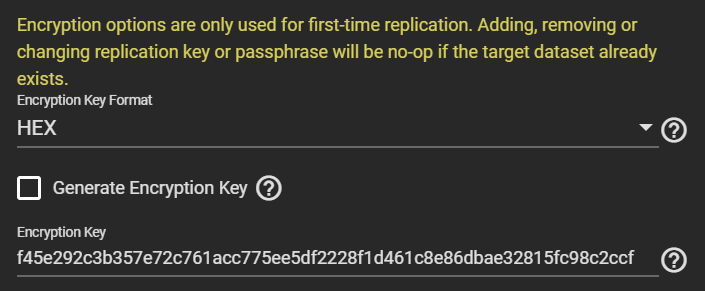
Tick Encryption, otherwise, despite being a child of an encrypted dataset, your temporary pool won’t be encrypted, contradicting Requirement 1.
Select HEX or Passphrase, but this won’t change the fact that TrueNAS will storage the generated key/passphrase to /data/freenas-v1.db on the boot pool. This means, while this replication task exists (running or not), the key to decrypt it is exposed. This is a vulnerable period before you can delete the task and the corresponding data. If you are OK with this, then go ahead, otherwise consider Method #2 instead.
Uncheck “Store Encryption key in Sending TrueNAS database“. When you uncheck this option, the new field “Encryption Key Location in Target System” appears, choose something under /tmp (mounted as tmpfs, you can verify with “df -h /tmp“), e.g., /tmp/migrationkey. This step is needed as the passphrase doesn’t get passed as a parameter of some commands but is read from a location. The file will be removed after a reboot. As long as the recovery task exists, the key for your temporary storage is kept. Say, if the replication process is interrupted, it can be resumed. If you reboot, you can find the generated key by editing this task.
Uncheck Run automatically.
Click Submit
Configuring the Replication Task
Edit the task to copy the generated key.
Next, click Run Now.
Step 6. Check the temporary pool
The replication task will go from Pending to Running to Finished.
Finished replication task
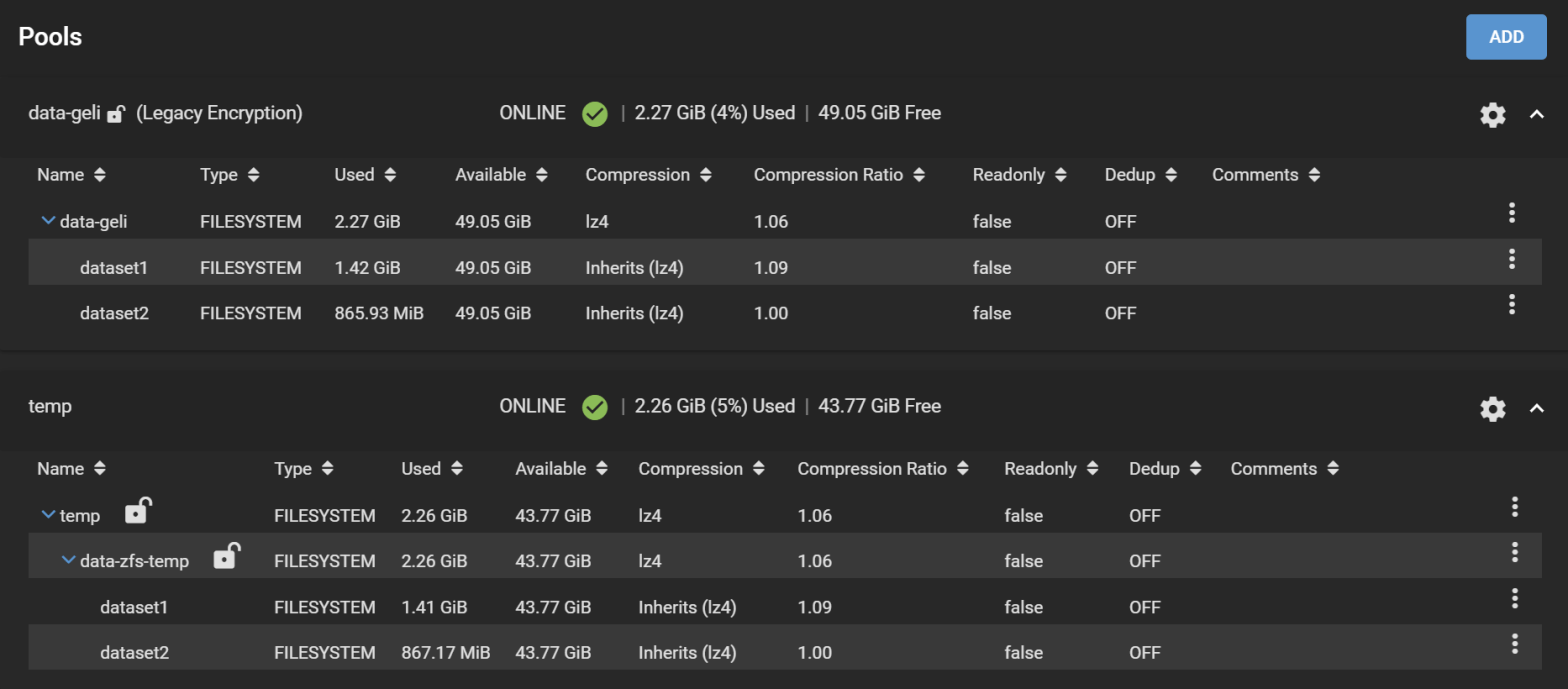
The new temporary pool now holds all your data encrypted with the passphrase you set and with ZFS encryption.
GELI-encrypted pool is replicated to the temporary ZFS-encrypted pool
All snapshots are preserved as well.
Snapshots got replicated too, even manual ones
Notes on Step 6. Insights from a real migration
Strangely, on the real system, on a dataset with some 10k files, 1k folders, the effective disk size shrunk notably. The dataset has 2.33TiB worth of data, and it took 2.58TiB of storage before (at a compression ratio of 1.04), and on the temporary pool this dataset now takes only 2.12TiB (interestingly, the compression ratio didn’t change). This is reflected on the “Size on disk” field reported by Windows, and also matches the Used field under the Pool page on TrueNAS.
This is not due to a change in snapshots (in fact, snapshots got copied as well, and this dataset didn’t have any snapshot other than the one I just made for the replication anyway). This should be due to reduced fragmentation when data was copied. Nice benefit!
An old dataset viewed over SMB on Windows
The dataset once replicated to the temporary disk
Step 7. Erase the original pool
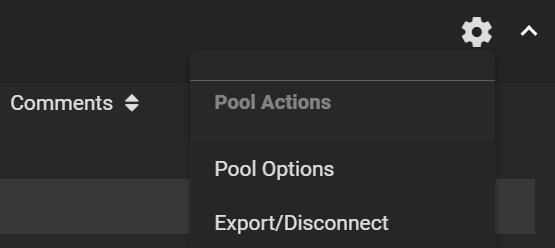
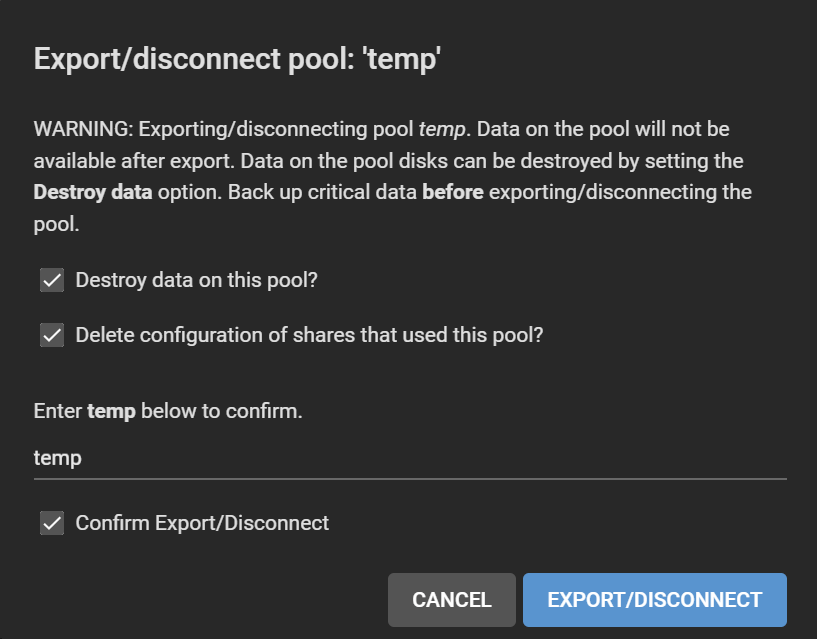
Go to Storage > Pool, click on the gear icon on the old pool, select Export/Disconnect.
Gear icon > Export/Disconnect
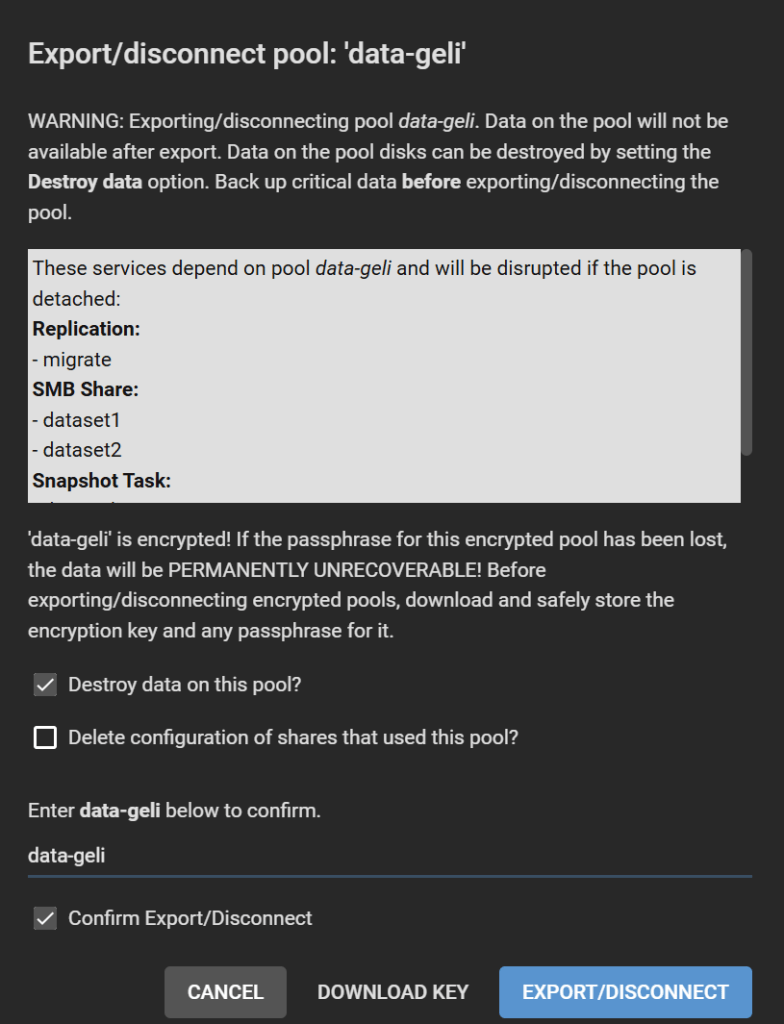
Check all boxes, or maybe keep “Delete configuration of shares that used this pool?” unchecked if you want to restore these shares after re-migration, though you will need to adjust the path for each of them. Follow the instructions and click Export/Disconnect.
Confirmation of disconnection
Step 8. Recreate a new pool
In Pools, click Add, Create Pool. Configure the vdevs the way they were before. We will call this pool data. Do NOT enable encryption! If this pool is your “default” pool, it will store data in TrueNAS SCALE that need to be unencrypted, such as ix-applications. It is more difficult to set the pool as encrypted in this case. We will solve this issue by creating all our datasets within an encrypted dataset instead of encrypting the whole pool.
New pool creation
Create an Encrypted dataset, named data-zfs in our case.
New dataset creation
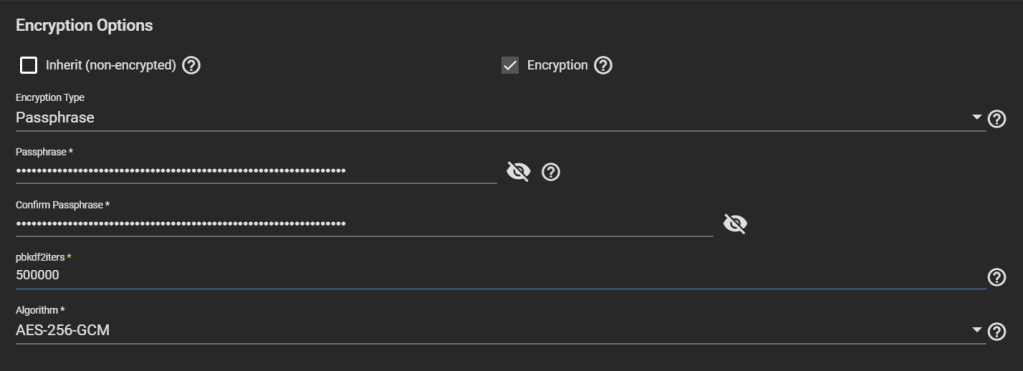
Make it encrypted. Choose Encryption Type: Passphrase. Choose a strong one, possibly your final passphrase. The number of PBKDF2 iterations defaults to 350,000, but other systems like VeraCrypt use 500,000 by default, so feel free to increase TrueNAS’ default value.
Setting encryption settings on the data-zfs pool, with an increased number of iterations in PBKDF2
Big warning:DO NOT CHOOSE “Key” as Encryption Type. TrueNAS considers that if you use a “key” instead of a “passphrase”, you want to have it stored in TrueNAS database, which is written unencrypted in the boot pool. This helps unlock the dataset automatically at boot, which might not be what you want.
Step 9. Replicate to the new pool
Under Tasks > Periodic Snapshot Tasks, edit the periodic replication task we created earlier and change the dataset to the temporary dataset created earlier that contains all replicated datasets, in our case temp/data-zfs-temp. Enable the task.
Adjusting the periodic snapshot task
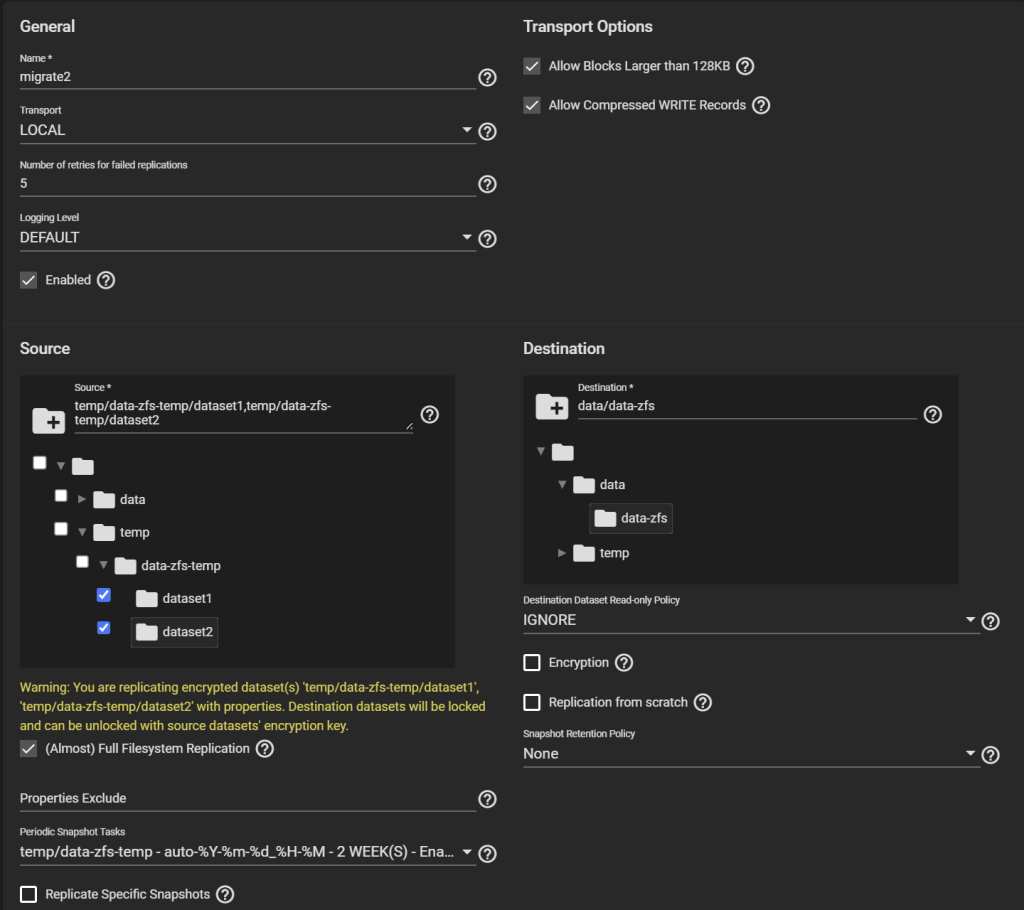
Under Tasks > Replication Tasks, after you make sure you copied the key generated for the previous replication task, delete that replication task and create a new one. Use the same settings as before, but choose as the Source datasets ALL the child datasets of the temp dataset and not the temp dataset it self (temp/data-zfs-temp/*), and the Destination as the new dataset on the re-created pool (data/data-zfs).
Replication task configuration to the new pool
Create and run the task.
Datasets replicated “back” in the new pool
Step 10. Setting passphrases
Now things are still messy. The child datasets on the new pool are managed differently than the parent, they don’t inherit the encryption of the parent. And they use a key that was written to disk for the first replication task. We need to change all that.
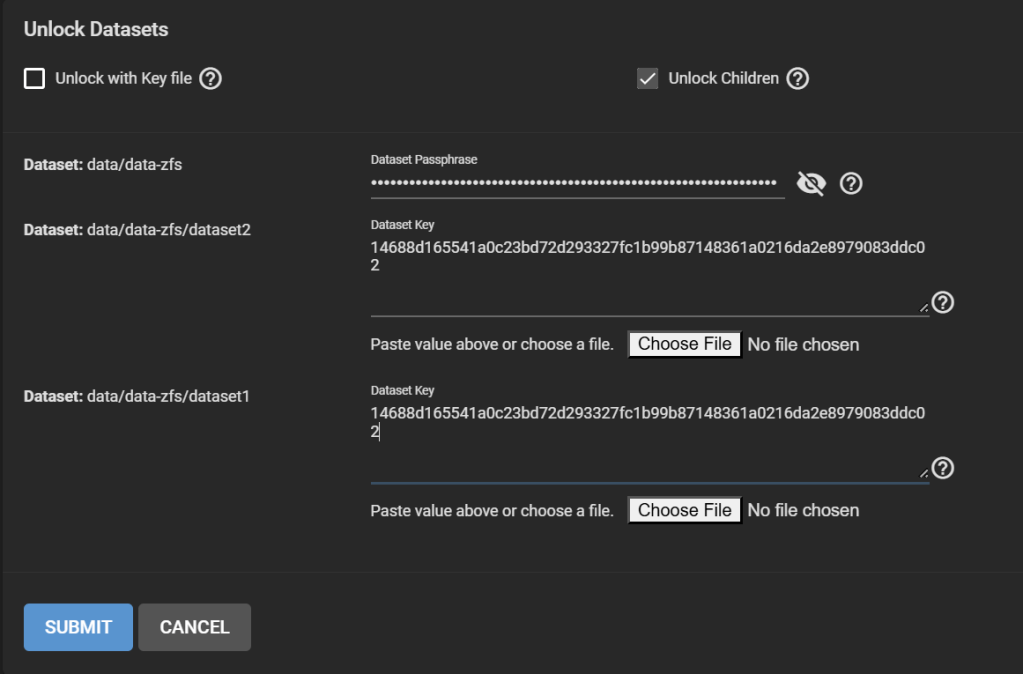
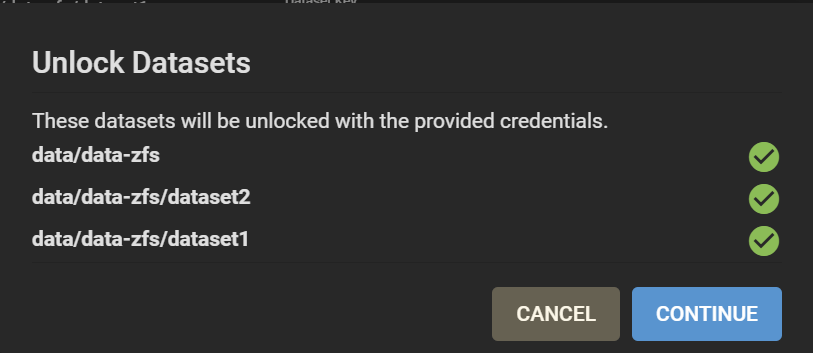
First, lock the data-zfs dataset: three dots > Lock. Then Unlock. This makes it easier to unlock all your datasets. On the Unlock screen, untick “Unlock with Key file”. Enter the passphrase for the data-zfs dataset you created in Step 8. Enter for all your child datasets the key that was generated in Step 5 and that you should have copied either at that moment, or in Step 6. You can still find it under /tmp/migrationkey if you did not reboot.
Unlocking all datasets, different keys/passphrase for the data-zfs and other datasets
Datasets unlocked, a nice step
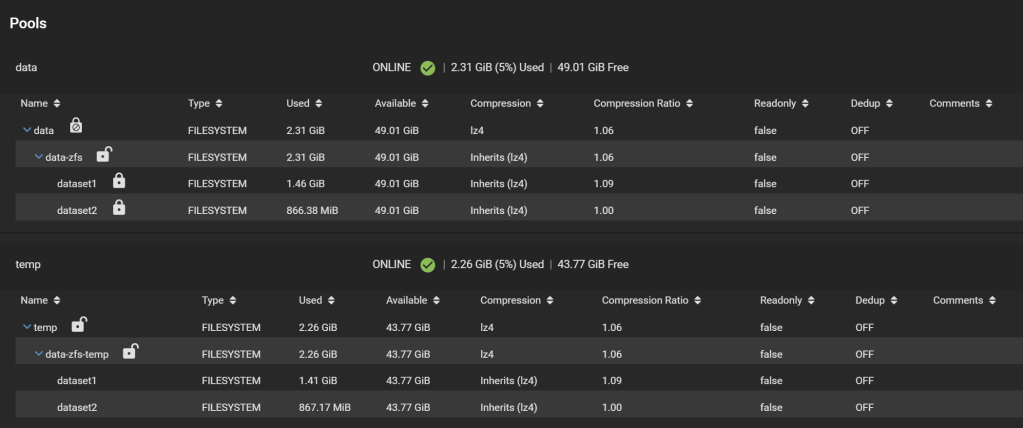
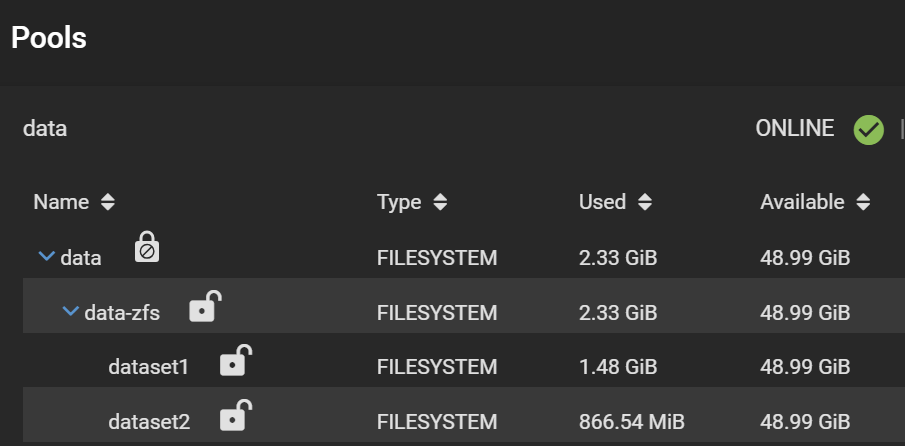
Good. Now, your pools look like this:
Unlocked child datasets
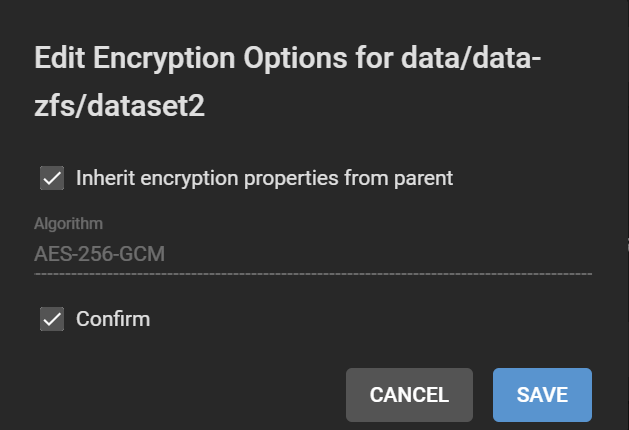
Note the separate padlocks on each dataset, meaning they are governed by different keys/passphrases. Next, we want to make all the child datasets inherit the encryption key (or passphrase in this case) from the data-zfs dataset, so we can unlock them all at once using the passphrase we set. For each child dataset, click on the three dots, Encryption Options. Then tick “Inherit encryption properties from parent“.
Inheriting the parent encryption properties to avoid unlocking child datasets individually
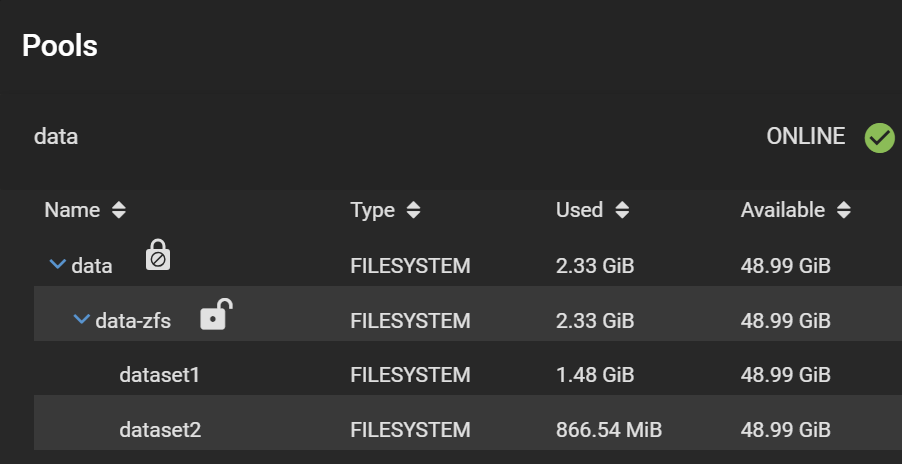
Finally, your datasets should look like this:
Change in UI after encryption property inheritance
And the snapshots are all here:
Screenshot of the Snapshot page taken after Step 11
Step 11. Cleaning up
Delete /tmp/migrationkey, either from the shell (rm /tmp/migrationkey), or by rebooting.
Tasks > Replication Tasks> remove the task.
Tasks > Periodic Snapshot Tasks > remove the task.
On the temp pool, gear icon > Export/Disconnect. Tick everything. Click Export/Disconnect.
Byebye temp pool
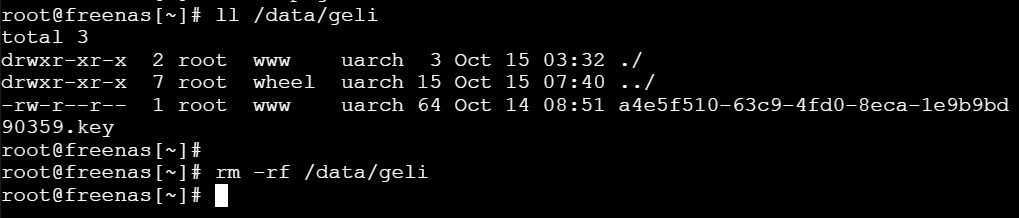
Remove old GELI encryption keys under /data/geli. They were used in conjunction with your passphrase to unlock the disks.
Removing old GELI keys using rm -rf /data/geli
Adjust your SMB shares, since the dataset paths have changed.
Done!
Method #2
This section is under construction. It will hopefully involve the proper zfs send/recv commands after I try them out.
Appendix: Why I’m not happy with Method #1: Encryption keys written to disk
due to the storage of the encryption key in the replication task settings in the unencrypted freedb-v1.db. OK, technically encrypted, but using the static key located in /data/pwenc_secret.
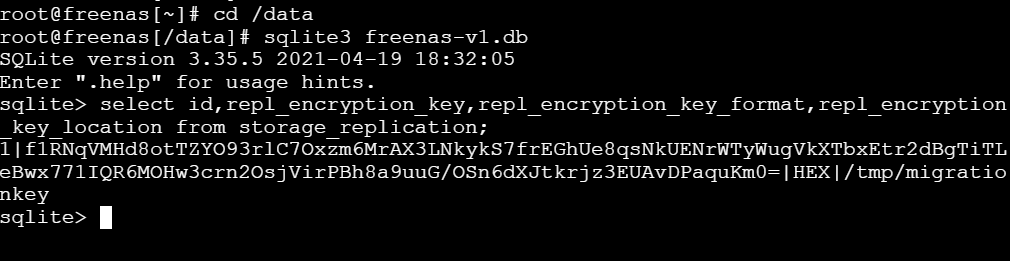
We can verify that the encryption key/passphrase for the replication task is indeed written to disk. After creating the task in Step 5 in Method #1, run from a shell:
Retrieving the encrypted key for the replication task in TrueNAS database
With a script adapted from https://milek.blogspot.com/2022/02/truenas-scale-zfs-wrapping-key.html?m=1, simply change at the end: for row in dbcur.execute('select id,repl_name,repl_encryption_key from storage_replication'): id,repl_name,repl_encryption_key = row print(f'dataset: {repl_name}\n key: {pwenc_decrypt(repl_encryption_key)}\n')
And run it:
Decrypting the key
The output shows the key (or passphrase if you chose that) with which the data of the temporary dataset is encrypted. It also matches what the GUI shows:
The recovered key matches what the TrueNAS Replication Task web interface shows
Since replicating the temporary datasets to the final pool copies the encrypted data as is without re-encryption, it means this key exposure has long-term effects: anyone able to grab this key during replication can decrypt your final pools unless you change the key later on (and you assume nobody copied at least the headers of your pool that contain the actual data encryption key, DEK). The DEK is generated when the encrypted dataset is created and does not change over the dataset’s lifetime.
Let’s get rid of the TrueNAS GUI to avoid all these complications!
When you run an FTP server in 2025, like a surviving dinosaur, and you have the presence of mind to add a TLS layer, you may find yourself puzzled by the lack of support for certificate renewal in commercial FTP server software. The idea of reverse proxying the FTP server makes sense, but FTP likes to cross protocol layer boundaries, making things complicated. Here is how to reverse proxy FTP with TLS using OpenResty (e.g., as used in Nginx Proxy Manager).
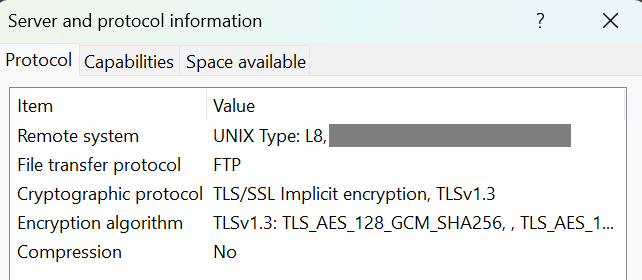
FTP is TLS-aware
A typical modern FTP over implicit TLS connection starts with an exchange like this one:
[11:55:02] [R] Connecting to x.y.z.a -> IP=x.y.z.a PORT=21
[11:55:04] [R] Connected to x.y.z.a
[11:55:04] [R] TLSv1.2 negotiation successful...
[11:55:04] [R] TLSv1.2 encrypted session using cipher ECDHE-ECDSA-AES256-GCM-SHA384 (256 bits)
[11:55:04] [R] 220 [whatever FTP software name] ready...
[11:55:04] [R] PBSZ 0
[11:55:04] [R] 200 Command PBSZ okay.
[11:55:04] [R] USER your_username
[11:55:04] [R] 331 User name okay, need password.
[11:55:04] [R] PASS (hidden)
[11:55:05] [R] 230 User logged in, proceed.
[11:55:05] [R] SYST
[11:55:05] [R] 215 UNIX Type: L8
[11:55:05] [R] FEAT
[11:55:05] [R] 211-Extensions supported
...
[11:55:05] [R]  PBSZ
[11:55:05] [R]  PROT
...
[11:55:05] [R] 211 End
[11:55:05] [R] PWD
[11:55:05] [R] 257 "/" is current directory.
[11:55:05] [R] PROT P
[11:55:05] [R] 200 Command PROT okay.
[11:55:05] [R] PASV
[11:55:05] [R] 227 Entering Passive Mode (x,y,z,a,41,5)
[11:55:05] [R] Opening data connection IP: x,y,z,a PORT: 10501
[11:55:06] [R] MLSD
[11:55:06] [R] TLSv1.2 negotiation successful...
[11:55:06] [R] TLSv1.2 encrypted session using cipher ECDHE-ECDSA-AES256-GCM-SHA384 (256 bits)
[11:55:06] [R] 150 Opening BINARY mode data connection for MLSD.
[11:55:06] [R] 226 Transfer complete. 875 bytes transferred. 56.97 KB/sec.
[11:55:06] [R] List Complete: 843 bytes in 2 seconds (0.5 KB/s)
Several things happen here. The FTP client starts a TLS connection with the server on the main port 21. Of interest to us, the client issues the PBSZ 0 command to set the protection buffer size. All FTP clients I use set it to 0. Next, the client sends a PROT P command, informing the server that all control + data channels must be encrypted.
This PROT (Data Channel Protection Level) command is important, because every time you list a directory or transfer a file, you must establish a new connection to the FTP server over a data port (if you use the “passive mode”, as everyone does). Whether this new connection must be TLS-encrypted or not is a relevant question.
PROT has 4 options:
C – Clear: Plaintext data connection (big no!)
S – Safe: “data will be integrity protected”
E – Confidential: “data will be confidentiality protected”
P – Private: “data will be integrity and confidentiality protected”
The RFC says: “The default protection level if no other level is specified is Clear.”
If you take TLS off your FTP server, making it operate as simple plaintext FTP, and add/remove TLS at a reverse proxy, your FTP server has no idea that TLS is involved. Therefore, when a TLS client connects over TLS to the FTP server via the reverse proxy, it first sends the PBSZ 0 command, and your FTP server will be like WTF DUDE this is a plaintext connection! Indeed, as per RFC 2228, “The PBSZ command must be preceded by a successful security data exchange.”
In response, the client gets confused, and this is where things get nasty.
FTP clients will react differently to this error. FlashFXP, my once favorite FTP/FXP client, unmaintained for years due to its author being jailed, ignores this problem and continues as if nothing happened. It later issues a PROT P command that receives the same treatment:
[12:06:10] [R] PROT P
[12:06:10] [R] 503 Secure command connection required prior to PROT command.
FlashFXP still ignores this error and pretends the server understood the client intends to use the data channel as a Protected channel. It then establishes a TLS connection to the data port for whatever operation (listing directory or transferring files). And this will work, given that TLS is supported by the reverse proxy and everything will correctly appear as plaintext to the FTP server!
Unfortunately, this behavior is not standard. WinSCP and FileZilla do it differently. They default to PROT C, as the RFC specifies. That means they establish a TCP connection to the data port, but instead of sending a TLS Client Hello, they either send data directly or wait for data to be received. Since the FTP client first lists the current directory, it expects the listing to come from the server, while the reverse proxy expects a Client Hello. This exchange will timeout.
Protocol-aware proxying with Lua
To effectively deceive the FTP client that the PBSZ and PROT commands were received successfully, without letting the FTP server disclose that its view of the connection is just plaintext, we need to reverse proxy to intercept these two commands and respond on behalf of the FTP server.
With vanilla nginx, this is not possible. But with OpenResty, that supports more advanced tasks written in Lua, this gets possible.
This FTP and TLS interaction issue was already encountered in the commercial firewall world a while ago. This post on the F5 community website shares a code, presumably for F5 appliances, that deals with our problem: https://community.f5.com/kb/codeshare/ftps-ssl-termination/274110
As I had no experience with doing Lua in OpenResty, I asked Grok to translate this F5 code into a Lua script for OpenResty. After a few iterations to fix bugs, it came up with the following solution. Instead of using proxy_pass to proxy the connection directly back to the FTP server, simply copy the following script.
content_by_lua_block {
    local downstream = ngx.req.socket()  -- Client socket (post-TLS)
    if not downstream then
        ngx.log(ngx.ERR, "Failed to get downstream socket")
        return ngx.exit(ngx.ERROR)
    end

    local upstream = ngx.socket.tcp()
    local ok, err = upstream:connect("x.y.z.a", 21)  -- Update to the actual FTP server IP address
    if not ok then
        ngx.log(ngx.ERR, "Failed to connect to backend: ", err)
        return ngx.exit(ngx.ERROR)
    end

    downstream:settimeout(30000)  -- 30s timeout
    upstream:settimeout(30000)

    -- Client to server
    local function client_to_server()
        while true do
            local line, err = downstream:receive("*l")  -- Read line without \r\n
            if err then
                if err ~= "closed" then
                    ngx.log(ngx.ERR, "Downstream read error: ", err)
                end
                return
            end

            local response
            if line and string.match(line:upper(), "^PBSZ%s+0$") then
                response = "200 Command PBSZ okay.\r\n"
            elseif line and string.match(line:upper(), "^PROT%s+([PCSE])$") then
                local prot_type = string.match(line, "^PROT%s+([PCSE])$")
                if prot_type == "P" then
                    response = "200 Command PROT okay.\r\n"
                elseif prot_type == "C" then
                    response = "534 Insufficient data protection.\r\n"
                elseif prot_type == "S" or prot_type == "E" then
                    response = "504 Command not implemented for that parameter.\r\n"
                end
            end

            if response then
                downstream:send(response)
            else
                upstream:send(line .. "\r\n")
            end
        end
    end

    -- Server to client
    local function server_to_client()
        while true do
            local line, err = upstream:receive("*l")
            if err then
                if err ~= "closed" then
                    ngx.log(ngx.ERR, "Upstream read error: ", err)
                end
                return
            end
            downstream:send(line .. "\r\n")
        end
    end

    ngx.log(ngx.INFO, "Starting FTPS proxy session")
    ngx.thread.spawn(client_to_server)
    server_to_client()
}
This script parses line by line the commands sent on the control port, detects the problematic commands, and responds to them. It forwards and proxies back any responses. The “PBSZ 0” command is labeled as “Essentially a no-op” in the F5 post, so nothing is done to process this command, and everything seems fine this way.
And it works! FTP clients get the responses they expect as if they connect directly to the FTP server over TLS, and the FTP server doesn’t know TLS is used at all.
NPM configuration
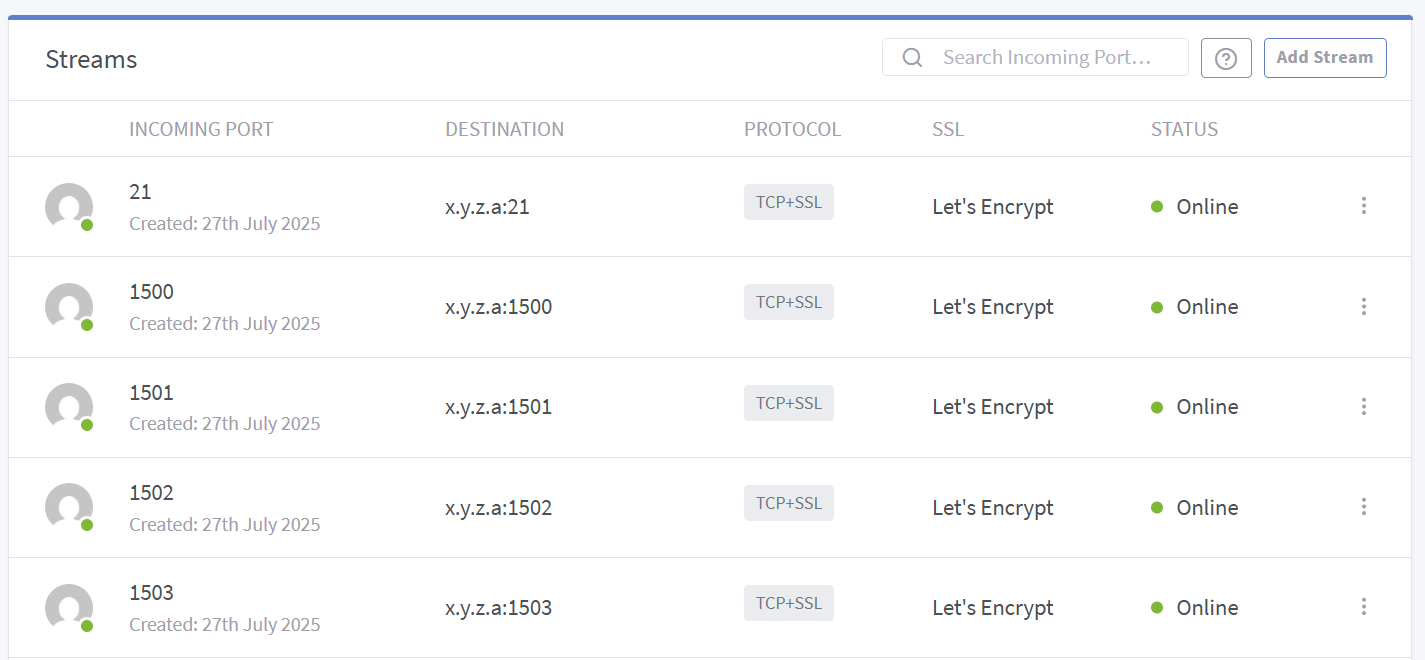
The overall configuration in Nginx Proxy Manager looks as follows:
There is one stream for the control channel (port 21), and one stream per data port (there is no way to set a range to forward at once, though an issue was made years ago on the GitHub project to request such a feature).
The actual OpenResty config file for the data channel is:
server {
listen 21 ssl;
listen [::]:21 ssl;

# Let's Encrypt SSL
include conf.d/include/ssl-cache-stream.conf;
include /data/custom_ssl/tls13-aes128.conf;
ssl_certificate /etc/letsencrypt/live/npm-25/fullchain.pem;
ssl_certificate_key /etc/letsencrypt/live/npm-25/privkey.pem;

content_by_lua_block {
  [...see code above...]
}

  # Custom
  include /data/nginx/custom/server_stream[.]conf;
  include /data/nginx/custom/server_stream_tcp[.]conf;
}
The other data channel ports config are simply:
server {
  listen 1500 ssl;
  listen [::]:1500 ssl;

  # Let's Encrypt SSL
  include conf.d/include/ssl-cache-stream.conf;
  include /data/custom_ssl/tls13-aes128.conf;
  ssl_certificate /etc/letsencrypt/live/npm-25/fullchain.pem;
  ssl_certificate_key /etc/letsencrypt/live/npm-25/privkey.pem;

  proxy_pass x.y.z.a:1500;

  # Custom
  include /data/nginx/custom/server_stream[.]conf;
  include /data/nginx/custom/server_stream_tcp[.]conf;
}
Note that I customized the TLS config. Normally, when using Let’s Encrypt, NPM includes its own TLS config in conf.d/include/ssl-ciphers.conf, but I don’t like it. I only want TLS 1.3 and I don’t care about TLS 1.2, so I include tls13-aes128.conf with the following content:
PS: I judge AES128 to be sufficient for my application, preferring it over AES256, but feel free to swap the ciphersuites in the config.
PS2: You may need to fight with the IP address given in response to the PASV (passive mode) command since you are now using a reverse proxy, but his is another story. Some clients ignore different IP addresses given here and connect to the same server IP address, while others honor the instruction, which could point to the wrong server.
When troubleshooting a problem with Comodo Firewall with the help of a staff memberfrom the Comodo forum, I found that the tool they asked me to run to gather (extensive) information about my system sends the report to a server via SSH, with hardcoded credentials, next to many other user reports, which are readable by anyone. The story was initially written in 2020, and I am releasing it now, after nobody ever replied to me 😦
Why am I still using a personal firewall in 20202025?
I use Comodo Firewall as a personal firewall application on my Windows laptop. A long time ago, this product was the most tech-savvy firewall that enabled me to configure precise traffic rules per application. The main purpose nowadays, when Windows already has an inbound firewall in place, is to be asked when a process makes new outbound connections. You do not want all your programs (including Windows components) to connect anywhere without your authorization.
Controlling which program can connect to the Internet can already kill some types of ransomware right away if it first needs to connect to some server before encrypting files. It also helps protect against some forms of malware that start with a “downloader”. And typically, malware often starts with a downloader if they just exploited a vulnerability in another software such as your PDF reader, or your word processor.
You block the downloader from fetching whatever payload from the Internet, nothing happens, you realize you are running something you shouldn’t, you find it, remove it, end of the story.
Let’s say you inadvertently install an adware/spyware, as it was bundled with another legitimate application, and the dark patterns got you: you didn’t realize you agreed to have it installed. When it runs, it typically wants to exfiltrate your personal info, including your browsing history, maybe some identifiers like your email address. Hopefully, it does not try to also include your saved passwords. With a personal firewall, you can see some unknown program tries to access a remote resource. You can “block & terminate” it. Switch to airplane mode to avoid further leaks, and investigate your system. You contain the threat.
You can also see progressively your OS turning very gossip…
Comodo Report Tool
As I was starting to receive popups from Comodo about a feature that I had disabled, namely the ability to check a file’s trustworthiness against Comodo’s cloud, I opened a ticket on their forum.
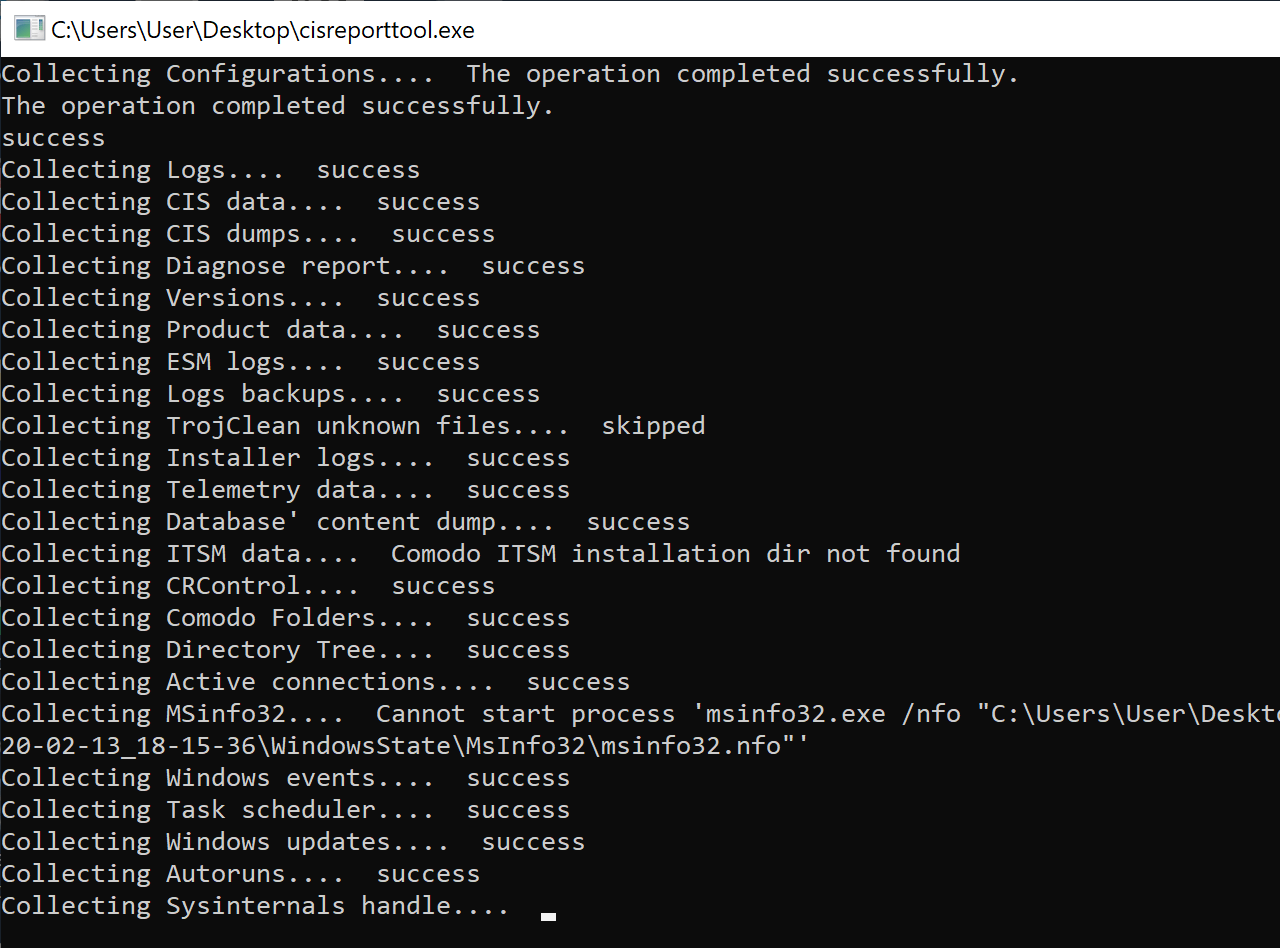
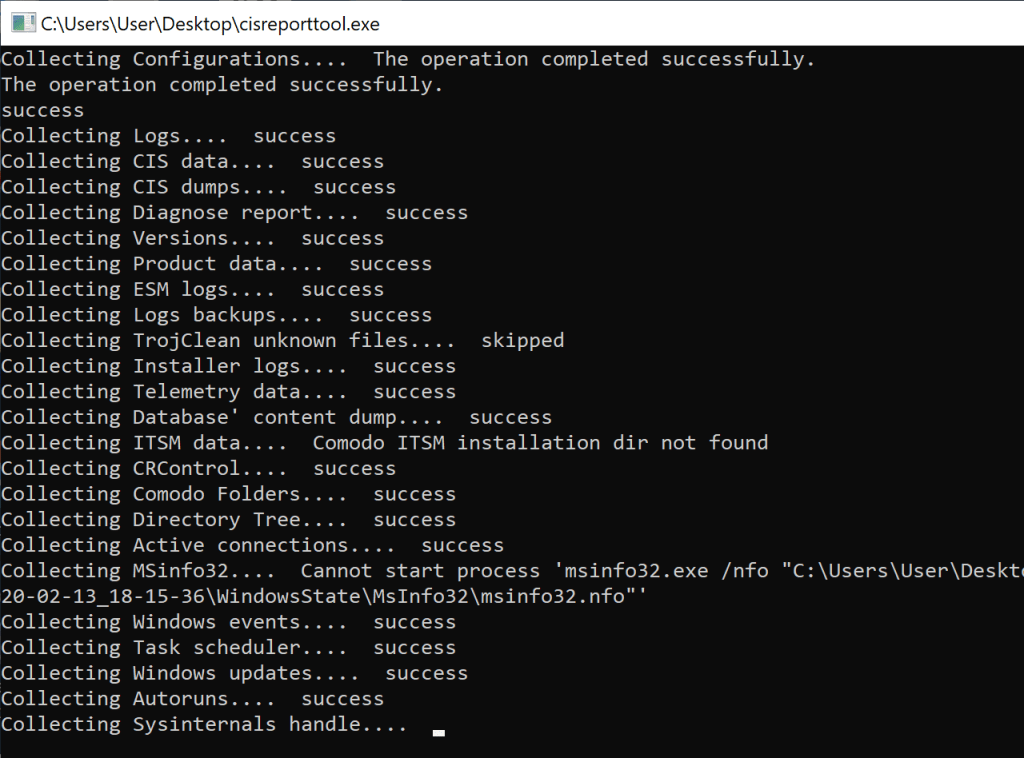
The report generation took quite some time, and seemed to gather a lot of information.
CisReportTool generating a report (I killed msinfo32 here, was taking too long)
I was a little worried that it included sensitive information, including some file paths, or all my firewall rules, exposing which programs and tools I ever ran. Basically, I was ready to dig into the report myself and vouch it before I could share it with Comodo’s staff.
Little did I know, once the report generation was done, the report was automatically uploaded to some servers. The firewall warned me about a curl.exe application connecting to some servers, but I figured it would be needed to run the diagnosis, so I allowed it… then the tool informed me that the report was uploaded successfully. Duh!
Once I checked my local copy of the report, I obviously found information I did not want to expose, but it was too late. I was curious as to how the report got uploaded with curl. It is rather unusual to rely on a generic third-party tool for this purpose.
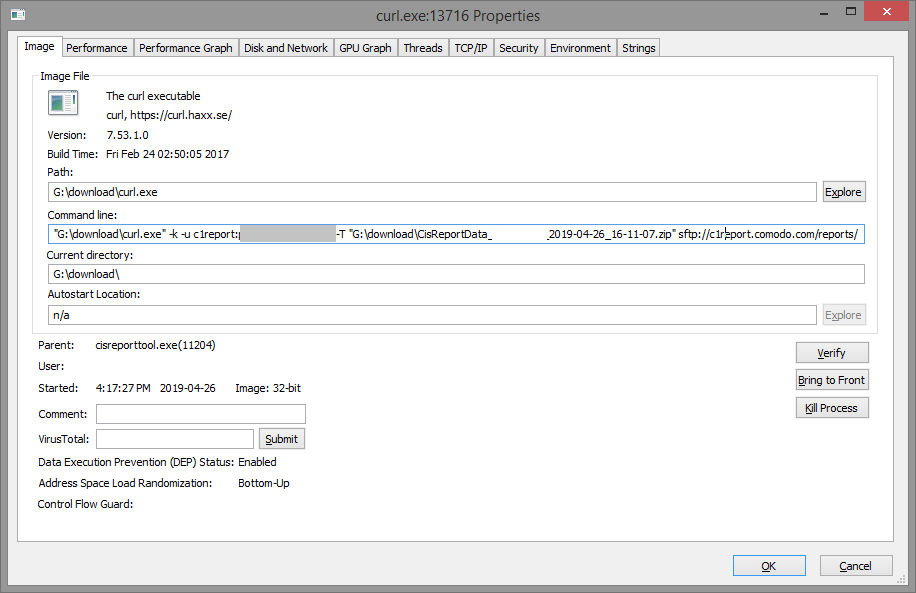
I re-ran the tool and traced I/O activities with Procmon. With Process Explorer, I could actually suspend the process before it finished. When curl.exe was called (this time I blocked it in the firewall), this is what I found…
The tool passed some credentials as an argument to curl: c1report:**** (password hidden here). Later, I figured those are hardcoded. Facepalm.
To connect or not to connect?
My goal was to un-upload my report. I wanted to connect to the SSH server, and hopefully find my report then delete it.
Should I connect or not? After all, this is a server I’m not authorized to play with, but at the same time, I’ve been given the credentials implicitly and I did not consent to have the report uploaded.
I decided to connect.
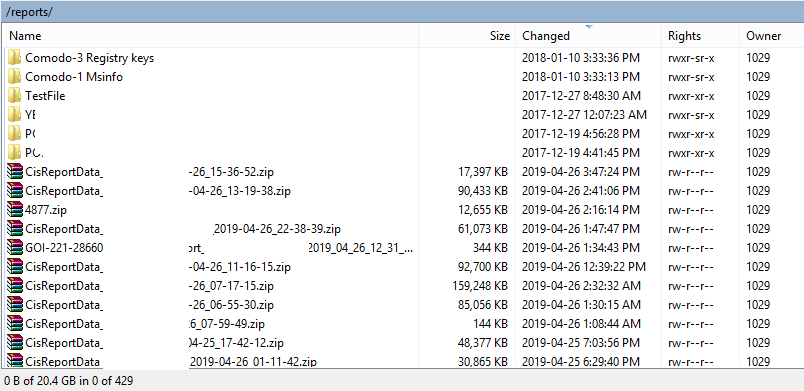
What I did not expect, is to find many other user reports, 400 of them, readily downloadable, because all are owned by the same user. To verify the severity of this problem, I downloaded my own report, then I deleted it from the server.
Mission accomplished for me. But WTF Comodo?
Comodo’s SSH server exposing other user reports
For Comodo’s defense, the SSH server does not allow the execution of other commands and does not forward traffic. This would have made the box a public proxy otherwise.
Reporting the information disclosure
I reported the problem to a Comodo staff member on the forum on April 26, 2019, and asked whether they had a bug bounty program. I never got a reply…
Fastforward to February 2020, I decided to talk about this story, and wondered whether they had fixed the problem. The tool hasn’t been updated, and the credentials are still valid. However, the report folder can no longer be listed.
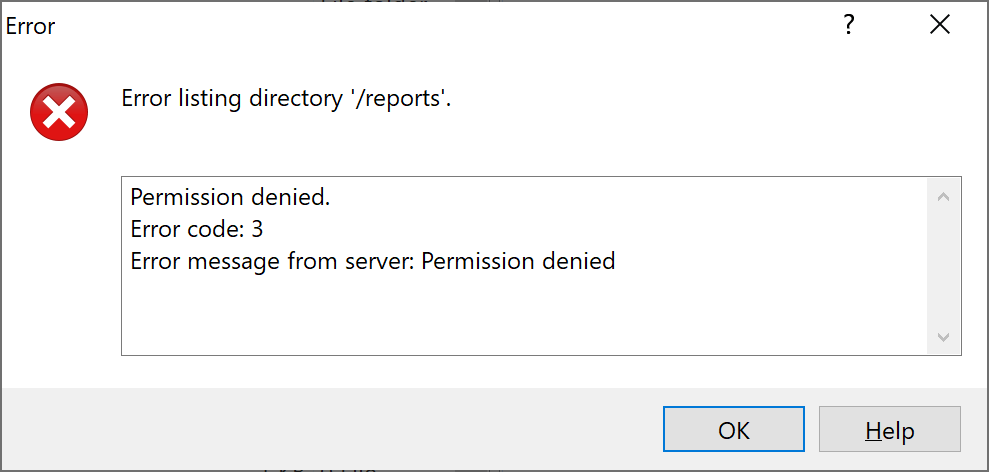
In February 2020, the report folder had permissions 370
The server returns “Permission denied” while trying to list the directory, but the uploads are still possible.
In fact, the folder was given permission 370 (-wxrwx—), meaning the owner cannot read it, which prevents the listing. You could still retrieve a report provided that you know its name. However, it includes the machine’s name and a precise timestamp. Not that easy to guess, unless an attacker is specifically targeting someone.
But wait.
The owner of the directory, which is myself, can modify the permissions on the directory I own to give it back read permissions. I successfully switched them from 370 to 770, and I was again able to list the directory and (re)discover hundreds of fresh user reports.
Update August 2025: Five years and a half later, having no reply from Comodo, I am releasing this blog post I kept private all these years. The SFTP credentials are still valid, only the permissions seem to have changed in a way that you cannot issue a chmod command anymore. You can only retrieve files for which you know the full filename.
As TrueNAS 13 reached RELEASE milestone in May 2022 and TrueNAS 12 got abruptly EOL’d shortly after, the usual question stroke me: Should I update now or wait?
TrueNAS 13 offered the option to stay on CORE or switch to SCALE. I was attracted by the ability to run containers more easily with SCALE, however that meant switching from FreeBSD to Linux, and the whole point of sticking with TrueNAS over a simple Ubuntu server was for the (alleged) superiority of FreeBSD.
With this option settled — staying on CORE — I patiently waited for TrueNAS 13 to become more mature. As everyone who has run FreeNAS/TrueNAS for a few years can tell: upgrades are rarely smooth. Things often break and require lengthy operations and debugging. Time flew quickly and my TrueNAS 12.0-U8.1 was really getting old. As we are now at TrueNAS 13.0-U6, I thought this would be quite stable and the upgrade process should have been “fixed” of obvious bugs.
WRONG!
Step 1: I painstakingly proceeded to launch the upgrade to TrueNAS 13-U6 by providing the TrueNAS-13.0-U6-manual-update.tar file directly (otherwise, the download of the three separate files is horribly slow). After a reboot, all things looked OK. I unlocked my pools and checked my jails.
My wireguard jail is running. That’s nice. I use wireguard as a way to get into my network, which helps me manage my TrueNAS server and whatever is running on it, so it is pretty important that I keep my remote access working.
Step 2: Let’s check if jails need an update? Jails indeed don’t get updated. Some design choice I assume. How about I click on Update on each of them?
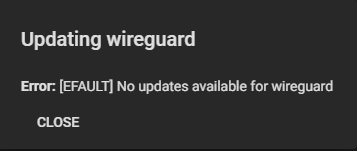
Uhhhhh.
Error: [EFAULT] No updates available for wireguard
No update available for the jail. It is running 12.2-RELEASE-p15 but there is no update. OK. I’m dumb, I must be missing something. Obviously there should be an update to bring it to 13.x, right?
Let’s open the shell and try pkg update and pkg upgrade. Some package updates for wireguard, OK, neat.
Step 3: I’m testing to connect to it just to verify nothing’s wrong.
Uhhhhhh.
Handshake for peer 1 (...) did not complete after 5 seconds, retrying (try 2)
Wireguard is not answering. WTF?!
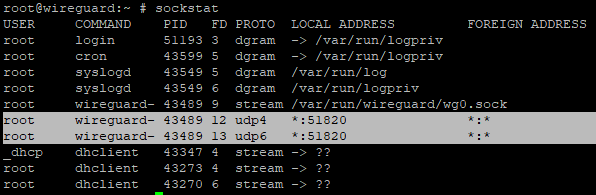
Wireguard is running and it is listening on the correct port, which you can know by using sockstat.
Wireguard is listening on port UDP 51820, as expected
Any other attempt at finding an issue in my network failed.
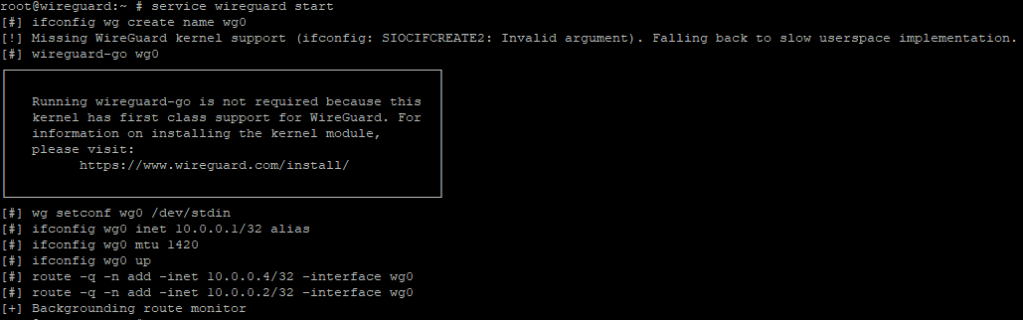
Step 4: Eventually, I checked the firewall rules in this jail, which is configured with ipfw, and tried to restart the firewall service using service ipfw restart. And….
Alright, a pretty error that is absolutely not helpful appears on the screen, along with other seemingly successful messages. Is it important? Who knows. I tried disabling the firewall, and I could connect to wireguard. So, the firewall is the issue.
Quick searches online pointed me to fake solutions like “rebuilding the ipfw binary should help” (yay!), as well as a post on TrueNAS forum suggesting that creating a fresh new jail with a base FreeBSD 13.1 would help (because yes of course, it is my hobby to recreate things that should already work). The post also suggested further network troubles, so this really filled me with joy…
Step 5: OK, so I have a jail based on FreeBSD 12.2 and the web UI tells me there is no update available (although I could at least update some packages with pkg update/pkg upgrade). How about I try to upgrade jails from the command line?
iocage upgrade -r 13.1 wireguard
After a while, I had to leave for work, spent the day without remote access, which I normally use daily, yay! Please run that within a screen otherwise you are doomed to never finish the process.
Some 14k updates later, and some warnings about files being changed/deleted, the update was complete!
Step 6: Let’s get into the jail and continue to update packages.
Uhhhhhh.
This time, wireguard packages are getting EOL’d. That means I need to re-learn how to install wireguard on TrueNAS due to FreeBSD 13.
=====
Message from wireguard-kmod-0.0.20220615_1:

--
At this time this code is new, unvetted, possibly buggy, and should be
considered "experimental". It might contain security issues. We gladly
welcome your testing and bug reports, but do keep in mind that this code
is new, so some caution should be exercised at the moment for using it
in mission critical environments.
--
===>   NOTICE:

This port is deprecated; you may wish to reconsider installing it:

Only useful for FreeBSD 12 which is EoL soon.

It is scheduled to be removed on or after 2023-12-31.
I eventually learn that wireguard likes to run in the kernel, it is more efficient, but it is also less secure. It literally tells you that this is a piece of experimental code and it might have security vulnerabilities. OK, great. Why do I use FreeBSD again? I don’t want to trade some performance boost for security.
Step 7: So I will use wireguard-go, the Go user-land implementation. I get rid of wireguard-kmod: pkg remove wireguard wireguard-kmod. Make sure you don’t also remove wireguard-tools, otherwise you won’t be able to set it up as a service.
Just trying to restart the jail before I continue further and…
Uhhhhhh.
Removing jail process FAILED: jail: ioc-wireguard: mount.fdescfs: /mnt/SSD/iocage/jails/wireguard/root/dev/fd: not a mount point
Conclusion and rant: Upgrading your TrueNAS is always full of surprises and bugs. Some are due to how poorly integrated the upgrade process is. You would expect to get everything, jails included, updated, or at least a standard guide that tells you what to do when you upgrade to TrueNAS 13. I guess a simple jail with wireguard and a firewall isn’t a corner case. The worst part is that the error was silent: my wireguard jail was running and I couldn’t suspect it was not running well inside. In the past, that’s the jail that has been the least affected by TrueNAS upgrades. You would think that waiting 1yr+ to reach a very stable release would help? Well, no. Next, the way wireguard works differently on FreeBSD 13 added a layer of complexity.
Finally, TrueNAS website and documentation are really ugly. I cannot even find as of today (2023-11-28) a page that indicates which was the last v12.0 release and when v12 was EOL’d. As somebody pointed out on this forum post, “It would be great if that were written somewhere “official”.” And a power user with nearly 7k messages on the forum to reply to him: “In the link […] it quite clearly states that 13 is THE supported version. Which implies all others are not.” Because CLARITY is at its climax when IMPORTANT THINGS ARE NOT WRITTEN BUT ONLY IMPLIED. I wonder how such a(n) (eco)system survives.
The AMI firmware update tool seems to have a problem with its driver, preventing firmware updates at the moment. I will show here how to update the BIOS of a Samsung Galaxy Book Pro 360 using the Windows recovery environment that doesn’t blacklist the driver.
In Samsung Update, I noticed a BIOS update was available. I clicked on Install, followed the instructions, clicked OK. The laptop restarted, but nothing happened.
System BIOS update for Samsung Galaxy Pro Book 360
Exploration of the problem
If the tool cannot update the firmware, there is usually a way to make the BIOS load the image and update from it, or apply the image otherwise. After downloading the BIOS update executable (ITEM_20211012_22055_WIN_P02AKF.exe), I saw it was not a simple self-extractible executable that WinRAR could open. A dirty trick I played to extract all the files contained in it was to run it in Sandboxie, then as soon as I hit OK on the above prompt, run a command line to copy all files from %TEMP%\__Samsung_Update to a separate folder. After a few trials, I managed to get the files.
Files extracted from the BIOS updater
Technically, WFU_PAKF.inf seems to install a driver, which effectively copies the firmware image (P04KF.cap) to a strange location (C:\windows\Firmware\{922DBE27-1BF4-41C4-B111-3CF1E4005552}). Other commands were likely run by the updater to effectively update the firmware.
In the real %TEMP%\__Samsung_Update, the file DebugAppLog.txt contains some interesting details about the command to run to update the firmware:
One thing to notice is the AFUWINx64_s.EXE file. This is an AMI firmware updater, which can be downloaded separately from https://www.ami.com/bios-uefi-utilities/.
The parameters “/p /b /n /r /e /capsule /q” are intended for AFUWIN and will be useful in a moment. They indicate what part of the firmware to update, which part to preserve, etc.
I tried running as admin AFUWINx64_s.EXE P04AKF.cap /p /b /n /r /e /capsule /q, but I am getting a driver error.
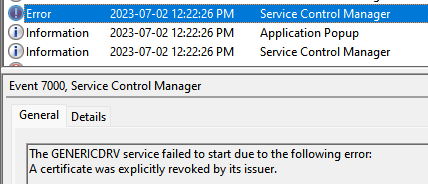
Looking at the Event Viewer, I noticed a recent Error event that brought in some new information:
Error event after driver failed to load
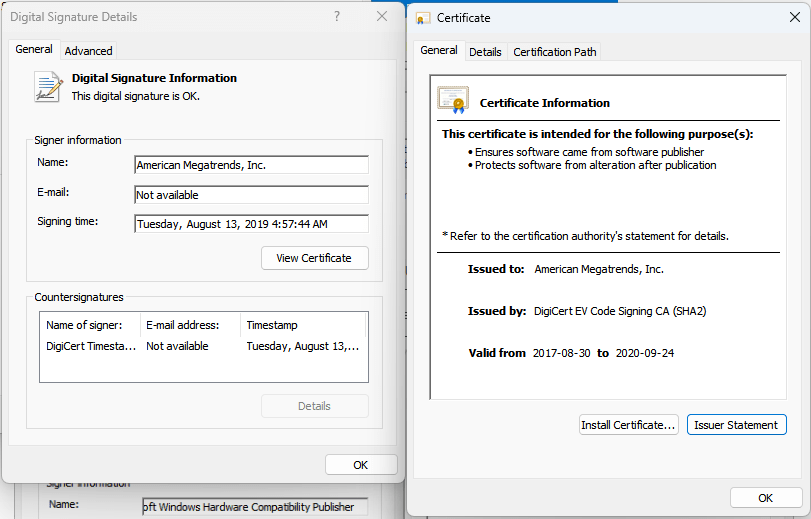
“A certificate was explicitly revoked by its issuer.” That’s a interesting problem. However, the driver file appears to be properly signed by AMI and countersigned by Microsoft, and none of the certificates involved appear to be revoked.
A bit of a search revealed that it might be a mechanism in Windows to block vulnerable drivers from loading.
I extracted afu\afuwin\64\AfuWin64.zip and tried running AFUWINx64.exe P04AKF.cap /p /b /n /r /e /capsule /q but the command failed likewise, and the same error was found in the event logs…
This would mean Windows is preventing all firmware updaters from AMI from running at the moment. Hmm…
The solution would be quite simple. While disabling the Microsoft Vulnerable Driver Blocklist did not seem to make a difference, so after placing all the necessary files on my desktop, and noting down the recovery key for my Bitlocker-encrypted OS volume, I clicked on the start menu, then pressed Shift while clicking on Restart.
After a restart and a few menus later to access a command prompt (which prompts for the Bitlocker recovery key), it is possible to run the updater using the command above (AFUWINx64_s.EXE P04AKF.cap /p /b /n /r /e /capsule), which initiates a reboot and lets the firmware get updated!
Firmware getting updated
Finally, the BIOS is updated:
Firmware manually updated to P04AKF (seen from AIDA64)
Now, blame Samsung for not providing any details/changelog about firmware updates…
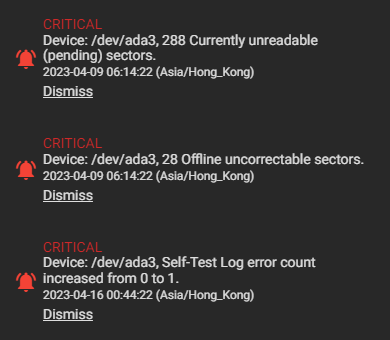
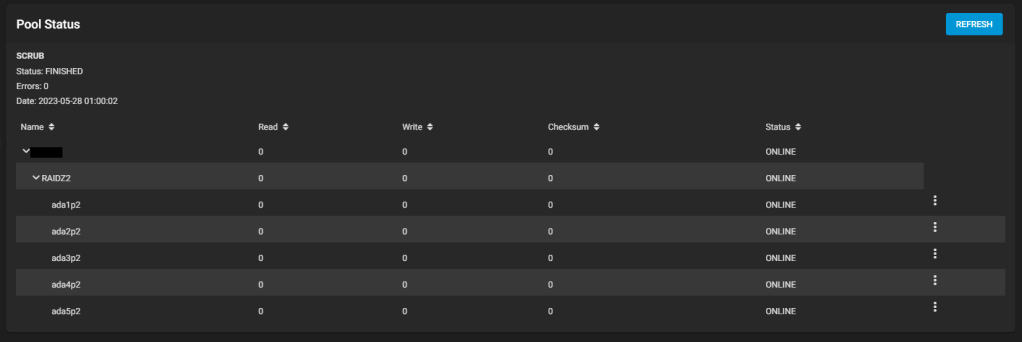
The other day I logged in to my TrueNAS admin interface and was welcomed by multiple warnings. Basically, one of my disks was having a bad time. This post talks about my experience swapping that disk.
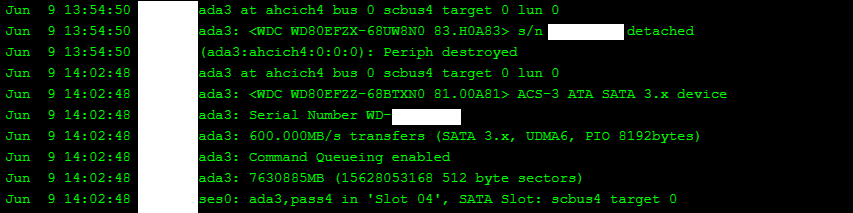
I connected to the server via SSH and checked the status of /dev/ada3 using smartctl.
# smartctl -a /dev/ada3
smartctl 7.2 2020-12-30 r5155 [FreeBSD 12.2-RELEASE-p14 amd64] (local build)
Copyright (C) 2002-20, Bruce Allen, Christian Franke, www.smartmontools.org

=== START OF INFORMATION SECTION ===
Model Family:     Western Digital Red
Device Model:     WDC WD80EFZX-68UW8N0
Serial Number:    XXXXXXXX
LU WWN Device Id: 5 000cca 263c99eb7
Firmware Version: 83.H0A83
User Capacity:    8,001,563,222,016 bytes [8.00 TB]
Sector Sizes:     512 bytes logical, 4096 bytes physical
Rotation Rate:    5400 rpm
Form Factor:      3.5 inches
Device is:        In smartctl database [for details use: -P show]
ATA Version is:   ACS-2, ATA8-ACS T13/1699-D revision 4
SATA Version is:  SATA 3.1, 6.0 Gb/s (current: 6.0 Gb/s)
Local Time is:    Fri Jun  9 09:19:56 2023 HKT
SMART support is: Available - device has SMART capability.
SMART support is: Enabled

=== START OF READ SMART DATA SECTION ===
SMART overall-health self-assessment test result: PASSED

General SMART Values:
[...]

SMART Attributes Data Structure revision number: 16
Vendor Specific SMART Attributes with Thresholds:
ID# ATTRIBUTE_NAME          FLAG     VALUE WORST THRESH TYPE      UPDATED  WHEN_FAILED RAW_VALUE
  1 Raw_Read_Error_Rate     0x000b   100   100   016    Pre-fail  Always       -       1
  5 Reallocated_Sector_Ct   0x0033   100   100   005    Pre-fail  Always       -       0
  7 Seek_Error_Rate         0x000b   100   100   067    Pre-fail  Always       -       0
  9 Power_On_Hours          0x0012   095   095   000    Old_age   Always       -       37597
 12 Power_Cycle_Count       0x0032   100   100   000    Old_age   Always       -       87
 22 Helium_Level            0x0023   100   100   025    Pre-fail  Always       -       100
194 Temperature_Celsius     0x0002   185   185   000    Old_age   Always       -       35 (Min/Max 19/43)
196 Reallocated_Event_Count 0x0032   100   100   000    Old_age   Always       -       0
197 Current_Pending_Sector  0x0022   100   100   000    Old_age   Always       -       176
198 Offline_Uncorrectable   0x0008   100   100   000    Old_age   Offline      -       275
199 UDMA_CRC_Error_Count    0x000a   200   200   000    Old_age   Always       -       0

SMART Error Log Version: 1
No Errors Logged

SMART Self-test log structure revision number 1
Num  Test_Description    Status                  Remaining  LifeTime(hours)  LBA_of_first_error
# 1  Extended offline    Completed: read failure       90%     37597         -
# 2  Short offline       Completed: read failure       10%     37468         -
# 3  Short offline       Completed: read failure       90%     37300         -
# 4  Short offline       Completed: read failure       90%     37132         -
# 5  Short offline       Completed: read failure       10%     36964         -
# 6  Short offline       Completed: read failure       10%     36797         -
# 7  Short offline       Completed: read failure       90%     36628         -
# 8  Short offline       Completed: read failure       90%     36460         -
# 9  Short offline       Completed: read failure       90%     36292         -
#10  Short offline       Completed without error       00%     36124         -
#11  Short offline       Completed without error       00%     35956         -
[...]
At this point, given the high values of Current_Pending_Sector and Offline_Uncorrectable, along with failed SMART self-tests, it is clear that this disk should be replaced quickly. It is still functional, and the pool’s integrity is not yet affected, but this should not stay unaddressed.
As you can see from the LifeTime column, the disk started failing shortly after 4 years of service. It is no longer under warranty. I could have expected a slightly longer life time from a NAS-quality disk, especially as the load it receives is not very intense.
On a side note, the disk was a simple WD Red NAS 8TB drive (5400RPM). This model is no longer advertised on WD’s website. The Red NAS series now ends at 6TB. The 8TB model is under a new category called Red NAS Plus and comes with a slightly unusual 5640RPM. All those models use SMR technology, unlike smaller size models which may use CMR and for which you should pay attention to the exact model number.
Fortunately, this disk is part of a RAID-Z2 pool, meaning it has two disks worth of redundancy. Even it stops working, the pool will be able to operate (albeit in a degraded state).
One concern I had is related to the GELI encryption: What happens to a pool that’s encrypted? Can I still swap the drive easily? The answer is yes.
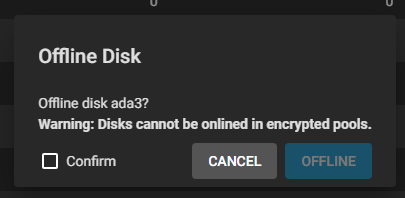
First step is to take the failing disk offline.
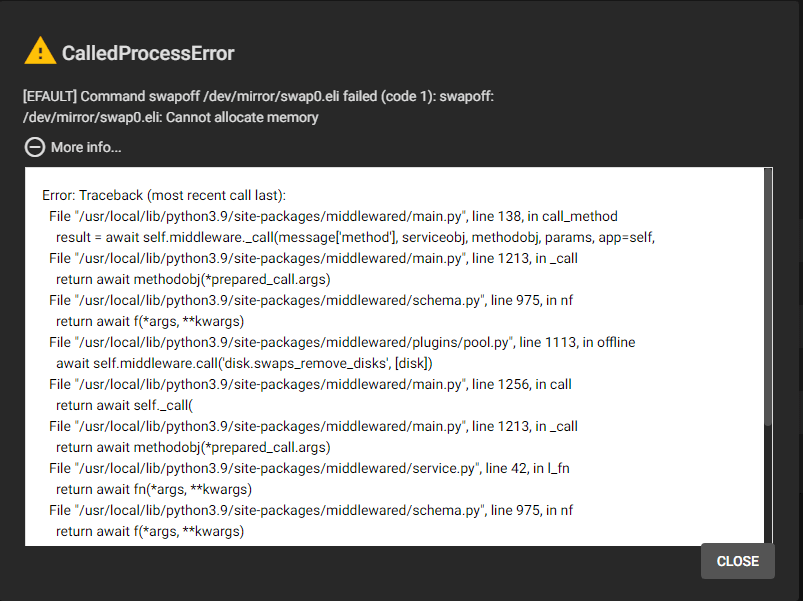
Of course, you would not assume everything with TrueNAS goes absolutely smoothly. There got to be some errors. And the first error indeed came: I cannot take the disk offline: Cannot allocate memory occured while trying to swapoff /dev/mirror/swap0.eli.
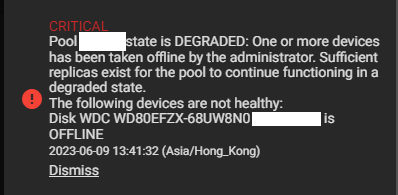
My server should have enough RAM to support its activities without swap, so I don’t understand why I get this error. I stopped a number of my jails and tried again, it finally worked. A new alert shows the pool is going from Active to Degraded state.
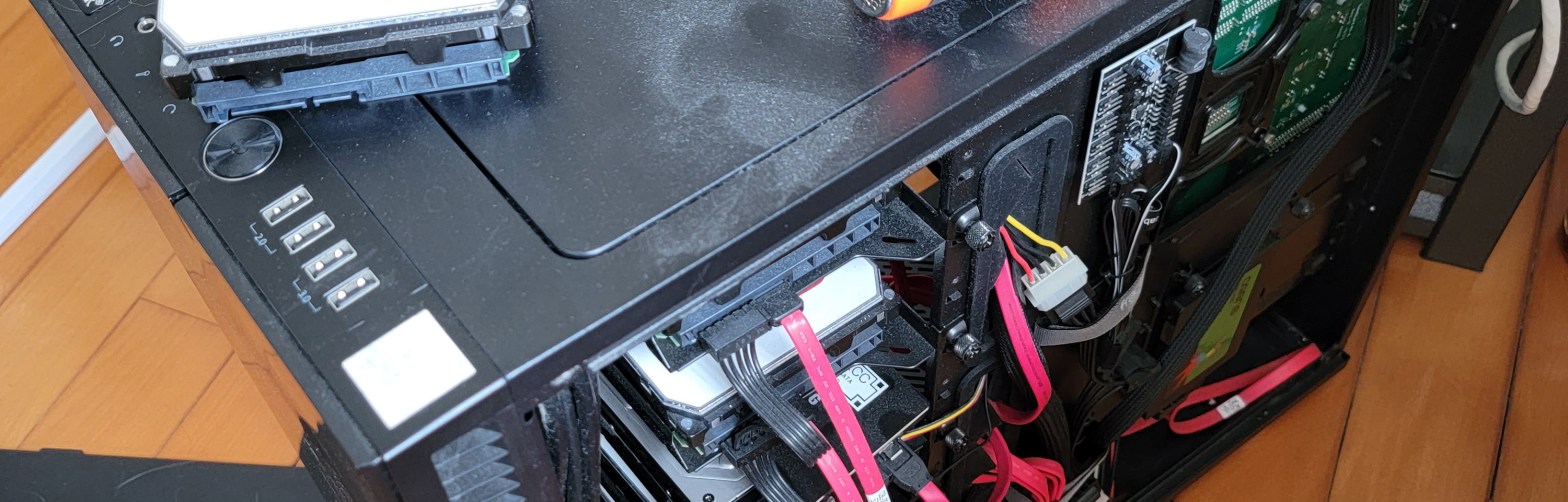
Second, I unplugged the disk’s power cable, then data cable, swapped in the new disk and plugged it in (data then power). TrueNAS will keep track of what you are doing.
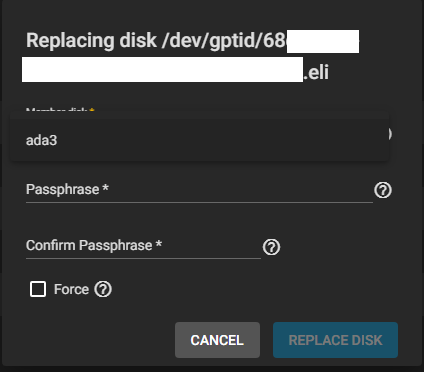
Third, I clicked on Replace for this disk in the pool, and selected ada3 (I plugged the disk in the same place as the old one).
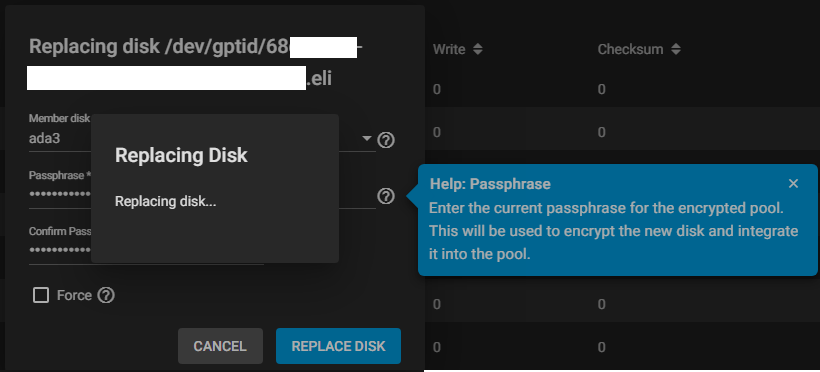
Unexpectedly, I needed to re-enter the GELI passphrase used in the pool. Since I needed to type it twice, I was unsure whether mistakenly using a different passphrase than the rest of the pool was going to create any issue. It does not seem that this new passphrase will be checked against the existing one, so be careful.
The disk then got formatted quickly, and resilvering started!
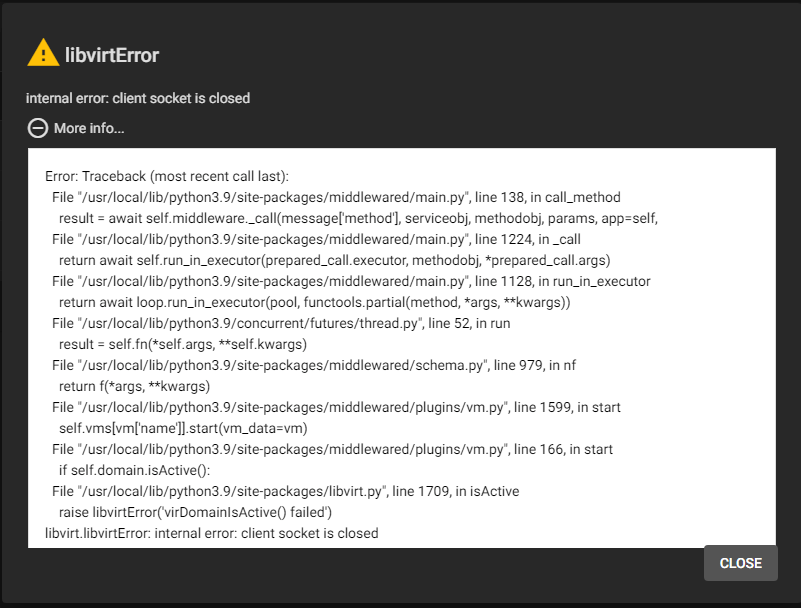
I thought this was all, but somehow in the process of taking the failed disk offline, I think some processes got killed. My virtual machines showed an Off state, although they were still running. I restarted the middleware service (service middlewared restart). Then, they were showed as On, but I couldn’t VNC To them, instead I got a libvirtError: internal error: client socket is closed. Cool…
To access the VMs using VNC, it is still possible to grab the VNC port (different than the web port you can use for VNC) and connect with a VNC client. My jails are suddenly unreachable even after a restart. Definitely something wrong happened… Except by restarting the server, I am not sure to address this problem.
Otherwise, the experience was rather good. Fingers crossed everything will be back to normal in a day after resilvering.
UPDATE: I had to restart the NAS for all jails and virtual machines to work properly. Resilvering resumed by itself after a while, and it’s now finished!
state: ONLINE
scan: resilvered 6.04T in 1 days 11:27:51 with 0 errors on Sun Jun 11 01:33:44 2023
If you have a HP printer/scanner that relies on the HP MFP Scan application to scan (sometimes, there is no other way), the app may fail to run on Windows 11. Here is how to fix it.
The scanner app
Make sure those options were selected during installation
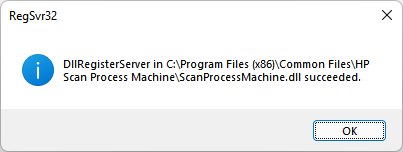
c:\windows\SysWOW64\regsvr32.exe "C:\Program Files (x86)\Common Files\HP Scan Process Machine\ScanProcessMachine.dll"
c:\windows\SysWOW64\regsvr32.exe "C:\Program Files (x86)\Common Files\HP Scan Process Machine\ImageEngineManager.dll"
The application should be able to run and detect the scanner. Doing a fresh install with the latest driver now seems to also fix the problem. Either way.
You wanted to upgrade your HDD to a SSD, or increase the capacity of your SSD? You cloned your old disk to a new one using whatever software and now you cannot boot Windows on your new disk? Here is how to fix it.
This guide is intended for people who know they did not miss any other technical tricks including the following ones: – Cloning software failed to copy everything (you ignored some error messages) – Not all partitions were cloned (especially the small EFI System partition) – You did not implicitly switch from MBR to GPT during cloning – Your BIOS settings are (suddenly?) incorrect
So here you are: you copied all the data and essential partitions, using a reliable method, but the system won’t boot.
The problem is due to the Boot Configuration Data on a hidden partition that no longer points to the correct volume (it continues to point to the original volume on the old disk).
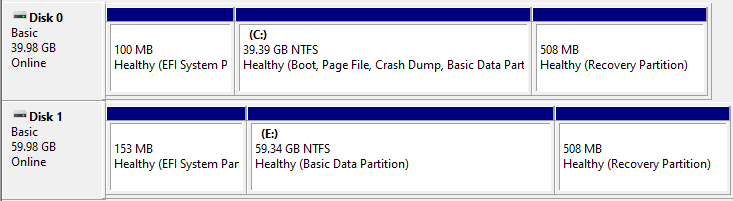
Here is an example of our computer with Disk 0 being the original disk and Disk 1 being the bigger cloned disk with resized partitions, connected using an external adapter.
Disk 0 cloned to a bigger one (Disk 1) with partition resized
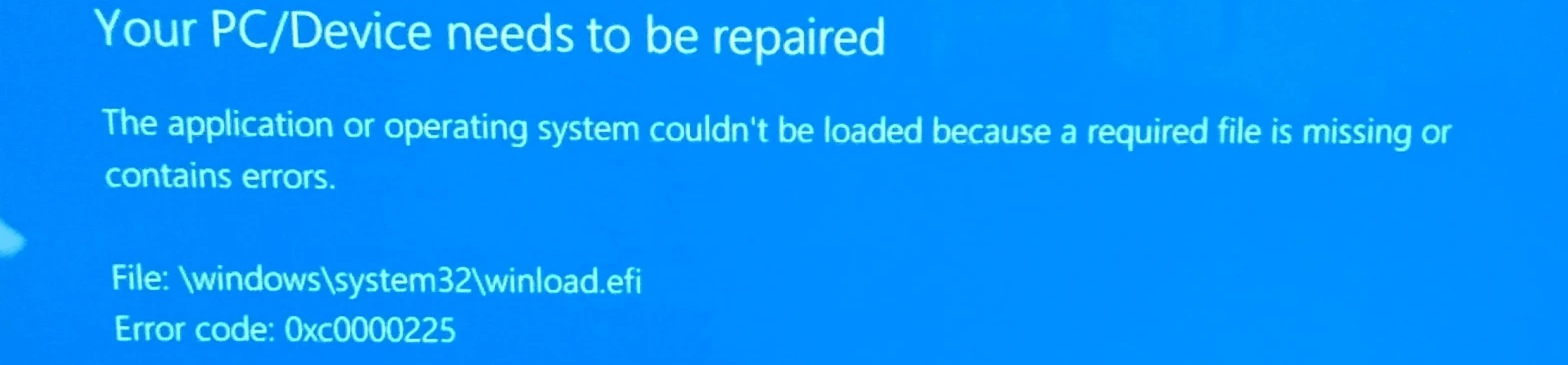
If we remove our original Disk 0 and replace it with Disk 1 and try to boot, Windows gives you this error message:
Unfortunately, at this point, you will need to either (1) temporarily revert back to your previous HDD/SSD, or (2) access another computer to prepare a Windows installation USB flash drive.
I will assume your disks are formatted using GPT, and your boot method is UEFI.
Option 1: If you did not yet swap disks
If you are still in Windows running on your old disk, or if you can swap back the disks easily to boot on your old disk, the procedure is faster.
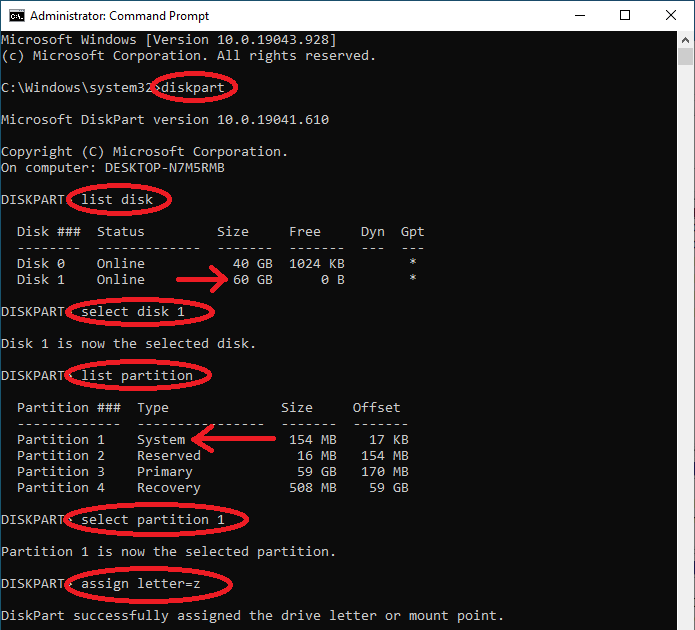
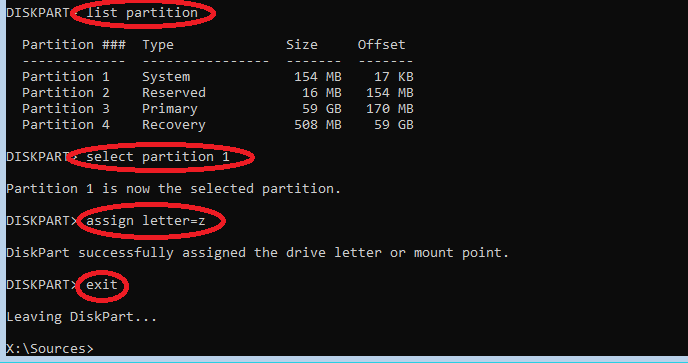
Start an elevated command prompt, and type the following (see screenshot below): diskpart list disk
Then, identify the cloned disk (if you upgraded to a bigger disk, this should be obvious by looking at the Size column). In our case, it is Disk 1. Then type: select disk 1 list partition
Identify the EFI System partition, it should be a small 100MB+ partition of type System. In our case, this is partition 1. Type: select partition 1 assign letter=z exit
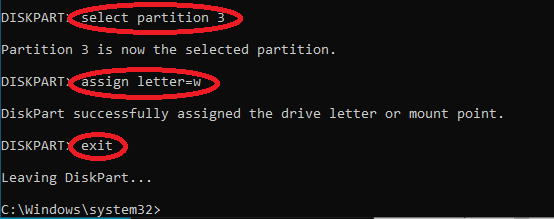
Then, we will also assign a letter to the new disk’s Windows partition (if not already done by Windows, e.g., E:\Windows). It is usually the only large partition of type Primary, in our case, it’s partition 3. Type: select partition 3 assign letter=w exit
Now, fix the boot configuration on the new disk by typing:
bcdboot w:\Windows /s Z: /f UEFI
Where w:\Windows is the Windows folder on your cloned disk, Z: is the EFI System partition on the cloned disk, which we just gave the letter Z. This command will edit the BCD, aka Boot Configuration Data, and point to the correct Windows volume.
Then, you can shutdown your computer, swap the disks and boot normally!
Option 2: Windows installation/repair media
In case it is not preferable or no longer feasible to boot on your previous working disk, here are the steps to create a Windows installation media if you can access a working Windows computer and have a spare USB flash drive (8GB+).
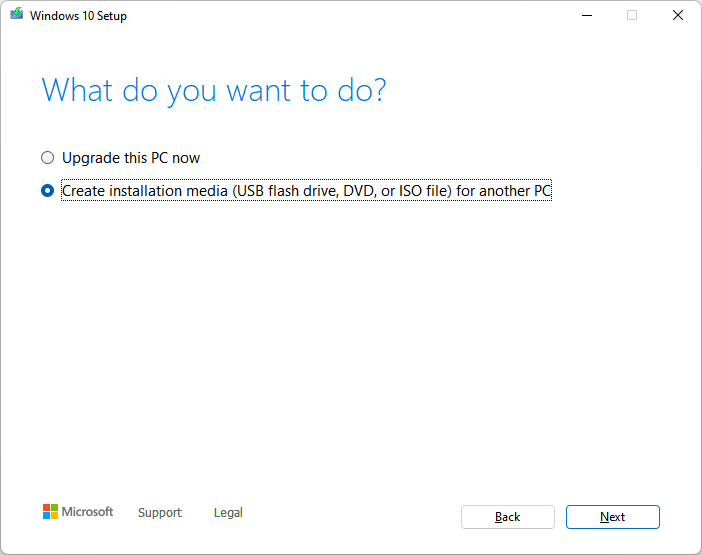
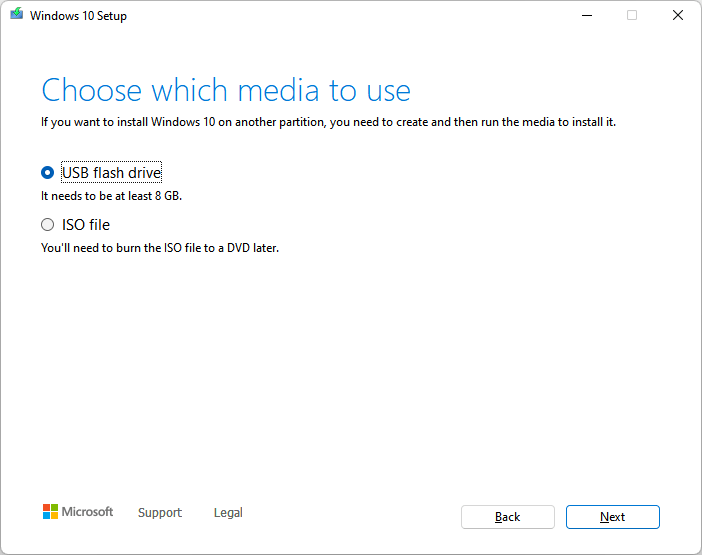
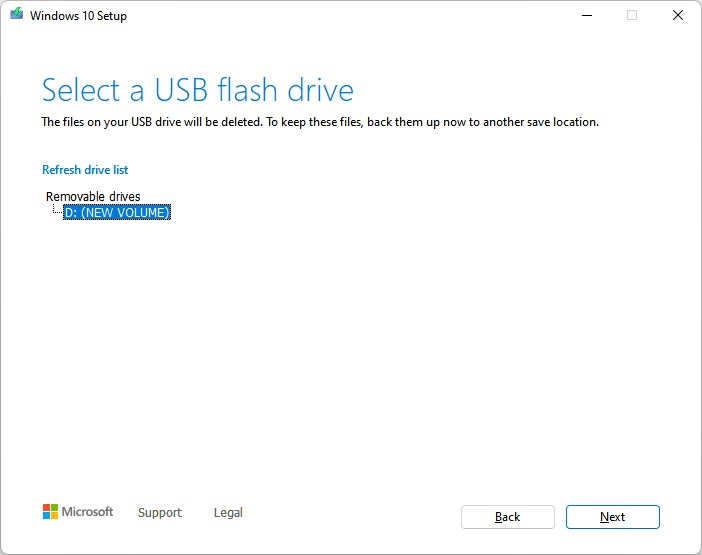
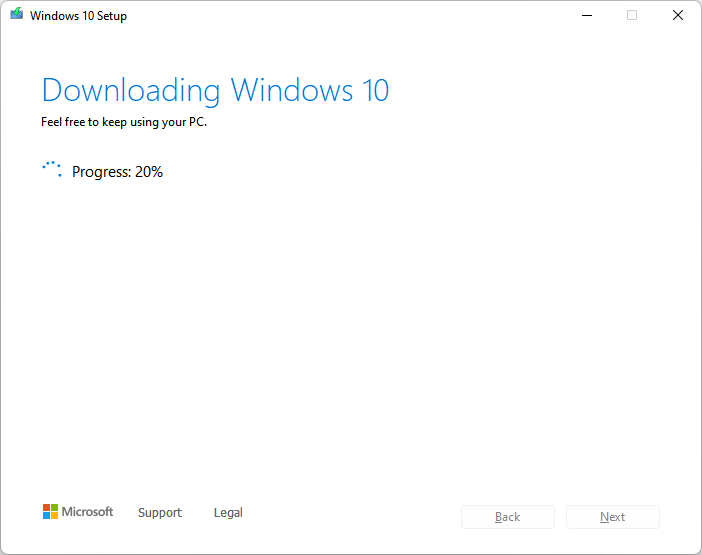
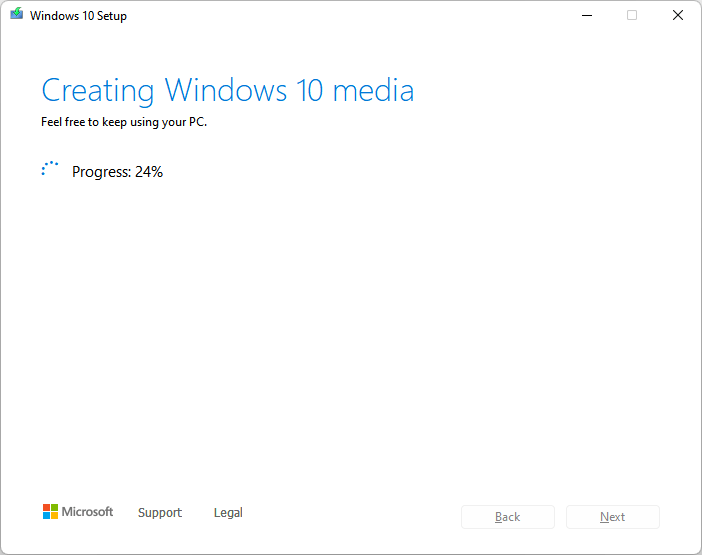
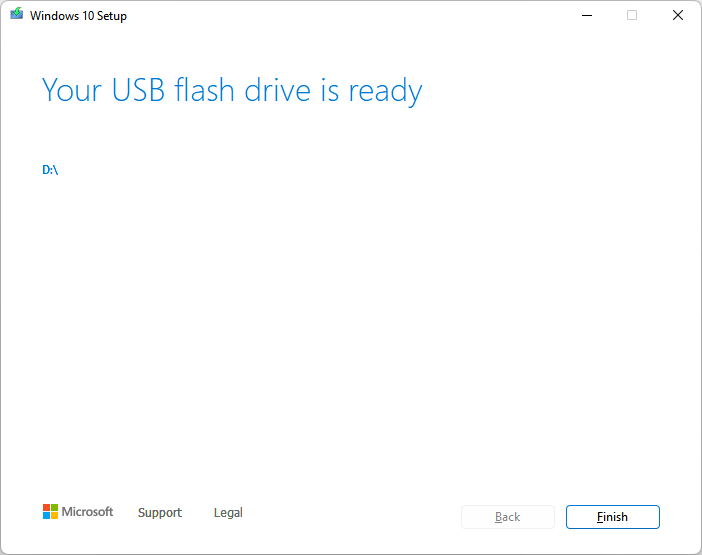
1) Prepare a Windows installation USB flash drive
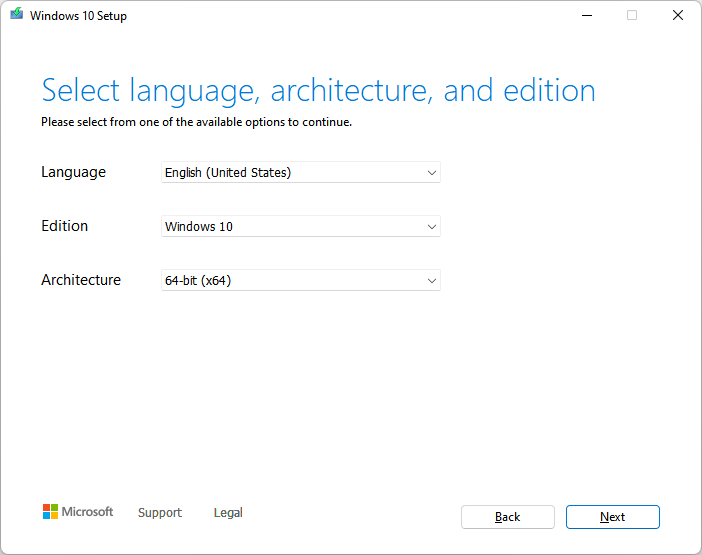
First, if you do not already have a Windows installation ISO file, download the Media Creation tool from Microsoft. Follow the instructions to either prepare a USB flash drive directly or just download the ISO file. Having an ISO, you can prepare a USB drive with Rufus. Note: having the exact ISO matching your Windows version/edition/platform is not required.
Follow the steps below to create a Windows installation media:
2) Boot on the Windows installation media
Back to the problematic computer. Insert the USB drive.
A tricky and non-standard step is to boot your computer on this Windows installation media.
Depending on your computer, you may have access to a Boot Menu by pressing F12, F11, F8 or another key as soon as your computer is powered on, which would allow you to select the USB flash drive as a boot media.
If not, the simplest way is to enter the BIOS (typically by pressing the Esc, F2 or Del keys early after power on), navigate to a Boot menu, and change the boot order to let the USB devices as a first choice, which you can revert later on when everything is done. Alternatively, you can also reach the BIOS by pressing Esc when seeing the Windows blue screen (“Esc for UEFI Firmware Settings“).
If you see this screen, this is a good sign, press Enter:
Booting on the Windows installation media looks the same as booting Windows, don’t be fooled:
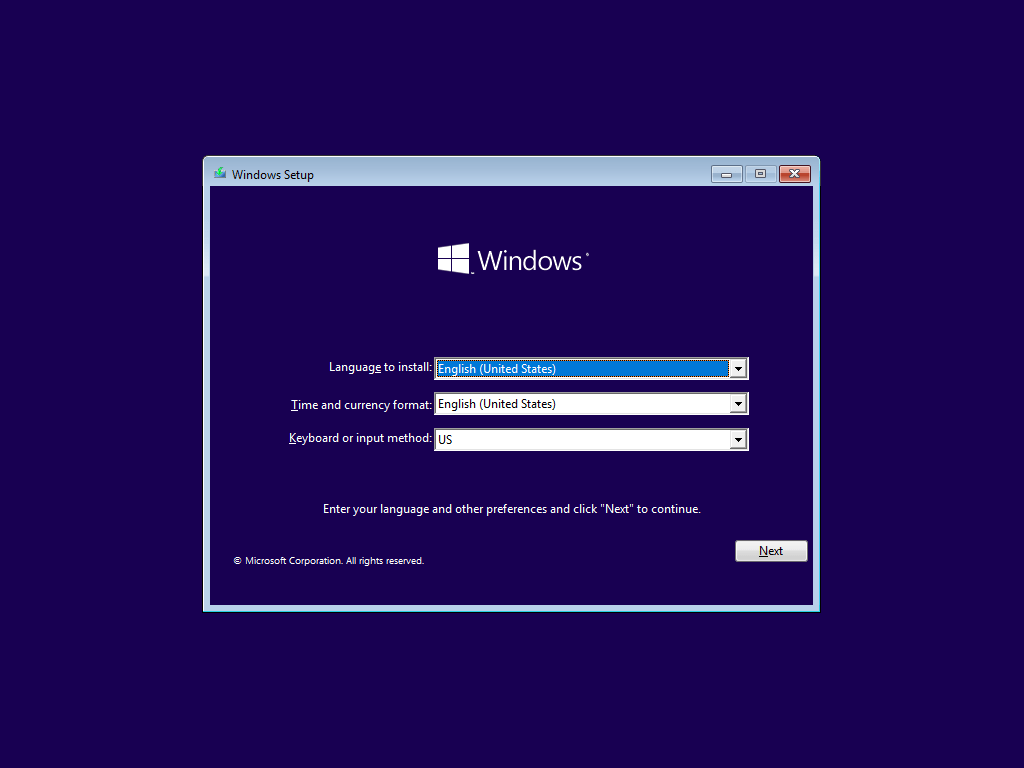
This following screen appears, click Next.
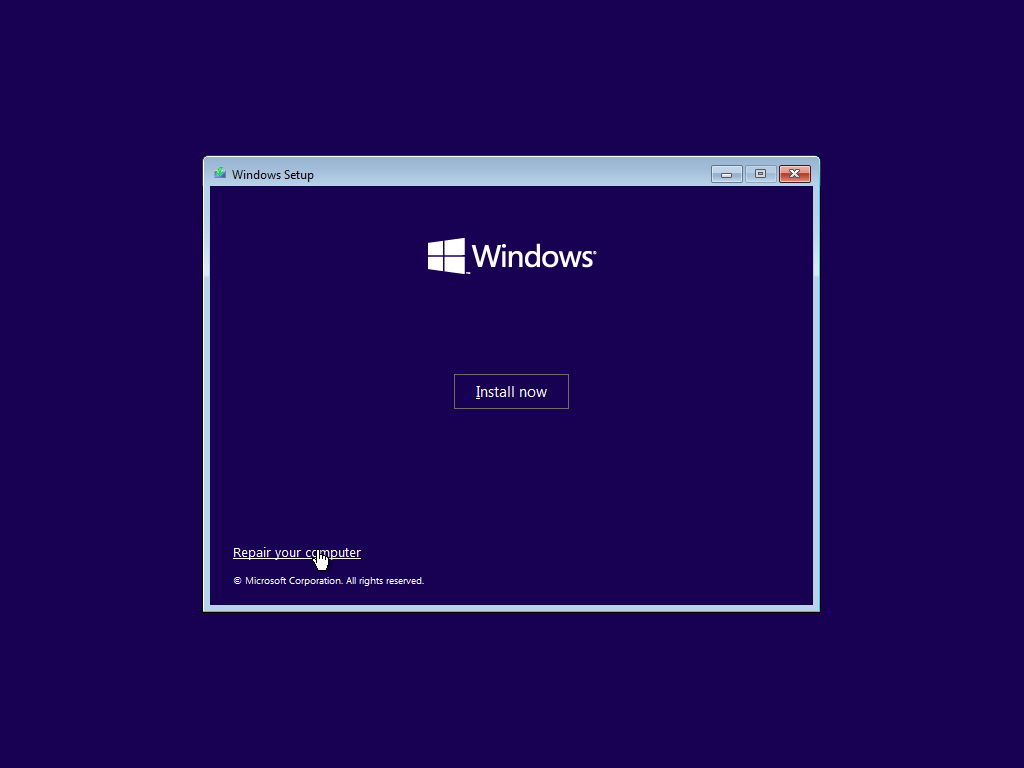
Then click the small link at the bottom: Repair your computer.
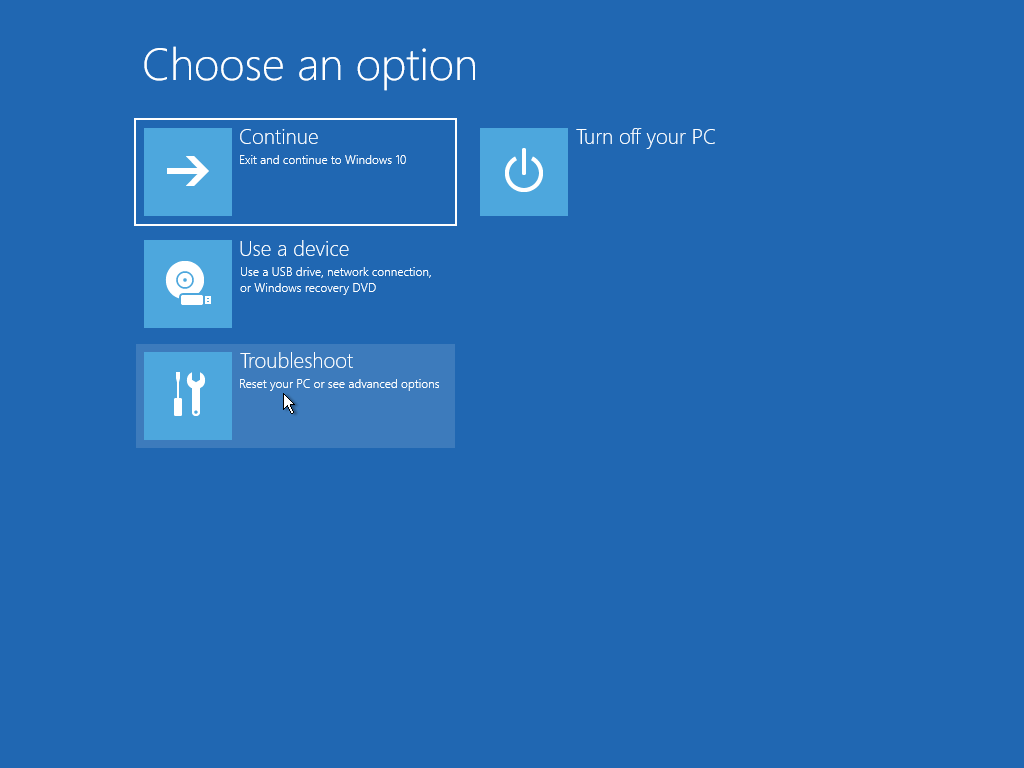
Click Troubleshoot.
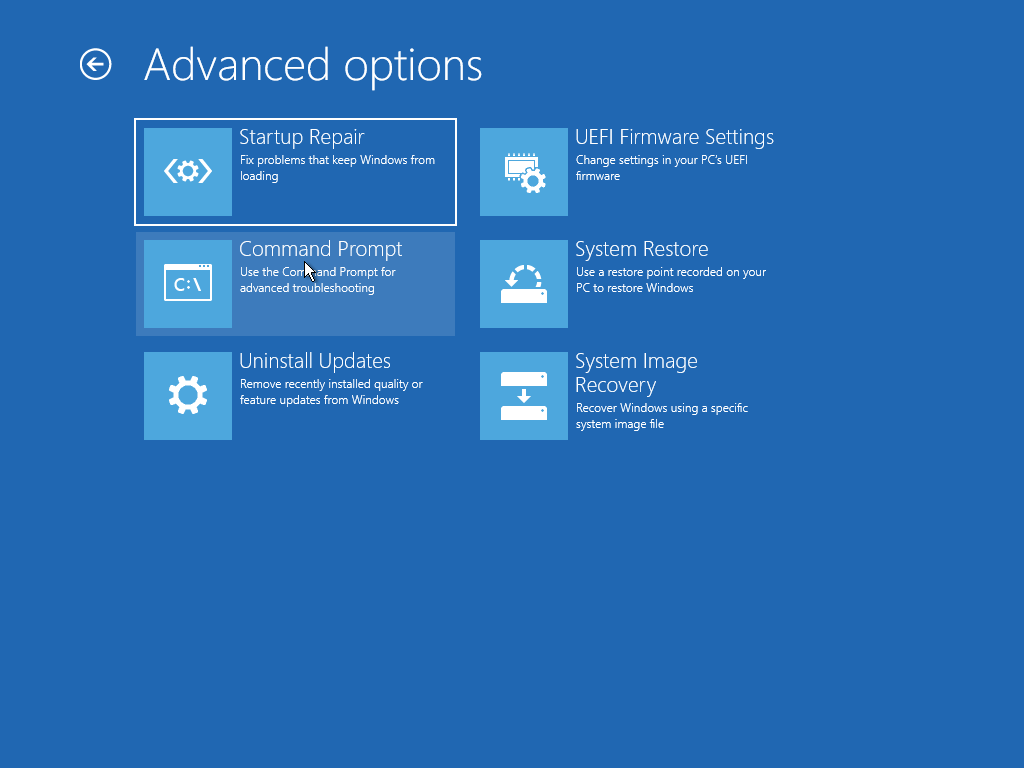
Click Command Prompt.
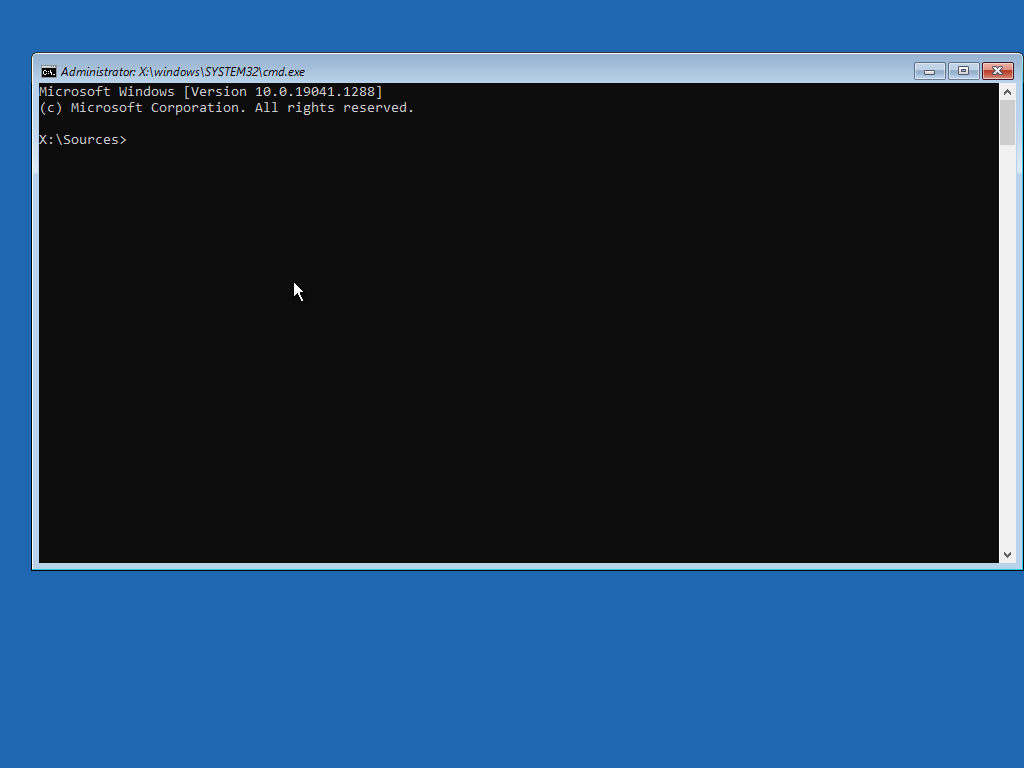
A command prompt appears:
3) Fix BCD
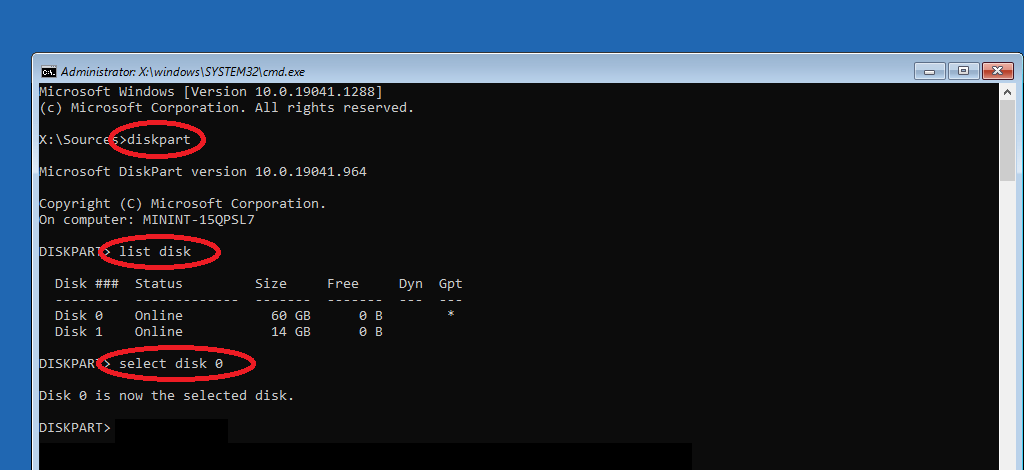
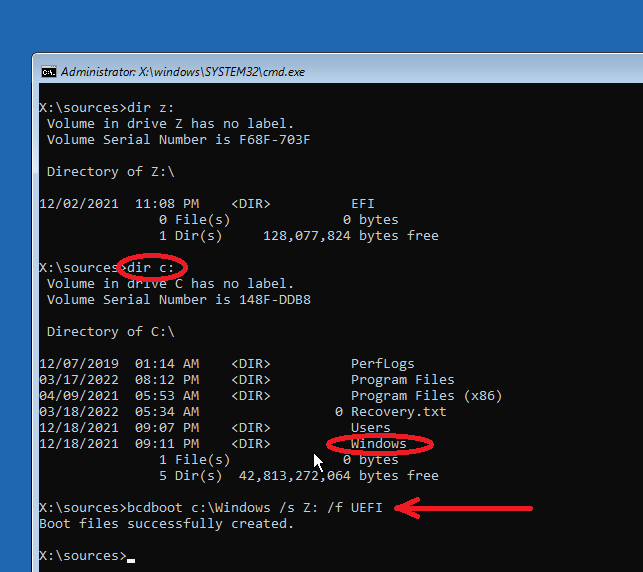
On the command prompt, type the following commands: diskpart list disk Decide which of the disks is your cloned disk. If you have only one disk in your computer, it will likely be Disk 0, and the USB flash drive will be attributed a later number. Then type: select disk 0
Next, type: list partition
You will see a list partitions on the select disk. Identify the EFI System partition: it is a small volume (typically 100MB or so), of type System. In our case, this is volume 1. Select this volume and give it a letter by typing the following commands: select volume 1 assign letter=z exit
Then, identify your Windows partition. It should have already been assigned letter C:, just confirm with dir c: to find a Windows folder.
The single command that will fix your booting problem is now the following:
bcdboot c:\Windows /s Z: /f UEFI
Where c:\Windows is the Windows folder on your cloned disk, Z: is the EFI System partition we just gave the letter Z. This will edit the BCD, aka Boot Configuration Data, and point to the correct Windows volume.
Type exit, and click Turn off your PC. Remove your USB flash drive, revert your BIOS settings if you changed them, and you’re done!